For years now, website speed has been pursued on several different fronts. We have been making some serious leaps in terms of hardware power, but they can only do so much. People realized long ago that software optimization and different methods for delivering content can also help immensely. Perhaps none more so than the technique of caching data.
When it comes to WordPress, the effects of caching can be invaluable. By storing copies of your page elements and delivering them straight to the users, you bypass the resource-intensive PHP scripts that take their toll on the server every time a page is requested.
The WordPress core comes with some object caching capabilities, but the feature is not very easy to activate, and it is somewhat limited in its functionality. Thankfully, developers have created WordPress plugins that are much more user-friendly and optimize your site performance significantly.
WP Super Cache is one of the most popular caching plugins on the market, and we’ll now show you how it can help you speed up your WordPress website.
What is WP Super Cache?
WP Super Cache is a free, open-source WordPress plugin that stores copies of previously compiled HTML files to serve returning users. It’s a highly configurable plugin with two separate cache delivery mechanisms, as well as a multitude of other options and settings.
WP Super Cache supports Content Delivery Networks (CDNs) and has automatic cache-clearing functionality, which can be configured to delete unneeded cached files. The Preload mode is particularly useful, as it makes WordPress faster by caching your entire blog.
WP Super Cache has racked up over 2 million active installations to date, which is a testament to its impact on page loading times.
How Does WP Super Cache Work?
WP Super Cache can serve cached files in two separate ways.
In Expert Mode, the plugin uses Apache’s mod_rewrite module to serve static HTML files to users. Not a single line of PHP is executed with this method, making it the fastest and least resource-intensive way of serving cached content with WP Super Cache. The downside is since the plugin may require additional configuration of the web server, it could be difficult to set up for less experienced users.
The Simple mode delivers similar results but is much easier to activate and configure. This method uses PHP to serve the cached content rather than compiling the files. As a result, while it may be a bit slower compared to the Expert mode, it’s still considerably faster than running your website without a caching plugin.
WP Super Cache – Installation and Overview
Many people have the misconception that installing a WordPress plugin is a difficult job, but the truth is, even the manual installation shouldn’t be too much of a problem for most users. With WP Super Cache, the installation is pretty much completely automated and happens directly in the WordPress dashboard.
Here are the steps:
- Log into your WordPress backend
- Go to Plugins > Add New
- Enter “WP Super Cache” into the search bar and hit Enter
- The WP Super Cache plugin should be the very first result. Click the Install Now button next to it
- In a few seconds, the installation will be complete, and you’ll see an Activate button. Click on it to activate the plugin
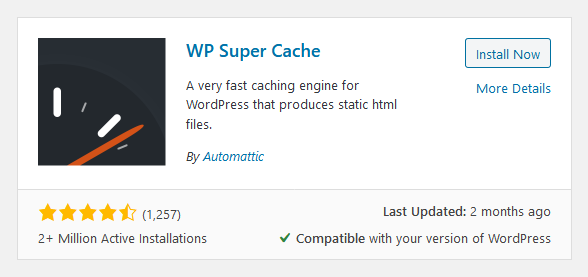
You will be redirected back to the Installed Plugins page, where you’ll see a message warning you that caching is still disabled.
One of the reasons why WP Super Cache doesn’t start caching pages right away is because it requires custom permalinks to work. If your permalinks settings are left in their default state, you won’t be able to turn on WP Super Cache’s caching mechanisms and speed up your WordPress site.
WordPress’ permalink settings are available from the Settings > Permalinks menu in the sidebar, and SEO experts advise choosing the Post name option for the best possible search engine ranking. Once the permalink settings are changed, you can start configuring WP Super Cache.
The plugin’s options page is available under Settings > WP Super Cache, and the first thing you need to do when you get there is to enable the caching on your website. Select Caching On (Recommended) and click Update Status. This turns on WP Super Cache’s caching mechanism and gives you a Cache tester, where you can see if everything works well.
During the test, WP Super Cache caches your homepage and then sends two separate requests to it. If the timestamps in the responses match, the page has been successfully cached, so the plugin works correctly.
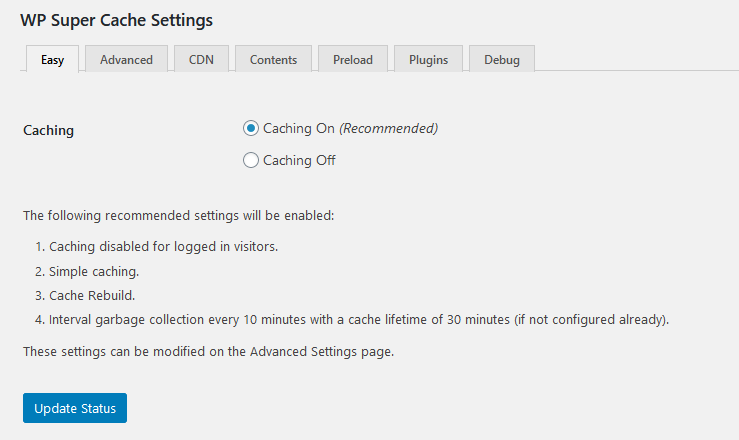
Most of the plugin settings can be found in the Advanced tab. This is where you choose the cache delivery method and set rules for cached pages, returning visitors, visitor groups, as well as other settings and preferences.
Through the CDN tab, you can control the settings for integrating WP Super Cache with a Content Delivery Network provider of your choice.
The Contents tab lets you see how many pages have been cached, and through the Preload tab, you can enable and configure WP Super Cache’s Preload mode.
The Plugins tab controls the support for a few other WordPress plugins and ensures that they can co-exist with WP Super Cache.
The Debug tab is for developers and contains vital technical information about bug identification and fixing.
WP Super Cache Options and Optimal Settings
Advanced settings
After you’ve ensured that caching is enabled, you need to move on to the Advanced tab and configure WP Super Cache. You can leave the plugin with its default settings, but by tweaking some of the options, you are more likely to be able to take advantage of its full potential.
First, you need to choose the cache delivery method. As we mentioned already, in Expert mode, WP Super Cache uses Apache’s mod_rewrite to deliver the cached content, while in Simple mode, the plugin relies on PHP.
Many WP Super Cache’s developers confirm the difference is barely perceptible, and they recommend using the Simple mode in most cases. Although a bit slower, it’s easier to set up, and you can be sure that you won’t need to make any modifications to the .htaccess file.

cache-delivery-method.png
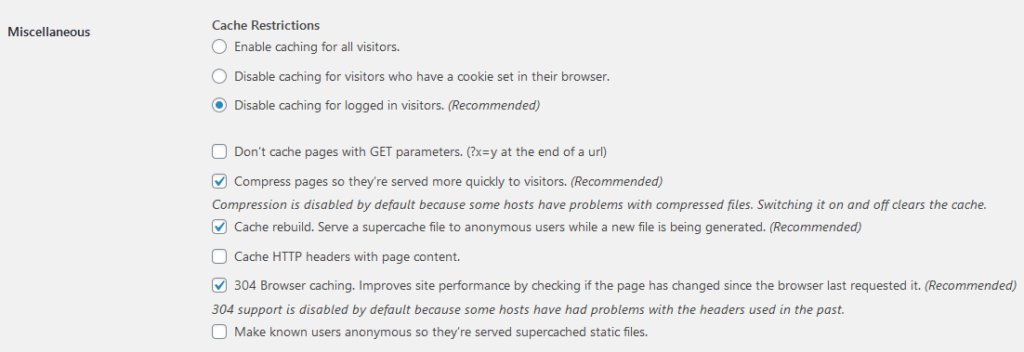
In the Miscellaneous section of the Advanced tab, you have quite a few options that are just as important. First, you’ll be asked to set the Cache Restrictions. You have three options here:
- Enable caching for all visitors
- Disable caching for visitors who have a cookie set in their browser
- Disable caching for logged-in visitors
The third choice is labeled as (Recommended) by WP Super Cache’s developers. Most logged visitors are making site changes, so they need real-time results instead of cached content.
By the same logic, you might want to enable “Don’t cache pages with GET parameters”. This option makes pages caches pages that are unique to the individual user while logged visitors access the dynamic data.
Enabling the Page Compression option is also a good idea. WP Super Cache has the ability to compress cached files, which helps the server take less time and use fewer resources when processing such content. The only scenario in which you might want to have this disabled is if it causes errors on your website.
The Cache Rebuild feature should also be turned on. It ensures that if a user requests a page that is in the middle of caching, they will get a slightly older version of the already cached files.
The Cache HTTP Headers with Page Content option disables the Expert cache delivery method and makes WP Super Cache serve cached content by executing PHP scripts. If you want to use Expert mode, you need to make sure that this option is off.
304 browser caching will ideally be enabled. With it, the returning visitor’s browser will first check whether a page has changed since the last request, and if it hasn’t – it will load it from a local cache.
The Make Known Users Anonymous option will indiscriminately cache content for all users. It overrides the Disable Caching for Logged-in Visitors option and is not the recommended setting in most cases.
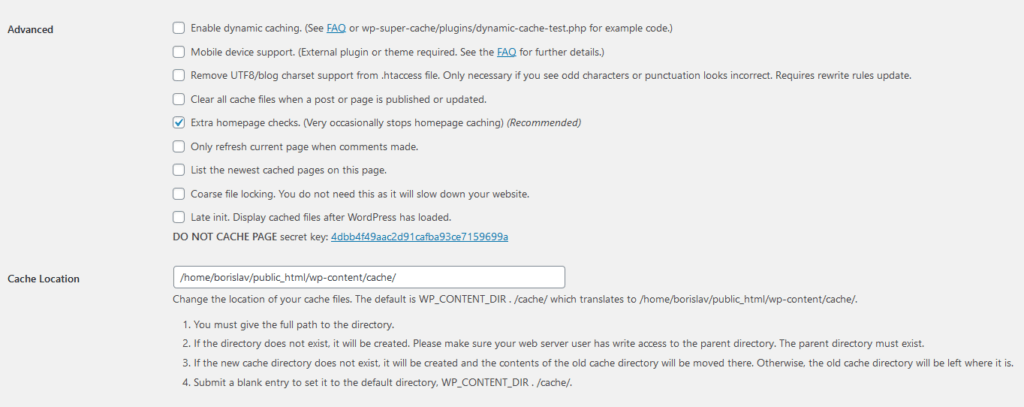
Further down the Advanced section, you have a bunch more useful settings. If the Enable Dynamic Caching checkbox is selected, WP Super Cache will cache dynamic content like ads, visitor counters, etc.
The Mobile Device Support option might sound like an essential part of your configuration, but in reality, it only concerns WordPress websites that use separate themes and plugins for a separate mobile version. Most modern websites rely on responsive themes, so they don’t really need this option.
In most cases, you won’t need to change the Remove UTF8/Blog Charset Support from .htaccess option either. It’s only necessary if the caching plugin causes formatting problems on your homepage.
Users who frequently publish posts will likely want to enable the Clear All Cache Files When a Post or Page is Published/Updated feature. It ensures that whenever you publish new content, the cache is cleared, and visitors see it right away.
For the same reason, you will probably want to select the Extra Homepage checkbox. This is especially good if all your newest posts appear as links on your homepage.
The Only Refresh Current Page when Comments are Made could be useful for websites with lots of comments. For the rest – it’s likely to make virtually no difference.
The List the Newest Cached Pages on this Page won’t affect the way your website loads either. It’s a tool that shows which pages have been cached in WP Super Cache’s settings menu.
The Coarse File Locking option is fairly old and was originally designed to ensure that WP Super Cache doesn’t create any duplicate cache files. In its current version, the plugin has other mechanisms to prevent this, so it’s best if you leave the option disabled.
The last thing in this section is the Late init. Display Cached Files After WordPress has Loaded. It’s designed to fix an error message that says, “super cache dynamic page detected but late init not set.” If you haven’t encountered this error, you’re better off leaving the option disabled.
Scrolling further down, you’ll see that WP Super Cache lets you choose where your cached content will be stored. By default, the plugin creates a new folder inside the wp-content directory and puts the cached files inside. You can change the location from the plugin’s settings page by entering a new path in the Cache Location field. WP Super Cache creates the new directory and moves all cached files automatically. Still, you need to make sure the parent folder exists, and the server user has Write access to it.
Don’t forget to click the Update Status button to save all the changes you’ve made to this section.
Garbage collection
The Expiry Time & Garbage Collection section lets you decide when the cached files become invalid and when they get deleted. If you keep the cache valid for too long, you could end up serving outdated content to users. And if the invalid files don’t get deleted often enough, the server could soon run out of disk space.
The Cache Timeout field determines the period of time after which the cache is no longer considered valid. By default, WP Super Cache sets the cache timeout at 1,800 seconds (30 minutes). Despite this, the settings page says that 3,600 seconds (1 hour) should be a good enough starting point for most websites.
Obviously, the best value for this field depends on the type of website you’re running. If you post frequently, you’re better off with a shorter timeout period, as it would ensure your visitors get to see all the new content. Analogically, if you make very few updates – you can set a longer timeout.
Below the Cache Timeout field, you have the tools to schedule WP Super Cache’s Garbage Collection. As the name suggests, the Garbage collection service regularly checks for cache files that are no longer valid and deletes them. By default, WP Super Cache performs these checks once every 10 minutes, but you can change this and configure the plugin to send you email notifications whenever the garbage collection service has deleted old cache files.
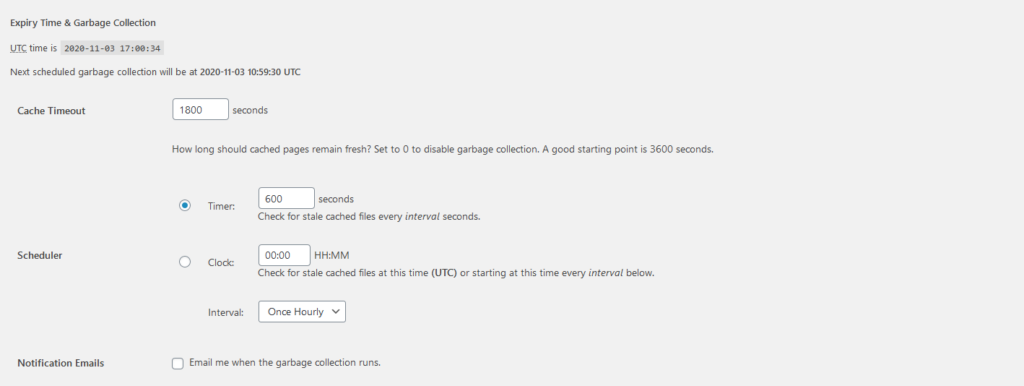
When you’re ready with the configuration, click Change Expiration to save the changes.
Other Advanced Settings
The Advanced tab with WP Super Cache brings even more options for customization.
You can, for example, block the caching mechanisms and set permissions for particular page types or pages that contain specific URL strings. If you run an ecommerce website, this particular section is important for you because you want to ensure that things like your shopping cart, checkout, and order confirmation pages are not cached.
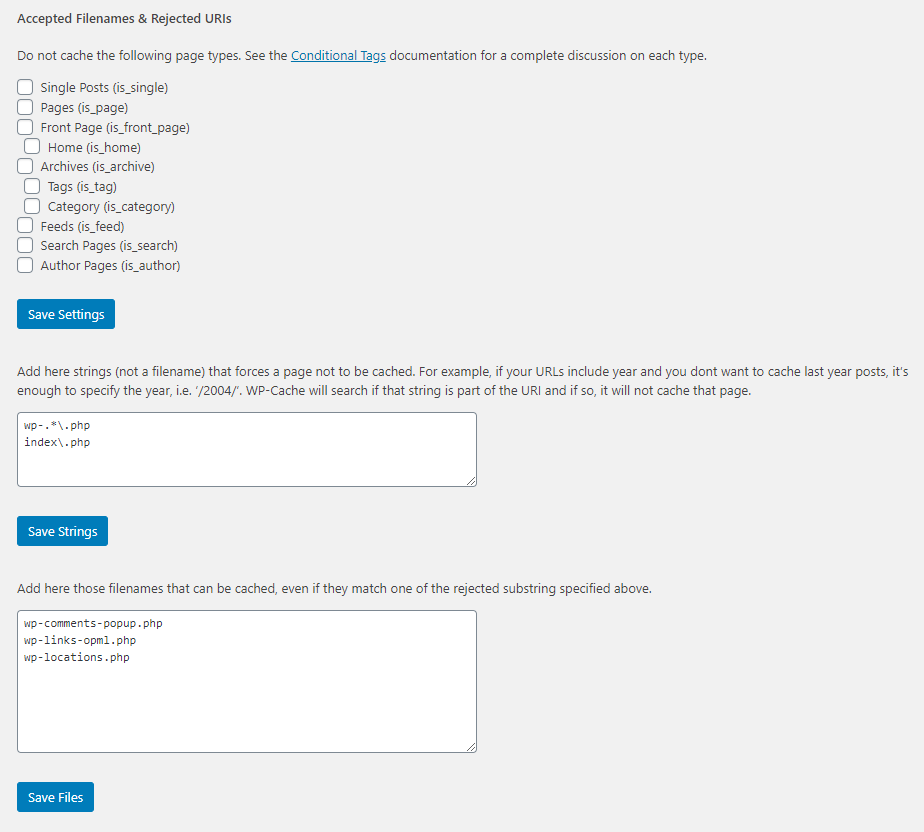
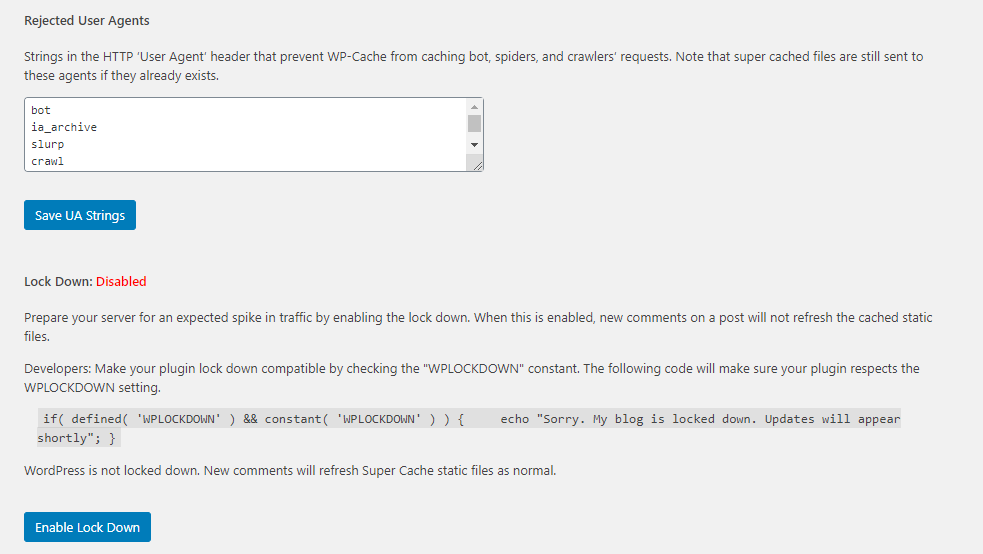
You can prevent specific User Agents from triggering WP Super Cache’s caching mechanisms, as well. This could be useful if you don’t want any search engine crawlers or bots caching the website’s pages. There’s also a Lock Down function, which, if enabled, will block any new comments from refreshing the cached static pages. This will reduce the risk of site crashes during a traffic spike, but it’s best to leave it disabled during normal operation.
CDN settings
A Content Delivery Network (CDN) is a great way of boosting your website’s performance. The solution lets you store static content on a network of servers spread all around the world, serving it from the location closest to the user.
Some people believe using a CDN and a WP caching plugin at the same time is a bad call because the website files are cached twice.
This is not really the case.
A CDN stores and serves static files like images, CSS, and JavaScript files, while a caching plugin takes less load on the server when delivering pre-compiled HTML files. In other words, the two optimization techniques relate to two completely different sets of assets. They still need to work in conjunction, which is why WP Super Cache supports Content Delivery Networks and has a CDN tab that helps the integration.
Cloudflare is perhaps the most popular CDN out there, and that’s mainly because it offers the service for free. It works differently compared to most of its competitors, though. Cloudflare effectively acts as an intermediary between the client and the origin server that hosts your website. It serves the static content by itself and relays the rest of the requests to your host. This is why you need to change your domain’s nameservers in order to set it up. This also means that if you use Cloudflare, you don’t need to do any additional configuration to WP Super Cache’s settings.
If you use another content delivery network, however, you will need to make a few changes. Obviously, you would need to mark the Enable CDN Support checkbox, but you need to set some parameters first. You need the Off-site URL and the additional CNAME(s), which can be obtained from your CDN provider.
There are other options you can consider as well. By default, everything but the PHP files in the wp-content and wp-includes directories will be handled by the CDN. For most, this setup should work fine, but if your website has some specific requirements – use the Include directories and Exclude If Substring fields to set additional rules.
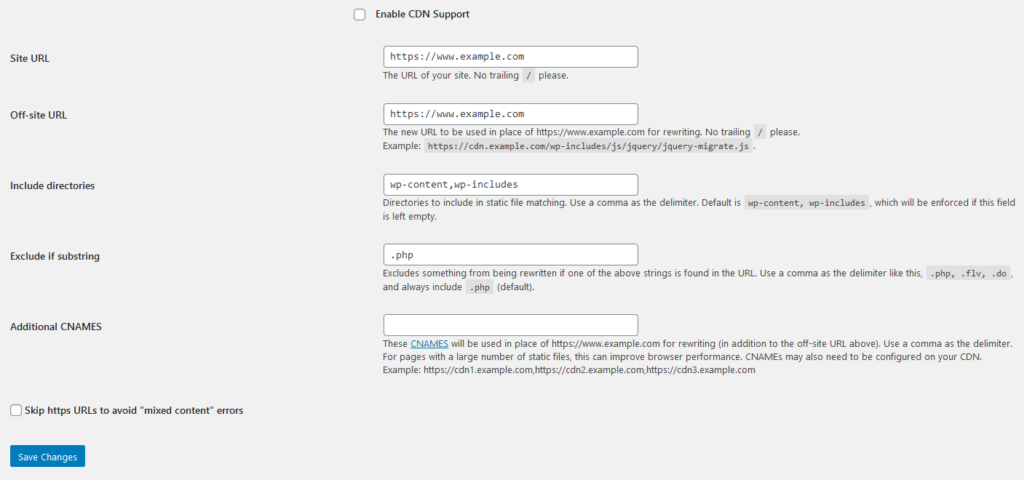
Don’t forget to select the Enable CDN support box and click Save changes to keep the new settings.
Contents tab
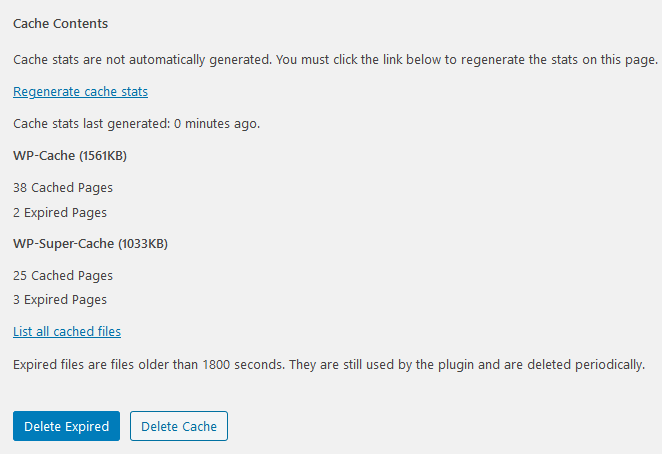
After you set up your CDN to work with WP Super Cache, you need to delete the cache in order to see the effects in action. You can do that from the Contents tab. At the bottom, you have an option of either deleting the expired cache (the Garbage collection should be handling this task automatically) or deleting all cached files.
In addition to this, the Contents tab gives you detailed statistics on how much content is currently stored in your cache.
Preload mode
WP Super Cache’s Preload functionality ensures all new website visitors get cached pages. When enabled, WP Super Cache starts caching pages immediately and automatically refreshes them after a predetermined period of time. This improves the loading and indexing speed of your website. Keep in mind, it’s a resource-intensive process, and it could cause problems, especially for bigger websites on shared hosting accounts.
You should also consider that if you enable Preload mode, WP Super Cache’s Garbage collection will be deactivated and your older files won’t be deleted anymore.
To minimize the risk of potential problems, you need to carefully consider the interval between the refreshing of preload pages. By default, WP Super Cache preloads pages every 600 minutes, but if you see this creates issues, it’s best to make the operation less frequent. If you set the value to 0, the preloaded static files will not expire and will be refreshed only when you preload them manually.

Select the Preload mode checkbox and click Save Settings to enable automatic preloading, and if you want to manually preload the pages, click Preload Cache Now.
Free WP Super Cache installation and configuration by Scala Hosting
As you can see, installing WP Super Cache isn’t difficult at all, and even novice users can tackle it without any real issues. Configuring the plugin and utilizing its full potential is more of a challenge, though, and we understand that for many, the task will be too daunting.
That’s why we decided to help our customers by offering them the installation and professional configuration of WP Super Cache completely free of charge. To request it, simply post a ticket to our technical support experts. If you have any specific requirements for the configuration of the plugin, you can add them to the ticket or discuss them directly with our support agents.
Conclusion
Website speed is crucial in this day and age, and people have been trying to find innovative ways of improving it. We know that caching data is a great way of reducing load times, and WordPress plugins like WP Super Cache make the solution much more accessible.
Hopefully, the above guide will give you enough insights on how to optimize the WordPress website speed with the help of WP Super Cache.
FAQ
What does WP Super Cache do to speed up my website?
WP Super Cache stores copies of pre-compiled HTML pages and serves them to visitors. In doing so, it deals away with the need to execute resource-consuming PHP scripts every time a page is requested. This not only speeds up your website but also reduces the load on the server.
Is WP Super Cache free to use?
Yes, it is. You can download it either from its official website or from WordPress.Org, or you can directly install it from the WordPress dashboard.
Is WP Super Cache easy to use?
Installing and activating the plugin is something even novice users won’t have any problems with. Configuring it correctly so you can take full advantage of its potential does require more in the way of technical knowledge, though. Fortunately, the ScalaHosting support experts can take care of it all for you.
Can WP Super Cache speed up my website in its default settings?
WP Super Cache comes with some optimization mechanisms activated by default, so you should be able to see an improvement in loading times immediately after enabling it. It’s not a plugin you can install and leave aside, though.
WP Super Cache has quite a few features that can have a significant impact on the way your website works but are disabled by default. If you’re going to take full advantage of it, you need to make some fine tweaks, which require some technical knowledge.
ScalaHosting – Optimize Website Speed with WP Super Cache

