cPanel Backups Made Easy: How to Safeguard Your Website Data
Backups are detrimental to every website. They keep the site data intact and ready in case of accidental deletion or other issues that result in data loss. Website backups are also important because they can help you recover from threats like malware, hardware failures, and other similar events.
cPanel, along with a few other great control panels, offers a robust and user-friendly backup system that allows you to create data archives seamlessly and whenever you need them. You can create, manage, and restore backups for your entire website content, databases, and configurations. This simplifies the retrieval process and provides a comprehensive solution for disaster recovery.
Regular data backups play a pivotal role in website security. In the event of cyberattacks, they can help you quickly restore a problematic page, minimizing downtimes and potential data loss. They also serve as a safety net against human errors during updates and modifications and act as reliable fallbacks, allowing you to revert to a stable state without compromising your data integrity.In this article, we’ll discuss how you can create backups in cPanel, the types of backups you can utilize, how to automate backup creation and restore backups, and more. Now, let’s get down to business.


Your Website with Entry Cloud
Types of Backups
We’ll start off this article by introducing you to the two main types of backups you can make – full and partial. We’ll also delve into your hosting account, directory, and database backups.
Full Backups
A full website backup is a comprehensive snapshot of all the files, databases, configurations, and settings associated with it. It encompasses the entirety of your web hosting account. This type of backup captures your site content and structure, server configurations, and other critical data needed for its proper functioning.
Full website backups typically include the following components:
- Website Files: This includes all the files that make up your site, such as HTML, CSS, JavaScript, photos, media files, and other assets. These files determine the visual and functional parts of your website.
- Databases: Most websites use databases to store and retrieve dynamic content. A full backup encompasses copies of your databases, ensuring that all posts, web pages, user information, and other similar data are preserved.
- Configuration Settings: This captures the configuration settings of your web server and other associated services. It ensures your website will function as usual within the server environment when you restore the backup.
- Installed Plugins, Themes, and Scripts: A full backup also includes plugins, themes, and scripts. Having backups of these elements is crucial for maintaining the functionality and appearance of your site during the restoration process.
- Emails and Mail Configuration: Some full backups also include your email account configurations, emails, and other related settings.
Full website backups are crucial for a number of reasons. Firstly, they help you perform disaster recovery, which is needed in the event of cyberattacks, server failure, or accidental data loss and deletion.
Secondly, they are essential for website migration. They make the process of moving your website from one hosting provider to another seamless and ensure that all components are transferred. Lastly, they allow you to do version control, track changes, and identify issues that may have occurred over time.
Partial Backups
Partial website backups involve selectively backing up specific elements or sections of your site instead of the whole thing. They allow website admins to choose only the elements they need in the archive and take up less storage. The flexibility that partial backups offer is valuable when there’s a need to conserve storage space, save time, or when certain site sections need more frequent updates.
The key components of a partial website backup include the following:
- Files: This may involve backing up specific directories or folders rather than the entire file structure. For example, you can choose to only backup the Uploads folder containing media files or the Themes directory for design elements.
- Database: Partial backups allow you to select specific tables or data within a database rather than archiving the entire database. This is useful for those who only need to update certain sections of their website frequently.
- Configurations: Some backup solutions allow you to focus on specific configuration files, such as those related to server settings, security measures, or custom scripts.
- Media Assets: You might choose to back up only the media assets, such as images, videos, or audio files, if you run a website that contains a large volume of media files. This saves storage and reduces backup time.
Partial backups are very important for websites for a couple of reasons. They are more resource-efficient because they exclude unchanged or easily remade elements. This saves both processing time and storage space. Partial backups also allow for quicker restoration as you focus on specific components. This helps web admins with the flexibility to tailor their backup strategy based on specific needs.
Account, Home Directory, and Database Backups
In the context of cPanel and other web hosting control panels, account, home directory, and database backups are specific types of backups that focus on different aspects of a hosting account or website.
- Account Backups: They are comprehensive backups that include the entire cPanel account. They encompass the home directory, databases, email configurations, settings, and more. Account backups are ideal for complete disaster recovery or migrating an entire cPanel account to a new server or hosting provider. They ensure a backup of all elements associated with the hosting account.
- Home Directory Backups: These backups are focused explicitly on backing up the files and directories within the home directory of a cPanel account, including the site structure, themes, plugins, and uploaded media. They’re useful when changes to website content and files are more frequent than database alterations.
- Database Backups: These specifically target the databases associated with a cPanel account. They include tables storing dynamic content, user data, posts, pages, user accounts, and more. Database backups come in handy when changes to a website involve frequent updates to dynamic content and for quickly restoring the database without affecting the site functionalities.
Creating Manual Backups in cPanel
Now that you know the different types of archives you can utilize, let’s go through a step-by-step guide on creating manual backups in cPanel.
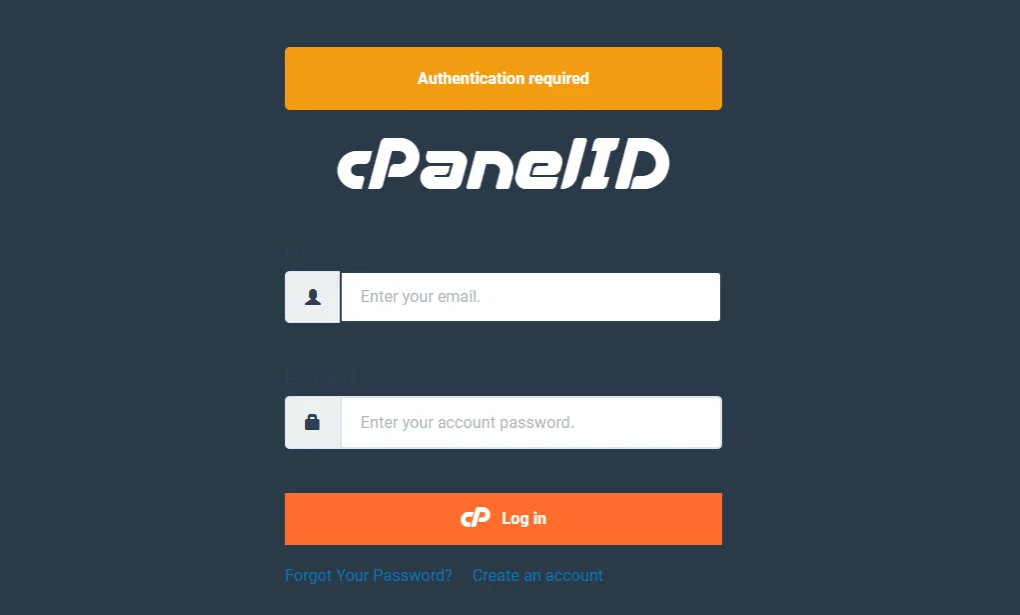
- Step 1: Log in to cPanel: You can do so by typing “cPanel login” into your web browser or using the following link – https://yourdomain.com/cpanel. Enter your cPanel username and password to continue.
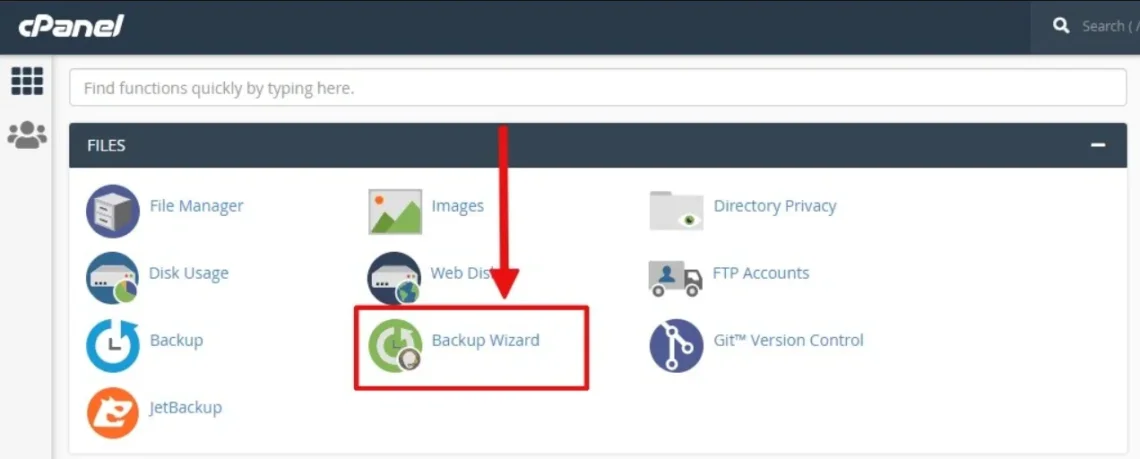
- Step 2: Access the Backup Wizard: Scroll down your cPanel dashboard to the “Files” section. Click on the “Backup” or “Backup Wizard” icon. The name of the tool will depend on the cPanel version you have.
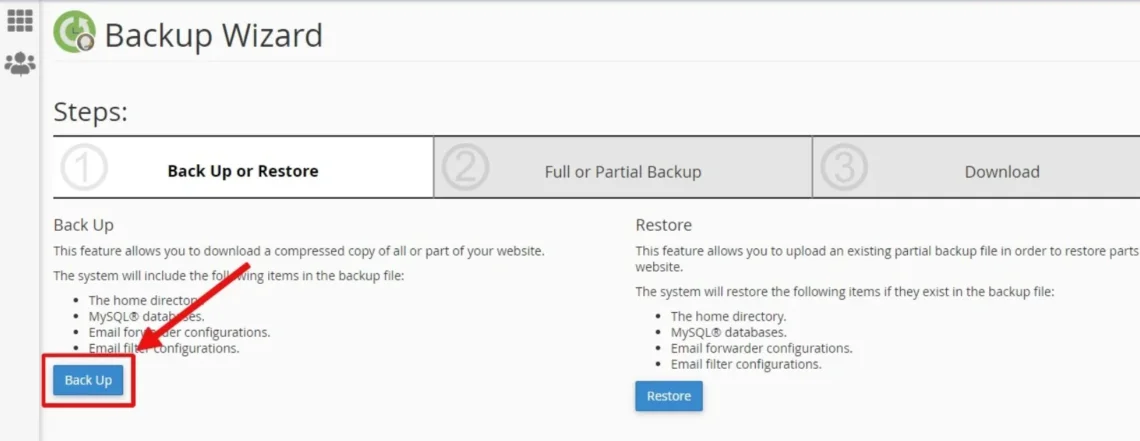
- Step 3: Click the Backup Button: You’ll be redirected to a page where you can select backup or restore. Click on “Back Up” to continue.
- Step 4: Choose Your Backup Type: You’ll be redirected to a page that allows you to either make a full or partial backup. Select the appropriate option based on your needs.
- Step 5: Select Data to Include (For Partial Backups): If you choose to make a partial backup, you’ll be prompted to select the specific data you want to back up. You can pick from options like Home Directory, MySQL Databases, Email Forwarders, etc.
- Step 6: Choose Backup Destination: Now, you’ll need to specify where to store your archive file. You can save it locally on the server or send it to a remote destination via FTP, SCP, or a similar transfer method. You’ll need to enter the required details, such as the FTP server, username, password, and directory, to send your backup to a remote destination.
- Step 7: Configure Your Backup Settings: You can find additional options to configure under the “Backup Settings” or a similar section. You can adjust settings like the notification email where you’ll receive notice of backup completion and whether to receive email notifications.
- Step 8: Initiate Backup: Click the “Generate Backup” or similar button to initiate the backup process.
- Step 9: Download or Manage Backups: You can download your backup directly from cPanel if you’ve done a full backup. Partial backups are usually managed through the same interface and allow you to download or restore specific components.
- Step 10: Verify the Backup: This is an optional step that you can do to ensure the backup is successful. To do that, you can test the restoration process in a staging environment.
Automating Backups in cPanel
Setting up automated backups in cPanel can help you a lot as it’ll save you the time and effort that goes into creating backups yourself. You’ll also ensure that backups are being made regularly without your intervention. Follow the steps given below to automate your backups in cPanel:
- Step 1: Open your cPanel dashboard and log into your account by entering your username and password.
- Step 2: Access cPanel’s Backup Section and Tools: Find the “Files” section, and click on the “Backup” or “Backup Wizard” icon.
- Step 3: Configure Your Settings: Look for “Backup Configuration” or “Backup Settings” within the Backup section of cPanel. You’ll find settings related to automated backups, including frequency, retention, and destination.
- Step 4: Choose Backup Frequency: The most common options you’ll get include daily, weekly, or monthly backups. Choose a frequency that suits your needs.
- Step 5: Set Retention Periods: This determines how long you would like to keep your backups. Make sure to select a frequency that is in tune with the importance of your online project.
- Step 6: Determine Backup Destination: Like with manual backups, you can save archives locally on the server or choose a remote destination via FTP.
- Step 7: Configure Additional Settings: Some cPanel setups offer additional settings like configuring notifications for backup completion or errors.
- Step 8: Save and Enable Automated Backups: Save the changes once you configure all the settings. Look for the option that enables automated backups. It can be a toggle switch or a button. Confirm your changes and ensure that the automated backup schedule is activated.
- Step 9: Monitoring: Check the backup logs and notifications occasionally to verify your automated backups are running as scheduled.
- Step 10: Test the Restoration Process: It’s always good to regularly test the restoration process you set in place with your automated backups. You can use a staging environment to do so.
Backup Restoration in cPanel
Now that you know how to create both manual and automated backups, we’ll show you how to restore them when you need to.
Restoring Full Backups
- Step 1: Locate the Full Backup Section: Look for the “Full Backup” section or another similar option in the “Backup” or “Backup Wizard” section on your cPanel dashboard.
- Step 2: Choose the Backup File.
- Step 3: Specify the Restore Location: Decide whether you want to restore the backup to the original location or a different directory.
- Step 4: Initiate the Restore: Click on the “Restore” button to begin the process.
Restoring Partial Backups
- Step 1: Find the Partial Backup Section: Look for options like “Restore Home Directory,” “Restore MySQL Database,” or other relevant options in the “Backup” section of your cPanel.
- Step 2: Select the Component: Choose the specific component you want to restore, like Home Directory, Database, etc.
- Step 3: Find the Backup File.
- Step 4: Start the Restore: Click on the “Restore” button on your screen.
Tips for Addressing Potential Restoration Challenges
- Check Compatibility: The backup file must be compatible with the cPanel version you’re using.
- Verify Backup Integrity: Verify the integrity of the backup file to make sure it hasn’t been corrupted.
- Address Storage Issues: If you want to restore a full backup, you must see if there’s enough room on the server for it. If there isn’t, the backup won’t be restored. You can also clear unnecessary files to make more room.
- Database User Permission: Make sure to confirm that the database user has the necessary permission to perform the restore when you’re restoring databases.
- Disable Security Measures Temporarily: Security measures like firewalls or mod_security might interfere with the restoration process. Disable them for the time being to perform your restoration.
- Check for Custom Configurations: A website’s custom configurations must be compatible with the backup for the restoration to be successful. Make the necessary adjustments if they’re not.
- Monitor the Process: Check the restoration progress regularly to catch issues early on.
- Have a Rollback Plan: A rollback plan can involve having a recent backup ready for quick reversion.
You can include an image here that shows tips.
Pros & Cons of Different Backup Storage Options
| Storage Option | Pros | Cons |
|---|---|---|
| Local Directories | It’s usually faster because the data doesn’t travel over the Internet; You’ll have full control over your local backups. |
They are susceptible to physical threats like fires, theft, and hardware failure. |
| External Hard Drives/ USBs | They are portable and easy to store offsite; The backup and restore processes are faster. |
They are vulnerable to physical threats. |
| Remote Servers | Remote servers are more protected from physical threats as they offer offsite storage; Backups can be accessed from anywhere. |
They are dependent on an Internet connection. |
| Cloud Storage | It’s easily scalable and can meet growing needs; Many cloud services offer automated backup solutions. |
It is more costly, especially if you need to use them more often. |
| Network Attached Storage (NAS) | NAS provides both local and remote backup access; Some NAS systems support RAID configurations for data redundancy. |
NAS setup and configuration require more technical expertise. |
| Tape Storage | Great for long-term archiving; It is cost-effective for large volumes of data. |
Data retrieval is slower, and initial setup costs can be high. |
cPanel is not the only control panel you can use for efficient and up-to-date backup creation and restoration. You can also utilize SPanel, ScalaHosting’s proprietary all-in-one web hosting platform that allows you to easily manage and restore local and remote backups. SPanel is one of the best web hosting control panels on the market, and it comes with the SShield Security System that will ensure your website and files are safe.
The best thing is that as a Scala customer, there are no added fees to use SPanel. This allows us to give excellent price rates on our managed VPS packages, saving you the licensing fees that come with cPanel.
Conclusion
Knowing how to create both manual and automated backups in cPanel and other web hosting control panels is crucial for your website security. They allow you to bounce back from accidental data losses and deletions, cyberattacks, and other events leading to data loss. Creating backups is fairly easy, and automating them makes the whole process even more effortless. You can create partial and full backups, depending on what you need.
If cPanel doesn’t meet your needs regarding website backups and restores. In such cases, you can easily migrate to other robust control panels, like SPanel, and enjoy an excellent managed VPS hosting environment. This will provide you with reliable website performance, easy backup creation and restoration, top-notch security features, and much more.
FAQ
Q: Which Is Better: A Full or a Partial cPanel Backup?
A: The answer to this question isn’t quite straightforward, as it depends on your specific needs. A full backup will capture your entire website and web hosting account, ensuring you have everything on hand if needed.
On the other hand, partial backups are more efficient and allow you to make selective backups. The optimal choice is to use both – regular full backups for better data protection and partial backups for efficiency.
Q: Are Manual Backups Safer Than Automated Ones?
A: This depends largely on how you make your data archiving. Manual backups offer better control but can be subject to human error, which could lead to security issues. Automated backups minimize the risk of oversight if done correctly and ensure regular and consistent backups. So, it all depends on your strategy.
Q: Which Encryption Options Can Be Used to Protect Sensitive Data?
A: You can use a wide range of encryption methods to protect your sensitive data, including the following:
- Symmetric Encryption;
- Asymmetric Encryption;
- Hash Functions;
- TLS/SSL Encryption;
- File-Level Encryption;
- Database Encryption;
- Full Disk Encryption;
- Homomorphic Encryption;
- Quantum Encryption;
- Tokenization;
- Post-Quantum Cryptography


