cPanel Auto-Installers: Simplifying Web Application Deployment
cPanel auto-installers can help you simplify and expedite website setup and web app deployment, as they allow you to download the software and programs you need with just one click. An auto-installer is a software tool integrated or compatible with cPanel, which is one of the most popular web hosting control panels.
The auto-installer is designed to automate the installation of various web applications and scripts with minimal user intervention. These apps and scripts range from content management systems like WordPress, Joomla, and Drupal to ecommerce platforms like Magento, PrestaShop, and more.
Auto-installers also empower users with different technical skills to effortlessly create feature-rich websites and apps without having to get into complex programming or configuration tasks. They help make the website and web app creation and deployment much easier and, more importantly, much quicker. Almost all cPanel auto-installers come with user-friendly interfaces, allowing those with limited technical expertise to navigate and use the wide range of available applications.
In this article, we’ll delve deeper into the world of cPanel auto-installers, showing you what they are, how they work, which are the most popular and useful options, and more.


Your Website with Entry Cloud
cPanel Auto-Installers: What Are They and How Do They Work?
Аuto-installers are programs or software tools that can automate the process of installing and configuring web applications on a server. Instead of having to do all the steps manually (like downloading packets, installation, and configuration), an auto-installer will do all of that for you. All you’ll need to do is find the desired app/script and click “Download” or “Install.” Super simple.
These tools play a crucial role in website deployment by simplifying the complex tasks involved in setting up different apps, making them accessible to people with limited technical knowledge. They do that by handling database creation, file uploads, and software configurations automatically, which also saves you a lot of time. Auto-installers are usually programmed in a way where they know exactly what they need to do to install and set up every app that they offer on your server.
There are many auto-installers that are compatible or integrated with cPanel. They provide hundreds of scripts and allow you to give your website and apps the functionality you want.
The primary functions of auto-installers in website and app deployment include the following:
- Application Installation: These tools help you install and use the apps you need. They automate the whole process and steps required to set up a website. This includes copying files to the server, creating databases, configuring settings, and more.
- Configuration Management: They ensure that settings are adjusted for optimal performance and eliminate the need for you to manually modify configuration files.
- Dependency Resolution: Auto-installers identify and apply any dependencies or additional software required for the proper function of a web app.
- Updates and Maintenance: Some auto-installers come with tools for automatic updates and maintenance of the installed app or script. This helps you keep your website and apps up-to-date and secure.
Auto-installers offer significant convenience for non-technical people. The benefits for such users include the following:
- User-Friendly Interfaces: These tools usually feature intuitive and user-friendly interfaces. Drag and drop functionalities further simplify the ease of use.
- Automated Processes: You can deploy complex web apps without dealing with intricate technical details. The majority of the installation is automated, allowing you to focus on more important business-related tasks.
- Time and Effort Saving: This piece of software saves you considerable time and effort by automating the deployment process. You won’t have to do anything manually or perform other time-consuming tasks.
- Reduced Risk of Mistakes: Since everything is automated, the likelihood of human errors during the installation and configuration of apps is significantly reduced.
Popular Auto-Installer Tools
In this section of the article, we’ll list all the most popular and useful auto-installers available in cPanel. We’ll also show you what they offer and how they work under the hood.
Softaculous
Softaculous is one of the most popular auto-installers on the market. Some web hosting providers integrate the tool directly into your cPanel account. You can find Softaculous in the Software section of your cPanel.
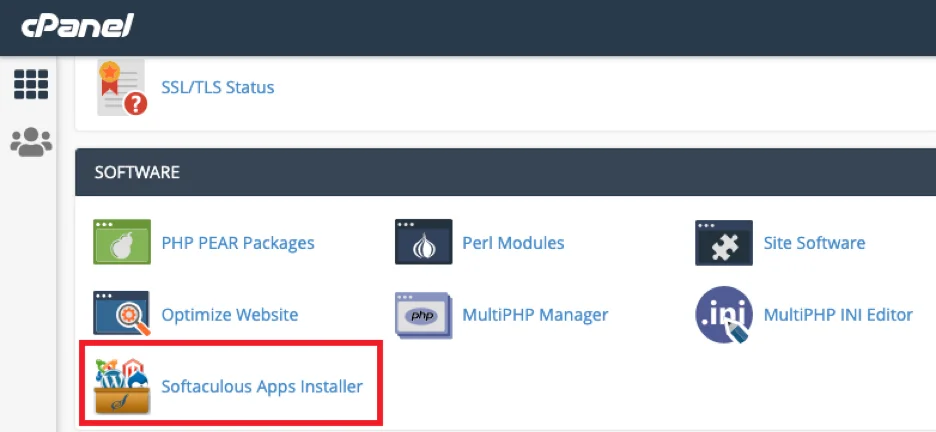
If Softaculous is not installed on your cPanel, follow the steps below to install it yourself:
- Meet the Requirements – Make sure ionCube Loaders are enabled and the ionCube Loader is selected for the backend copy of PHP.
- Log in to Your cPanel Server – You can do this via your IP address by using the following URL: https://yourIPaddress:2083. Enter your username and password.
- Enter the Following Commands:
wget -N https://files.softaculous.com/install.sh
chmod 755 install.sh
./install.sh
- Open WHM – Go to the Plugins or Add-Ons section of your WHM account and click on it to see if the installation was successful.
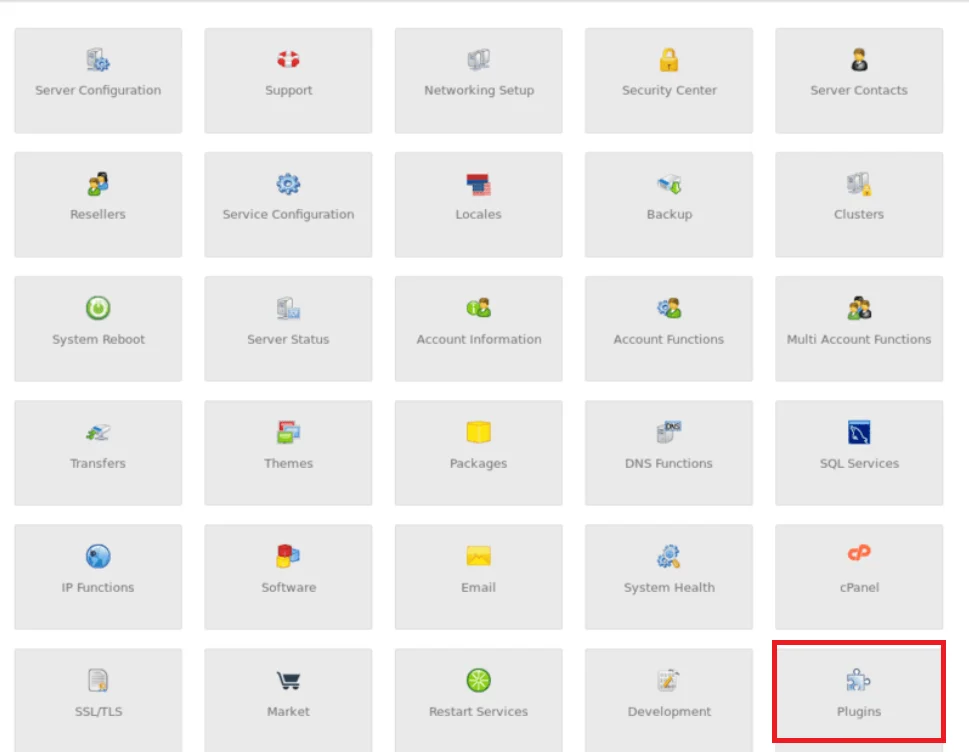
This tool comes with a comprehensive library of apps and a user-friendly interface. Let’s explore its features in more detail:
- Interface: You’ll get an intuitive interface that simplifies the entire installation process. The dashboard is also easy to navigate. You can browse through categories or search for a specific app in the search bar to find what you need. Click on one of the two installation options, and the app will be installed on your server in minutes.
- Application Library: Softaculous is well-known for its extensive application library. It supports all kinds of websites, from blogs, portal/CMS, and ecommerce apps to ERP, video, and gaming. Some of the most popular options include WordPress, Joomla, AbanteCart, PhpBB, WHMCS, and SMF.
- How It Works: This tool offers one-click installs. It automates the installation process, including the configuration of app settings. It only requires you to pick an app and choose if you want to quickly install it with Softaculous Cloud or develop it on your desktop.
- Updates and Backups: It allows you to easily update installed apps directly from the Softaculous interface. It also provides automated backup features that enable you to create and restore backups easily.
- Advanced Options: Advanced users will get more control over their installations. They can modify configuration settings and personalize their setup according to specific requirements.
Fantastico
Fantastico is another excellent auto installer that gives you access to over 380 apps. You must have a cPanel/WHM account, as Fantastico is a plugin for cPanel. That means you have to install it on your WHM account to use it.
Follow the steps below to do that:
- Log in to Your WHM Interface – You can do that via your server IP address with this link – https://yourIP:2087. Enter your WHM username and password.
- Execute the Following Commands:
$ cd /usr/local/cpanel/whostmgr/docroot/cgi
$ wget -N http://files.betaservant.com/files/free/fantastico_whm_admin.tgz
$ tar -xzpf fantastico_whm_admin.tgz
$ rm -rf fantastico_whm_admin.tgz
- Navigate to and Click on Plugins – The “Plugins” section is located on the homepage of your WHM dashboard.
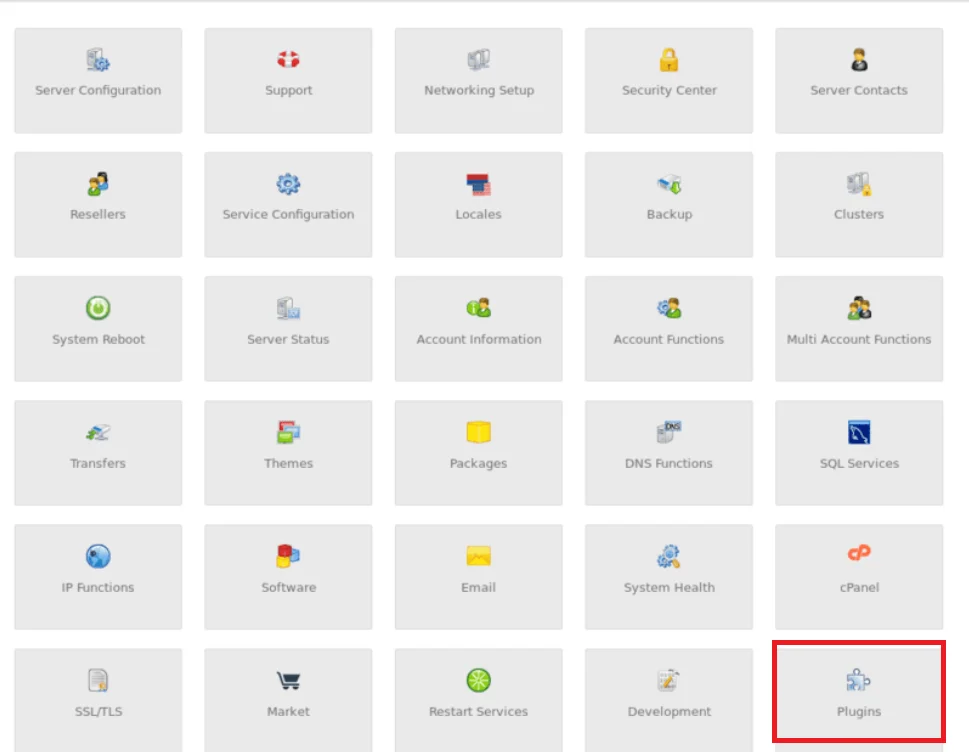
- Click on the Fantastico De Luxe WHM Admin Icon.
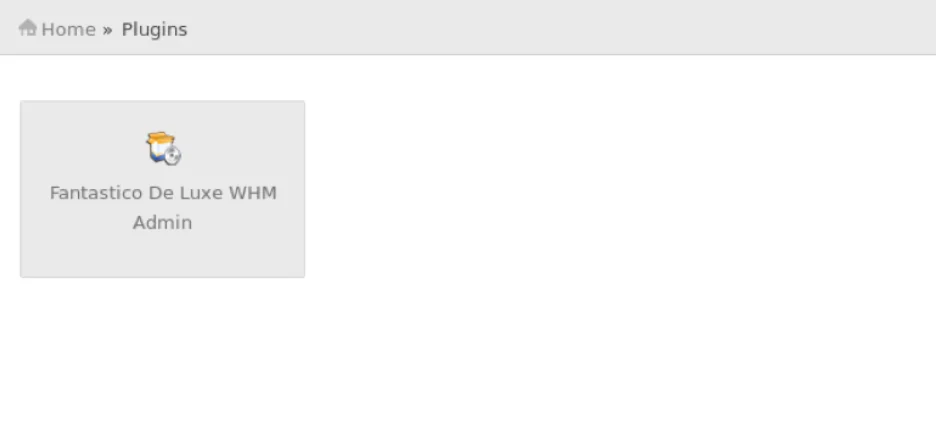
- Click on Install – A window will pop up once you click on the “Fantastico De Luxe WHM Admin” Icon. Click on the “Install” option to continue.
- Follow the Instructions – You’ll get clear instructions to complete the installation.
Some of the features and functionalities you can typically expect from Fantastico include:
- Interface: Fantastico provides a straightforward interface that allows you to quickly find the apps you need and install them.
- Application Library: You’ll get access to over 380 apps that cover all kinds of purposes. You can find apps for content management systems (CMS), ecommerce platforms, blogs, forums, and more.
- How It Works: This tool offers one-click app installs. However, not all Fantastico apps come with this feature, and those that don’t – will require a bit more effort from you.
- Updates and Backups: Fantastico doesn’t offer a system for automatic updates or backups. You’ll have to rely on other tools or manual methods to keep your apps up-to-date and create backups for them.
- Advanced Options: The tool doesn’t provide as many advanced options as other auto-installers.
Installatron
Installatron is a reputable auto-installer that is widely used in cPanel environments. It comes with a wide range of apps and an easy-to-use interface. You can install it on your cPanel account by downloading and running the installation script from the tool’s website. Here’s what you’ll need to do:
- Download the Installatron Installation Script – use the following command:
wget https://data.installatron.com/installatron-plugin.sh
- Update Permissions – you can update the permissions of the installation script via the following command:
chmod +x installatron-plugin.sh
- Run the Installation Script – use the command given below:
./installatron-plugin.sh –f
Once you complete the above-mentioned steps, you’ll be able to access Installatron via the “Plugins” section of your WHM dashboard or the “Software” section of your cPanel dashboard.
You’ll get the following features and functionalities if you choose Installatron as your cPanel auto-installer:
- Interface: You’ll receive a simple and user-friendly interface. Installatron’s dashboard is easy to navigate and allows you to browse apps, manage existing installations, and access additional features.
- Application Library: The tool offers an extensive app library that covers purposes like popular content management systems (CMS), blogs, e-commerce platforms, forums, and more.
- How It Works: Installatron also comes with one-click installs. All you need to do is find the app you need, click on it, and choose “Install this application.”
- Updates and Backups: You can perform automatic updates for installed apps. You’ll also get automated backups that allow you to create and restore data backups.
- Advanced Options: You’ll get advanced customization options and settings for fine-tuning configurations.
Keep in mind that you must have root access or privileges to your cPanel account to configure an auto-installer or any other program you want.
Accessing Auto-Installers in cPanel
We’ve covered how you can set up different auto-installers on your cPanel account. Now, we’ll provide you with the general steps to do that, regardless of the auto-installer tool you use.
Keep in mind that the exact steps might vary slightly based on the cPanel version you’re using.
- Login to cPanel – You can do that by using the following link: http://yourdomain.com/cpanel or via the IP address provided by your hosting provider. Enter your cPanel username and password.
- Find the Software or Services Section – The Software or Services section contains all the tools related to software management you have. Scroll down your cPanel dashboard to find it.

- Identify the Auto-Installer Tool – Look for the logo or name of the auto-installer you’re using. Click on that.
- Explore Applications – You can now install the apps you need with one click via your auto-installer. You can browse by category or via the search bar to find your desired apps.
- Install an App – You need to click on an app to install it. Follow the instructions you see on your screen to complete the installation.
- Access the App – You can access the app you just installed by navigating to the appropriate URL or directory specified during installation.
Almost all auto-installers offer one-click installs. That means the whole process of installing apps is super fast and simple. cPanel also makes it straightforward to find the tools you need and use them for easier web application deployment.
Types of Applications Supported
Auto-installer tools in popular web hosting control panels like cPanel support a wide range of applications that serve all kinds of purposes. The specific apps you’ll access vary depending on the tool and your hosting provider.
Some of the most common categories include the following:
- Content Management Systems (CMS): Almost all auto-installers allow you to download CMS apps, such as WordPress, Joomla, Drupal, Magento, TYPO3, Concrete5, and b2evolution.
- Blogs: Blogs are another very popular category among these tools and usually include WordPress (often listed separately from CMS apps), b2evolution, and Serendipity.
- Forums: Some of the most popular apps in this category include phpBB, SMF (Simple Machines Forum), MyBB, and Vanilla Forums.
- E-commerce Platforms: This includes platforms like Magento, PrestaShop, OpenCart, and WooCommerce (a WordPress plugin for e-commerce).
- Wikis: A few of the most well-known wikis include MediaWiki (the software behind Wikipedia), DokuWiki, and Tiki Wiki CMS Groupware.
- Social Networking: Includes apps like Elgg and Dolphin.
- Galleries and Photo Management: You can install apps like Gallery, Piwigo, and Coppermine Photo Gallery.
- Project Management: Some of the most popular apps include Traq and Redmine.
- Customer Relationship Management (CRM): You’ll get access to apps like SuiteCRM and SugarCRM.
- Learning Management Systems (LMS): Moodle is one of the most popular LMSs that most auto-installers offer.
- Miscellaneous: Other popular apps you’ll find in auto-installers include Mailman (mailing lists), phpMyAdmin (database management), Roundcube (webmail), LimeSurvey (online survey software), and ZenCart (ecommerce).
Using Auto-Installers for Website Setup
Follow the below-given steps to successfully set up a website using auto-installers:
- Log in to cPanel – You can do that via the IP address provided by your hosting provider, a web browser, or by using the following link: http://yourdomain.com/cpanel. Enter your cPanel username and password.
- Find the Auto-Installer Tool – Locate the Services or Software section of your cPanel dashboard and click on your auto-installer tool.
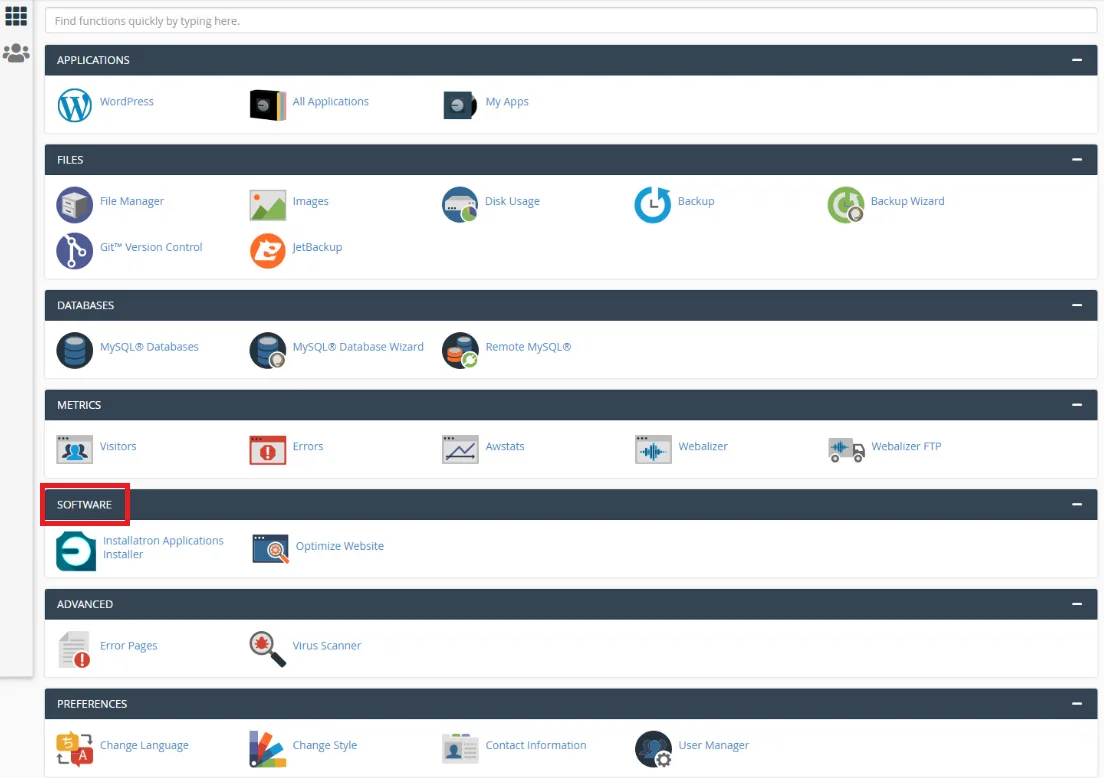
- Explore Apps – You’ll find a wide range of apps once inside the auto-installation tool. Browse through the categories or use the search bar to find the solution you want to install.
- Choose an App – Click on the app you want to get (e.g., WordPress for creating a website). Review information like version and features to ensure you get the latest edition.
- Configure Installation Settings – Fill in the required configuration settings, such as the installation directory (the location where the app will be installed), admin username and password, website name and description, and database settings (some auto-installers handle this automatically).
- Optional Advanced Settings – Some apps come with advanced settings like the ability to customize database prefixes, language, and other features.
- Initiate the Installation – Click the Install or Submit button once you have configured your settings. You can track the installation progress via a progress indicator that will appear on your screen.
- Completion and Access – Once your app is installed, you’ll receive a confirmation message. You can now access your website via the provided URL or directory.
- Explore the Website Dashboard – Log in to the admin dashboard with the credentials you set up in step 5 to customize your website, configure themes, and add content.
- Launch – You can publish your website once you’ve added all the content you want and customized your site to your liking.
Benefits of Using Auto-Installers for Non-Technical Users
| Benefit | Description |
|---|---|
| Easy Installations | Auto-installers eliminate the need for advanced technical skills to install web apps, allowing you to do that with a few simple mouse clicks. |
| Time Efficiency | The installation process is automated and takes a few minutes to complete. |
| Automated Configurations | Tasks like creating databases and adjusting settings are automated, and everything is set up without your intervention. |
| Wide Range of Apps | You can take a pick from all kinds of apps, including CMS solutions, ecommerce platforms, blogs, forums, mailing lists, CRMs, and more. |
| User-Friendly Interfaces | You’ll get a simple interface where you can easily find and install your desired apps. |
| Automatic Updates | Many auto-installer tools offer automatic update features. |
| Multilingual Support | Some tools support multiple languages and allow people who do not understand English to use them efficiently. |
cPanel is a must-have feature if you want to use auto-installers to simplify web application deployment. That’s why it is imperative to find a web host that offers convenient control panel tools and extra support.
Not only does ScalaHosting give you access to cPanel, but our managed cloud VPS services contain our very own SPanel. Our platform allows you to manage your server and website without any prior experience or coding knowledge. Naturally, Softaculous is a part of the deal, coming absolutely free of charge with our control panel.
Conclusion
Auto-installers can make your life much easier as they allow you to install and use hundreds of helpful apps for your website. cPanel is compatible with many powerful options that might even come pre-installed by your hosting provider. Once you set up an auto-installer, you’ll enjoy quick and easy access to all kinds of apps and be able to deploy them with a few simple clicks.
If you don’t want to utilize an auto-installer tool manually on your cPanel account, you can use ScalaHosting’s managed cloud VPS services, which come with Softaculous locked and ready. You will also enjoy Scala’s proprietary control panel, SPanel, which gives you immediate access to the Softaculous one-click installer.
FAQ
Q: How Do I Back up Applications Installed With an Auto-Installer in cPanel?
A: Creating backups for your app depends on the tool you’re using.
Generally, the process involves the following:
- Login to cPanel.
- Click on the auto-installer in the “Software” section.
- Mark the app you want to back up and look for a Backup button.
- Add a label to the backup if you want to, and click Backup or Save.
Additionally, the ScalaHosting plans come with a self-developed backup functionality. Whether you want to archive your data manually or automatically – there are easy backup options in our SPanel.
Q: How Do Auto-Installers Simplify Web Application Deployment?
A: Auto-installers simplify web application deployment by automating the installation process and setting configurations. All you need to do is select your app, click on the Install button, and enter some basic information (file location, admin username, and password). The auto-installer will handle everything else.
Q: How Can I Optimize the Performance of My Auto-Installed Apps?
A: There are quite a few things you can do to make your auto-installed apps faster, including the following:
- Use the latest app versions.
- Implement caching mechanisms within the apps.
- Utilize a Content Delivery Network (CDN) to reduce the load on your server.
- Minify CSS, JavaScript, and HTML files.
- Use a CMS cache.
- Employ Content Preloading to load critical resources in advance.

