People often switch web host providers for better deals and features. For instance, they could get lesser fees for more quality services, receive better customer support or enjoy superior speed and bandwidth.
If you’re thinking of moving your website to a new web host and have not decided on a provider, Scala Hosting provides all the tools you need to grow your business and keep your customers happy.
When you’ve made the switch and are wondering how to transfer your website to ScalaHosting, this article takes you through step-by-step instructions on how to get it done.
Move Your Website Files
The first step to moving your website is to download the website files to your local computer. Before that, take a screenshot of all your pages. It helps you know the changes to fix should something go wrong while moving the files to the new host.
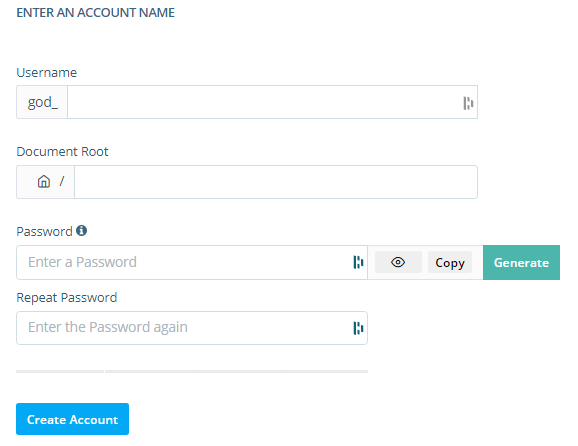
But, it would help if you didn’t mess around with the files after downloading them. It could wreck your site structure and designs. To download your file safely, log in to your website’s control panel, locate the FTP tool and create an account (if you don’t have any), granting yourself access to the root directory (public_html).
Here’s how the user interface looks on SPanel—ScalaHosting’s all-in-one control panel.
Create a folder in your local computer to hold all your website files in one place. Now, download an FTP client to your computer, install the program and open the application.
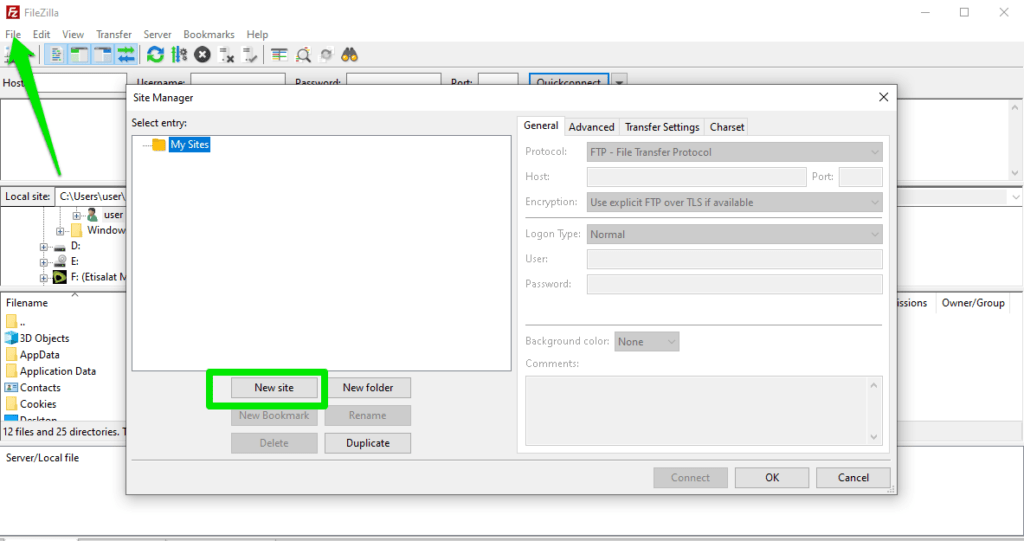
Go to File > Site Manager, and click New Site.
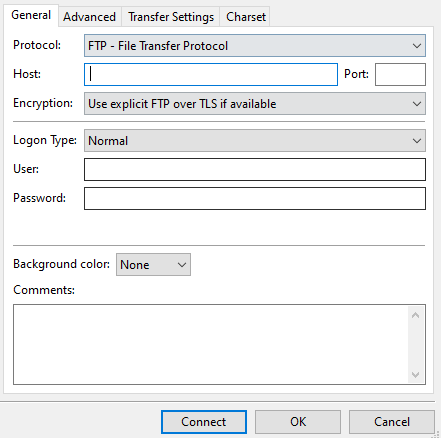
To connect to your website:
- Select FTP as the transfer protocol
- Enter your website URL (www.domain.com) or IP address in the host field
- Connect with port 21
- Select your encryption type (SSL or TLS)
- Input the FTP username and password you recently created.
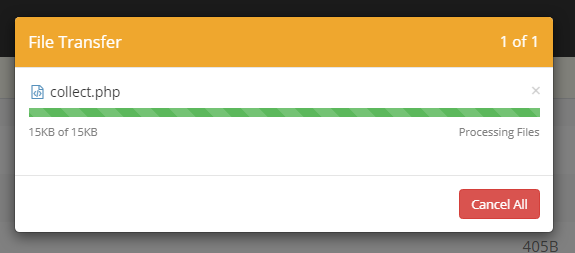
Click the Connect button and wait patiently as the FTP establishes the connection. When connected, you’ll see all your desktop files on the left-hand side of the FTP client and your website files on the right-hand side, similar to what you have on your hosting portal.
Please select all your website files folder named public_html and drag them into the folder you created on your computer. You can also download your website files via the control panel’s file manager. To get it done, log in to your control panel, open your file manager, locate the public_html folder and download it to your local computer.
Export Your Database
You can skip this step if your website doesn’t have a database. Websites use database management systems to organize and retrieve data. For example, the database helps store passwords and usernames, posts, comments, pages, WordPress themes, configuration, and others.
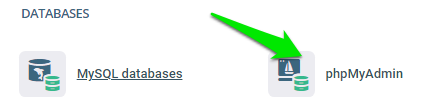
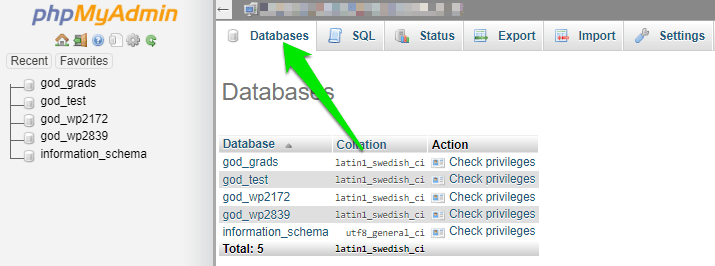
If your website is on WordPress, you’re likely to have a database, and the CMS uses MySQL for its database management system. Exporting your database ensures you don’t lose any data after the move. To get it done, log in to your control panel, locate and open phpMyAdmin—a web-based interface for managing MySQL databases.
On the phpMyAdmin dashboard, click Databases on the menu to list all your databases. If your account hosts other websites, then you might see more than one database.
Click Export on the menu bar, use the Custom option, select SQL as the export format and pick the database you wish to export.
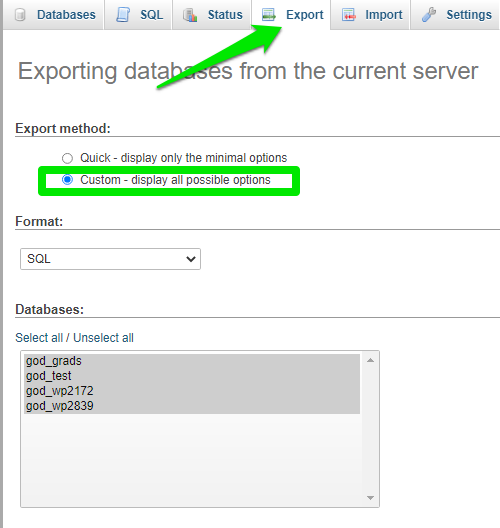
Set up the other configurations or use the default setup and click the Go button to export the database to your local computer.
Create a New Database
You’ll need to create a new database for your website on your new hosting account. If you’re transferring to ScalaHosting, you can quickly create one on SPanel. To get started, visit www.domain.com/spanel/login, replacing domain.com with your domain name to log in to your SPanel account.
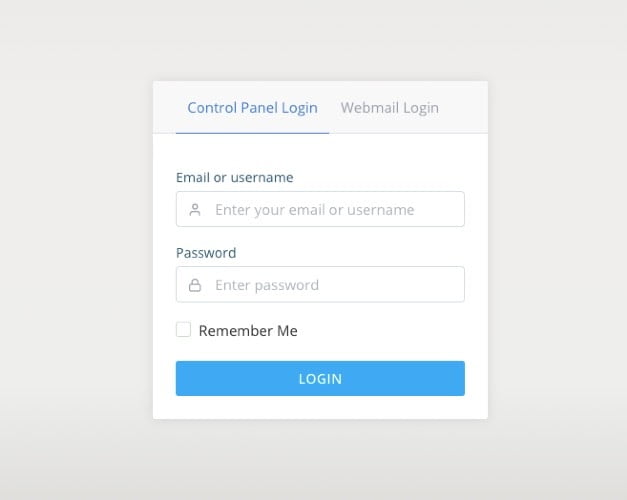
Enter your login details and click the Login button to sign in. If you logged in with admin access, Spanel takes you to the admin dashboard, which helps you manage all your accounts in one place but takes you straight to your account’s control panel if you sign in as a user.
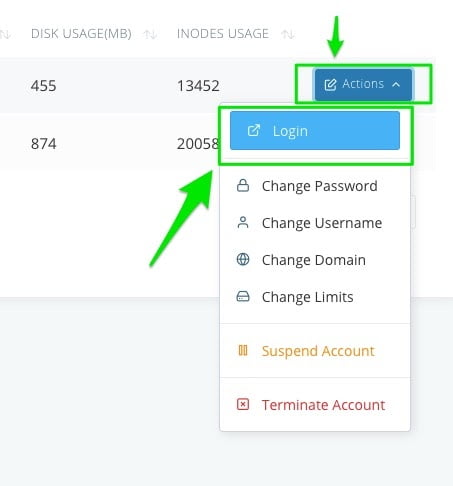
Now, to access your account control panel from the admin dashboard, scroll to QUICK LINKS and click List Accounts.
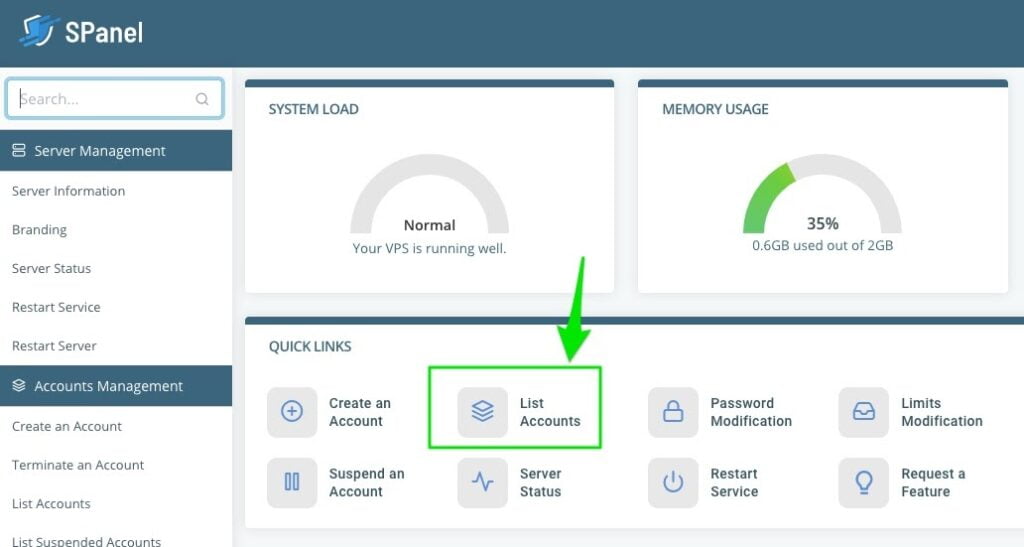
Find the website account you wish to create the database on, click Actions > Login in the pull-up menu to get into its control panel.
Other things you can do on SPanel include:
- Creating and managing email accounts, domains and databases
- Installing WordPress
- Setting up SSL certificates and many other things
On the control panel, scroll to the DATABASES section and click MySQL database.
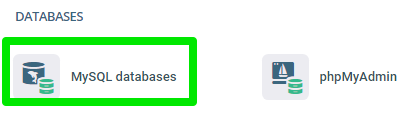
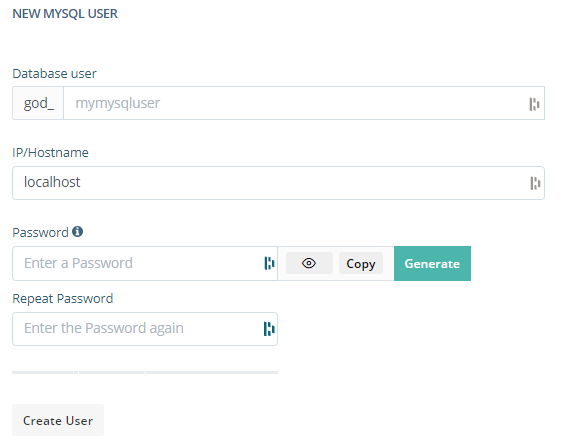
Managing a database requires at least a user with access to it—so, you’ll need to create a database user first. To get started, scroll to the NEW MYSQL USER section, enter a username and password, then click the Create User button to get it done.
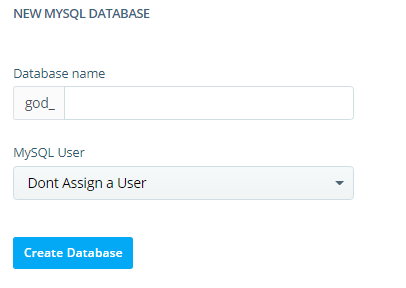
After creating the user, scroll to NEW MYSQL DATABASE, enter the database name, select a user from the drop-down and click the Create Database button to complete the setup.
Import Your Database
The next step after creating your database is importing the downloaded database files into your newly created database, and here’s how. Log in to your phpMyAdmin dashboard from your SPanel account and click Databases in the top menu.
Select the database you just created, and you will see the message “No tables found in database.”
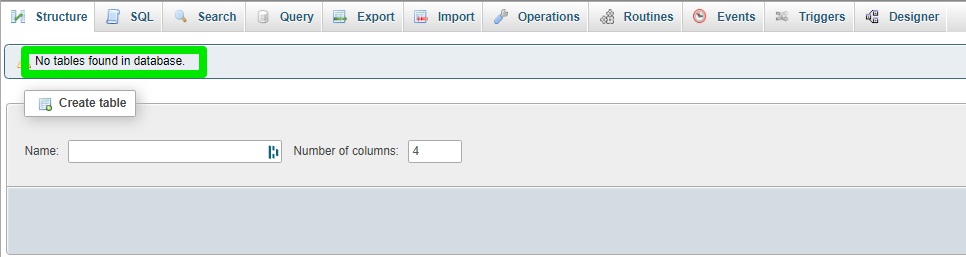
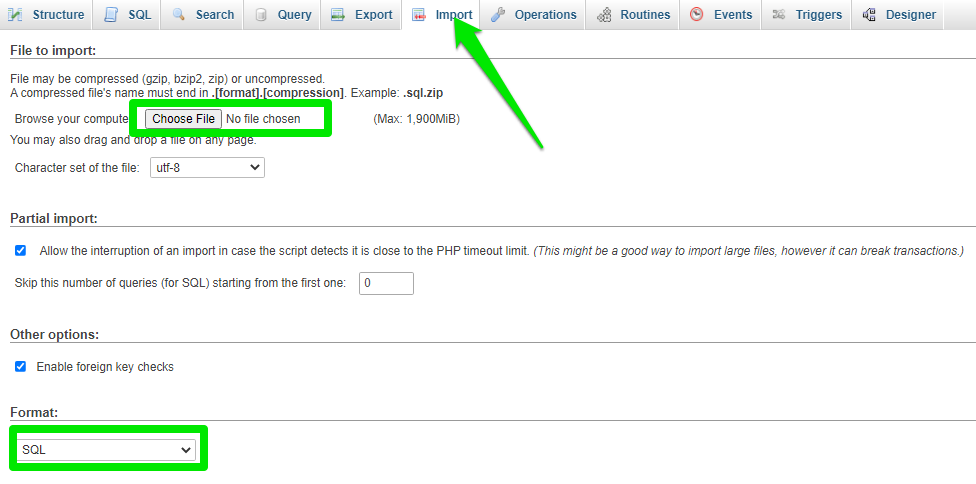
If there are tables in the database, then you’ll have to create a new database. It would help you had a blank database to house the exported database files. To import the files, click the Import tab at the top menu, select the exported database file from your computer, choose SQL as the file format and click the Go button to run the file import.
Upload Your Website Files
The next step is to upload your website files into your new hosting account with the database sorted out. You could upload the files via FTP or the new hosting account’s file manager.
Follow these steps to upload the files via FTP:
- Create a new FTP account in your new hosting account. Go to the Files section, select FTP and create a new user.
- Connect FTP to your new hosting account using your hostname, port 21, SSL, and your username and password.
- You will see your desktop files at the left-hand side of the FTP client, locate your downloaded website file and move them to the folder named public_html and at the right-hand side of the client to upload it.
If you wish to upload your files through the file manager, here’s how to get it done.
Step 1: Log in to Your Control Panel
Log in to your account’s control panel with your user access.
But if you’re an admin, scroll to the QUICK LINKS sections, click List Accounts > Actions > Login to sign in to the account control panel.
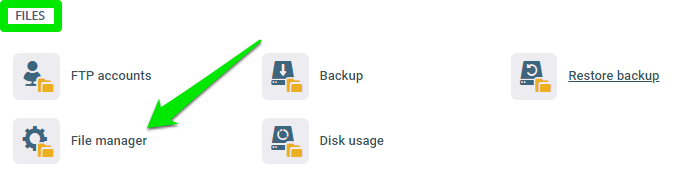
Step 2: Access the File Manager
Scroll to the FILES section on the control panel and click File manager.
Find the public_html folder and click to open it.

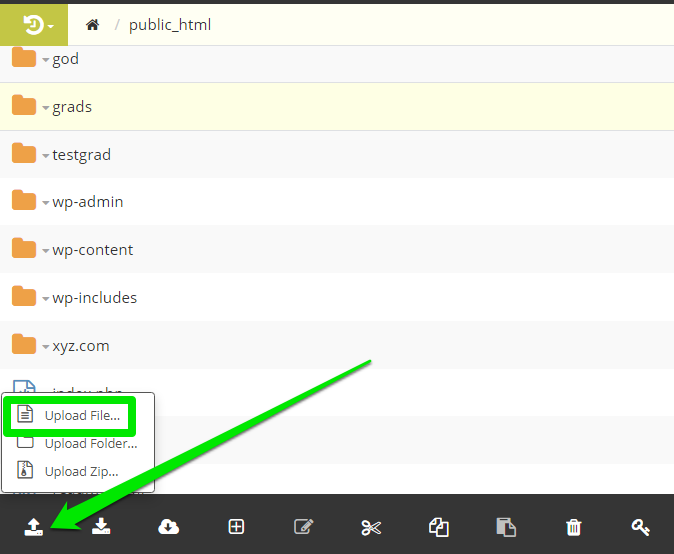
Step 3: Upload Your File
Upload all your files into the folder as downloaded, maintaining their exact structure. To get started, click the upload icon and select File Upload.
Select the web files from the folder you created, and SPanel uploads them to your file manager.
In a few seconds, you’ll see your file in your file manager’s public_html folder. SPanel allows only a 500MB maximum file size at a time.
If you have more than 500 MB of files or wish to upload all the files at once, convert your website files folder (public_html) as a ZIP file.
Delete the public_html folder in your file manager, then upload the ZIP file into the file manager to replace the deleted folder and unzip the folder.
Connect the Website to the New Database
Since you uploaded precisely the exact file you exported from your old host without editing any code, you’ll need to modify certain lines of code to sync the new website to the newly created database.
Modifying the code ensures the website connects to your new database. If your website runs on WordPress, log in to your SPanel account and follow the rest of the steps below to sync with the new database.
Step 1: Access the File Manager
Click File manager under the FILES section on your control panel.
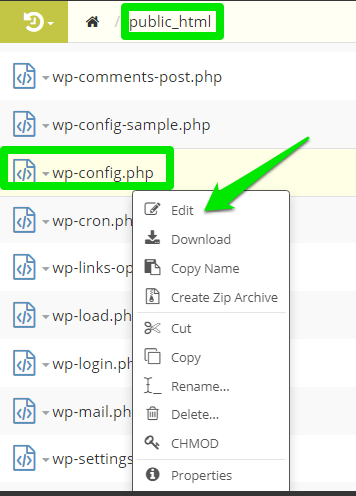
Locate your website root directory (public_html folder) and click to open it.
Step 3: Modify Your Website Configuration File
Please scroll down to the wp-config.php file in your root directory, right-click it and select Edit.
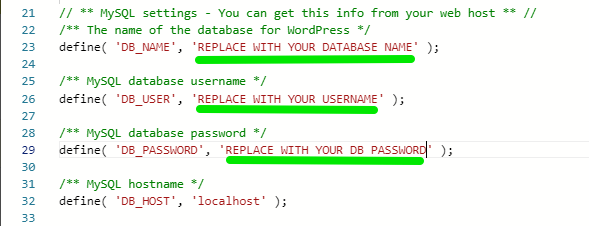
Scroll through the file till you get to MySQL settings. In the DB-NAME line, replace the old database name with that of the newly created database in-between the double apostrophe mark (‘’).
Replace your old username and password with the new ones in the DB_USER and DB_PASSWORD lines, respectively.
Save the file and exit the file manager.
To sync a Joomla website with the new database, find the configuration.php file, click CTRL + F on your keyword and search “localhost” and replace the database name, username and password with the new details.
On Drupal, find the settings.php file, search “$databases” and enter your new database name, username and password.
Update Your DNS Settings
The final step is to change your domain nameserver to point to your new host. It ensures people find your website on the internet.
You can only make this change with your domain name registrar, and the process often varies. If you don’t know how to go about it with your registrar, contact their support for assistance—most registrars are always willing to help out.
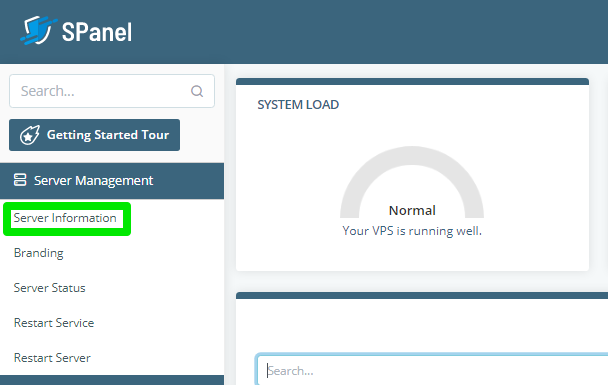
You’ll need the nameserver of your new hosting provider to update your DNS settings. To find it on SPanel, sign in to your SPanel account as an admin, click Server Information under Server Management at the left-hand side of the dashboard.
SPanel will load a new page displaying your ScalaHosting’s name servers (1 and 2).
Need Support?
Moving a website to a new host could be challenging. If you need help transferring your website to ScalaHosting, you’re welcome to contact our Support by chat, email, or phone, and we’ll be glad to help.
How To Point a Domain Name To a Web Hosting Provider