Backing up your site’s files is relatively straightforward. In essence, you put them all in an archive, which you can later extract and restore everything. When it comes to generating backups of your MySQL databases, however, things are a bit more complicated.
Today, we’ll look into the different types of database backups, and we’ll see some of the most popular ways to back up and restore your website’s data.
Types of MySQL Backups
MySQL is a relational database management system used by most modern websites and applications. The information is stored in tables, with relations between the different datasets. In effect, these relations build the structure of the database.
A working backup of a database must be able to recreate the tables and the relations between them in the way they are originally organized. Ideally, it must do it quickly and efficiently in order to minimize service interruption.
There are two main types of MySQL database backups:
Logical backups
A logical backup exports (or dumps) the data and the data structure to a file with an SQL extension. SQL files are created by running scripts either through a third-party GUI-based tool or from a shell. Once generated, the backup can be stored locally, sent to another device on the network, or, ideally, transferred to an offsite location (it could be a server located in a different center, but it could also be an account with a popular cloud storage provider like Dropbox, for example).
In addition to the data itself, a logical backup contains the SQL statements (e.g., CREATE DATABASE, CREATE TABLE, etc.) – instructions that enable MySQL to rebuild the database with the correct table structure and relations. The main advantage of logical backups is that they can be used to transfer a database from one host to another.
Physical backups
A physical backup is a snapshot of the database’s datadir directory. All the tables and the data inside them are copied in their original file formats and can be restored in a fully functioning database as long as the structure is maintained.
Physical backups are quicker but can only work if they are restored from the same database engine on the same MySQL version. Hence, they aren’t always suitable for moving a database from one environment to another.
Your backup strategy should be determined by a number of different factors including the hosting setup, the database size, and your requirements.
Logical backups tend to be more common because, as we’ll find out in a minute, there are several ways of creating them, with tools readily available and fairly easy to use. Furthermore, logical backups can copy individual database objects, giving you more flexibility and a quicker resolution when you’re dealing with data corruption problems in specific tables. They are also more suitable if you’re looking for an incremental backup solution.
Overall, while physical backups do make sense in a few specific scenarios, for the regular website owner, logical ones are easier to set up and manage. That’s why today’s article will focus on them.
Creating a Database Backup via the Command Line
If you use the command line, you’ll export MySQL databases with mysqldump command-line utility – a tool designed for this specific purpose. The lack of a graphical user interface means many will likely prefer one of the other methods. However, if you decide to give it a go, you’ll see that there’s nothing too complicated about the process.
Your first job is to open an SSH shell. Modern operating systems support the protocol out of the box. Windows computers connect to remote servers via PowerShell or the Command prompt tool, and Unix-based systems do it with the Terminal.
Some people prefer dedicated SSH clients like PuTTY, and if you have an SPanel server, you can open a shell directly via the SSH Terminal available on the homepage of the User Interface.
Before you continue, make sure you use a MySQL user account with privileges over the database you’re about to back up. If you log in as root or any other account with SYSTEM_USER permissions, you can export data from any database you want.
It is worth mentioning that mysqldump won’t be able to back up a database if one of the tables is corrupted. To make sure everything will go smoothly, you can use the mysqlcheck command-line utility to connect to the MySQL server and check for corrupted data.
The command looks like this:
$ mysqlcheck [the database’s name] -u [your MySQL user’s username] -p
After you provide your user account’s password, mysqlcheck will scan all tables for data corruption. Ideally, the output will look like this:

To check all databases, add the –all-databases option. With that done, you can proceed with the backup.
The mysqldump utility covers quite a few scenarios. Here are the most common ones:
Backing up a single database via the command line.
To back up one of the databases on your account, you need a command that looks like this:
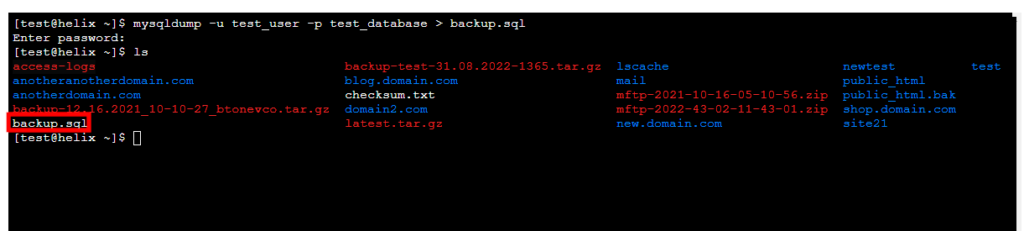
$ mysqldump -u [your MySQL account’s username] -p [the name of the database] > [the name of the backup file]
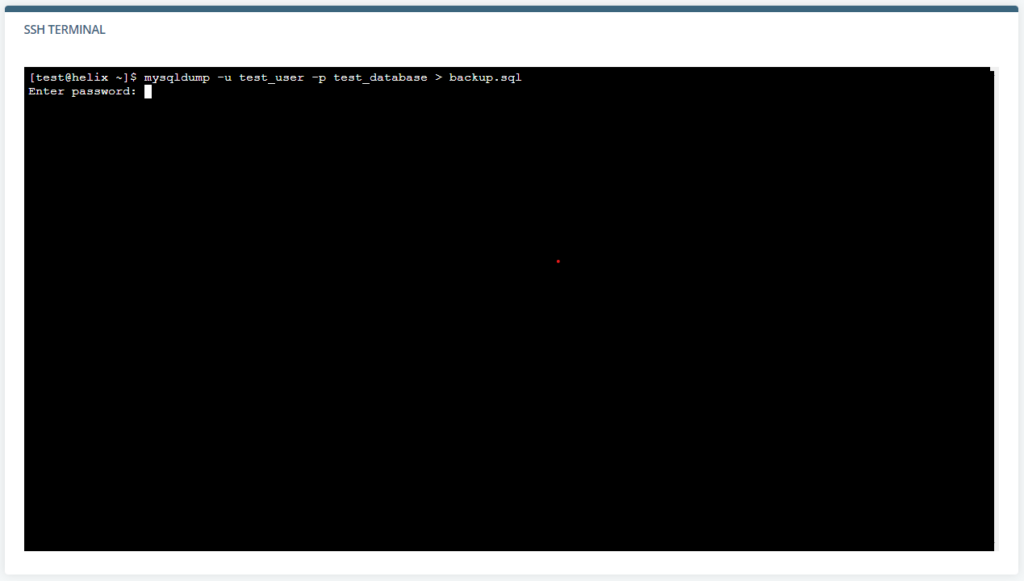
With the above command, the user test_user exports the database test_database to the file backup.sql. All you need to do is enter the user account’s password. If backup.sql doesn’t exist, MySQL will automatically create it.
Backing up specific tables from a selected database
The mysqldump utility can also back up specific tables only. Just add the table’s name after the database. Here’s an example:
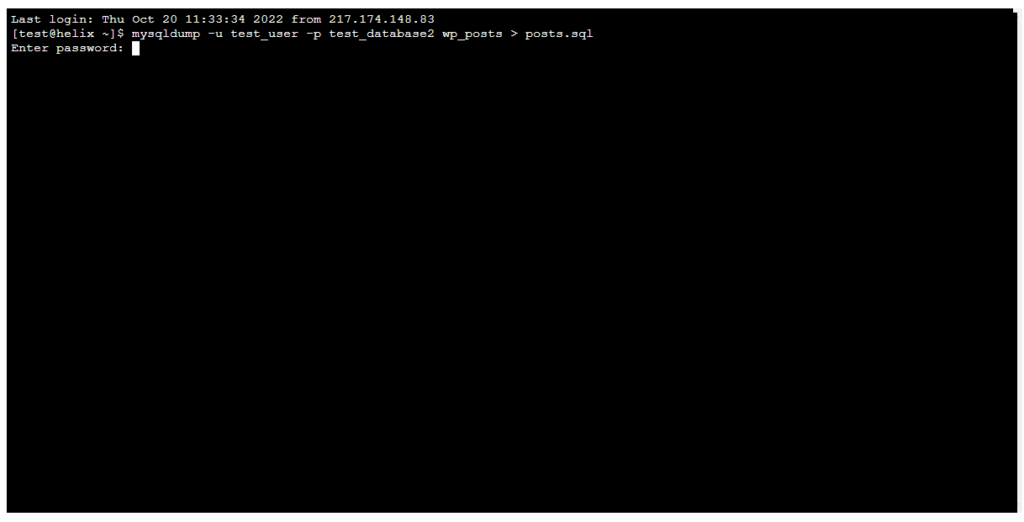
In the screenshot above, test_user is trying to back up the table wp_posts from test_database2 to the posts.sql file. To dump multiple tables to the same file, simply add their names separated by spaces. For example:
$ mysqldump -u test_user -p test_database2 wp_posts wp_options wp_users wp_links > wordpress.sql
Multiple database backups
You can export more than one database to the same file with mysqldump. To do that, use the command above, adding the –databases option and the names of the databases separated by spaces. For example:
$ mysqldump -u test_user -p –databases test_database test_database2 test_database3 > backup.sql
Backing up all accessible databases
If you want to back up all the databases you have control over, replace the database name with the –all-databases option. For example:
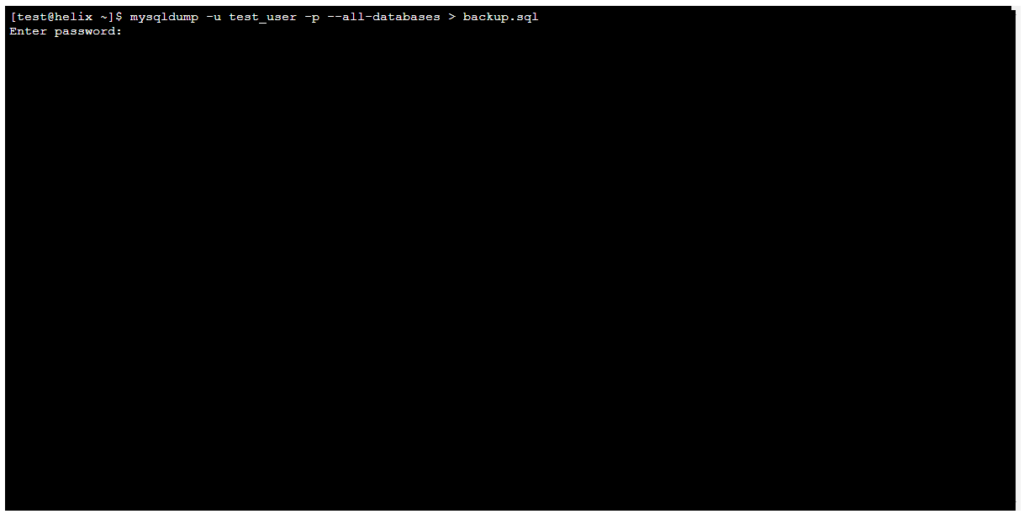
This will dump all databases except information_schema, performance_schema and any other default MySQL schemas. To include them in the backup, add the — skip-lock-tables option.
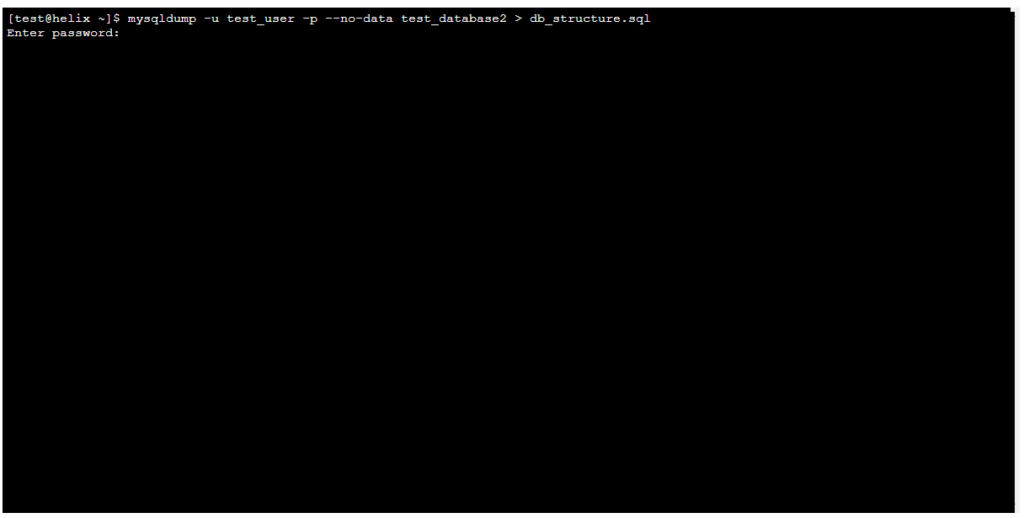
Backing up a database structure only
Sometimes, you may need to generate a backup of a database’s structure without the data stored in it. The mysqldump utility can do it if you include the –no-data option. Here’s what the command looks like:
Backing up the data without the structure
The reverse is also possible – you can backup the data without the structure. The option is –no-create-info, and the command looks like this:

The mysqldump utility won’t print a message telling you that it has successfully backed up your database, so you can use the ls command to confirm that the backup is completed.
Dumping a large database with mysqldump
Using mysqldump on larger databases could be trickier. If you have lots of GBs to back up, you may experience increased server load, and if the database is really big, the entire operation could fail.
The first problem is the amount of storage the backup takes up. Large databases produce large files, and although mysqldump has some options like –extend-insert that help to some extent, they aren’t always as effective as you may hope.
What is almost guaranteed to shrink the size of your backup is piping mysqldump’s backup through gzip and compressing the output file before writing it on the disk.
The command will looks like this:
$ mysqldump -u [your mysql account’s username] -p [your database’s name] | gzip > [filename].sql.gz
On the one hand, this reduces the size of the generated backup, and on the other, it cuts the IO load.
The mysqldump utility has a couple of other options that may also help. The –opt option encompasses several different command parameters that optimize the dump operation. Bear in mind that they make the backup more difficult to understand by other database systems, so this may not be the best approach if you want to migrate the database to a new host.
The –quick option may also work. By default, mysqldump stores each table row into memory before dumping it into the backup file. with the –quick option, the data is transferred directly to the backup.
If a large backup operation fails, you can try to increase the max_allowed_packet parameter in MySQL’s configuration file (the my.cnf file usually stored in /etc). This is usually necessary only when you’re trying to shift dozens of gigabytes of information, and it’s not guaranteed to succeed.
Putting that much data into a single file will never be easy, and many experts suggest that in such cases, you’re better off using a physical backup solution like MySQL Enterprise Backup or Percona XtraBackup.
How to Back Up a MySQL Database Using phpMyAdmin?
Many shared and managed hosting accounts come with phpMyAdmin preinstalled. Its default login URL is https://[your server’s IP]/phpmyadmin (it’s deliberately changed by some hosts for security reasons), though it’s often accessible from the control panel, as well.
It has an easy-to-use graphic interface, meaning you don’t need to learn any SQL commands to manage your database. You can also export data with a few mouse clicks. Here’s how to do it.
Backing up a single database
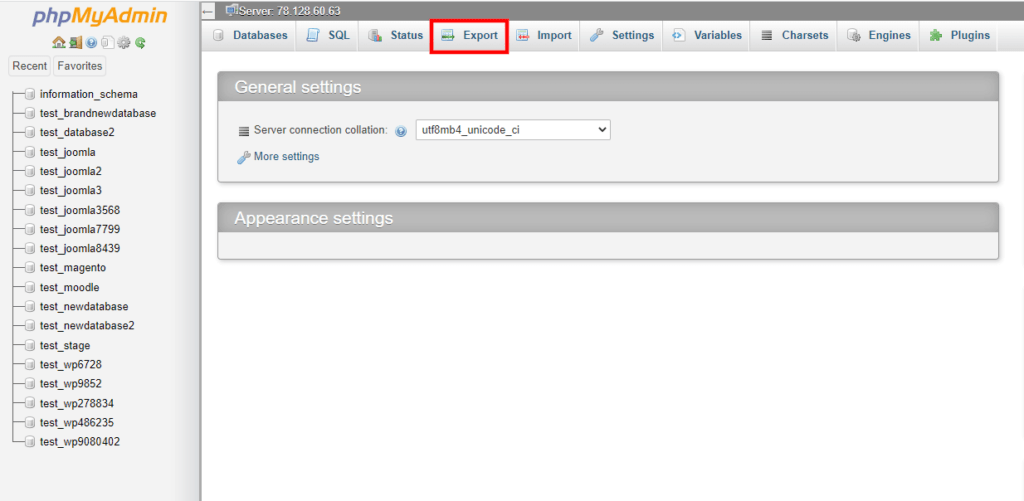
After you open phpMyAdmin, you’ll see a list of all the databases on your hosting account.
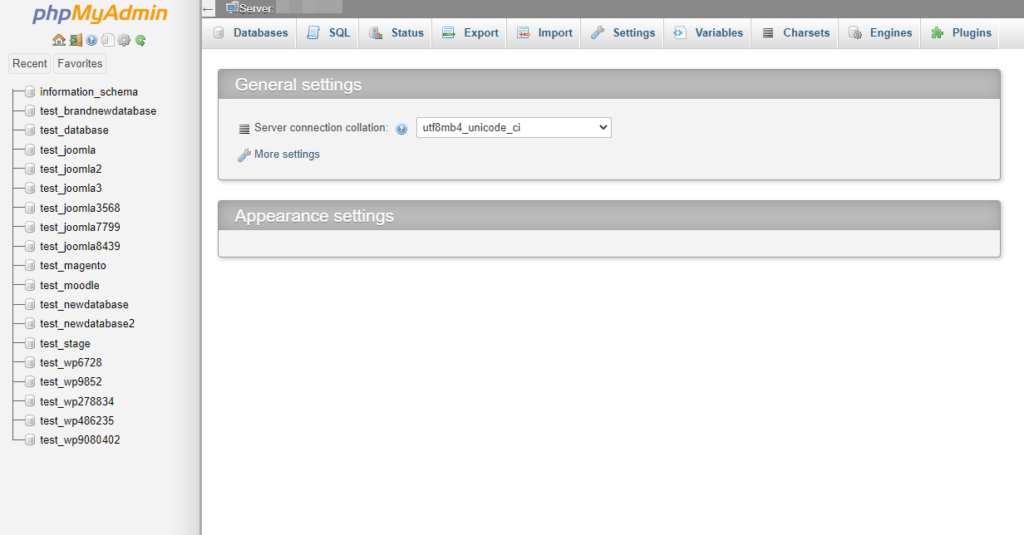
Click on the one you want to back up and go to the Export tab.
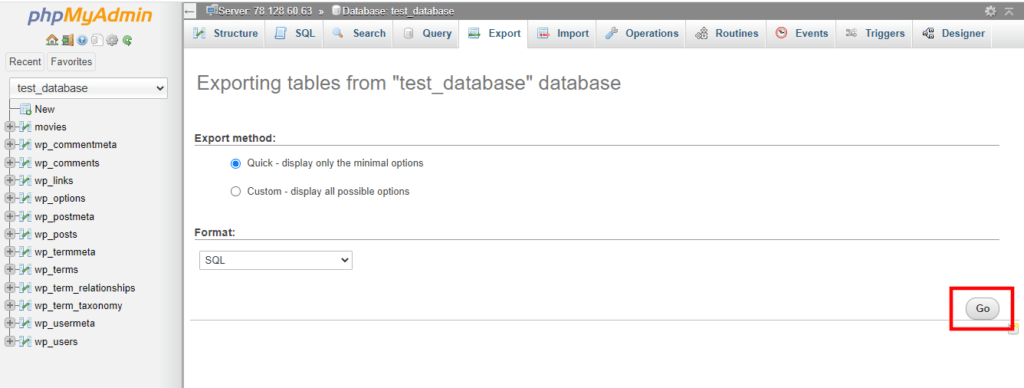
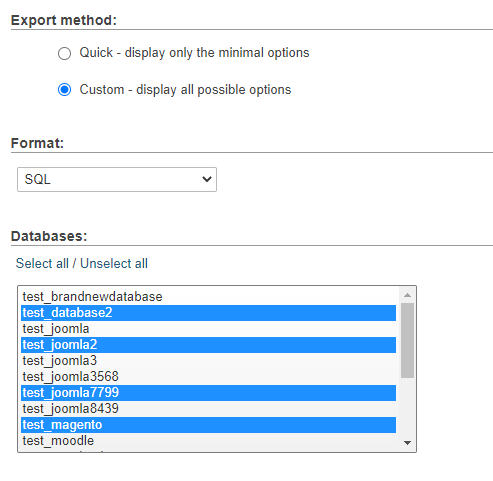
You can choose the export method and the format. It’s preferable to keep the SQL format, as this will give you more options when you need to restore the backup.
As for the method, Quick is selected by default, and if you leave it like that, phpMyAdmin will dump the entire database (the data and the structure) into the SQL file.
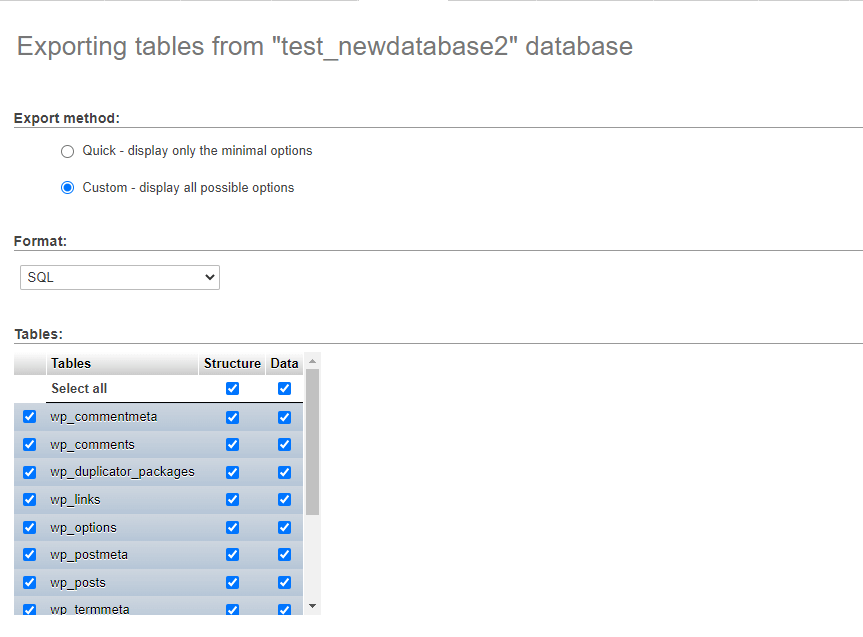
If you select the Custom radio button, you’ll see quite a few more options. First, you can select which tables you’d like to dump. You can back up the structure, the data, or both.
Further down, you can have phpMyAdmin automatically rename the database, its tables, and/or columns while exporting them. This is where you specify the file name template as well. By default, it’s set to “@DATABASE@” which means that phpMyAdmin will name the backup file after your database.
You can lock the database’s tables or export them as separate files. Options for the exported file’s encoding and compression are also available in this section. You can skip tables over a certain size and see the output as text instead of dumping it into an SQL file.
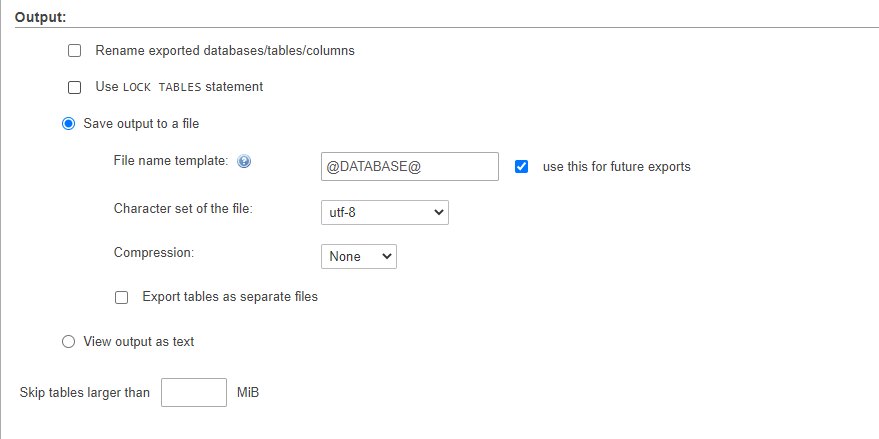
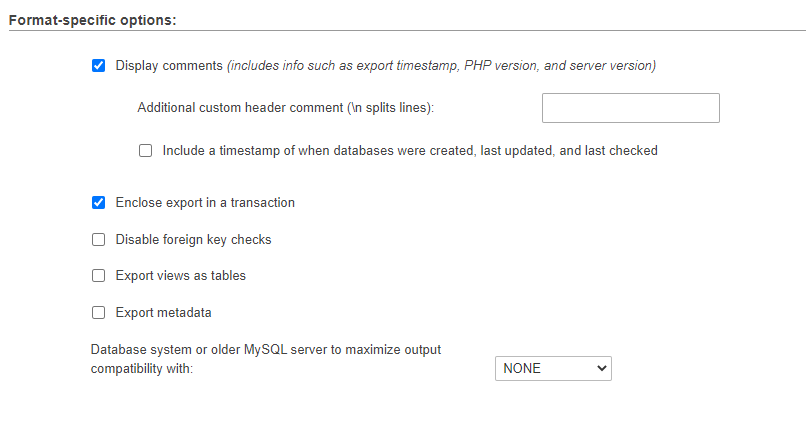
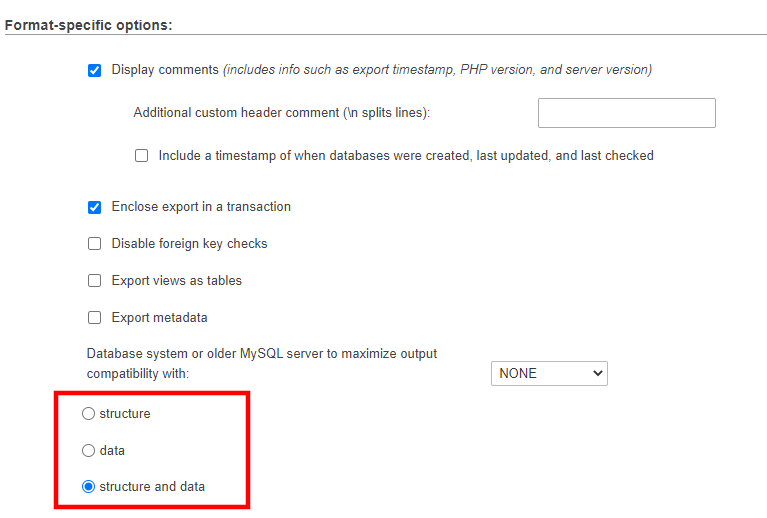
In the Format-specific options section, you decide whether to have comments, metadata, and other formatting elements in your backup. You can have phpMyAdmin export the database as a transaction, disable foreign key checks, and dump views as tables.
There’s also a drop-down menu letting you make the backup backward compatible with a number of older systems.
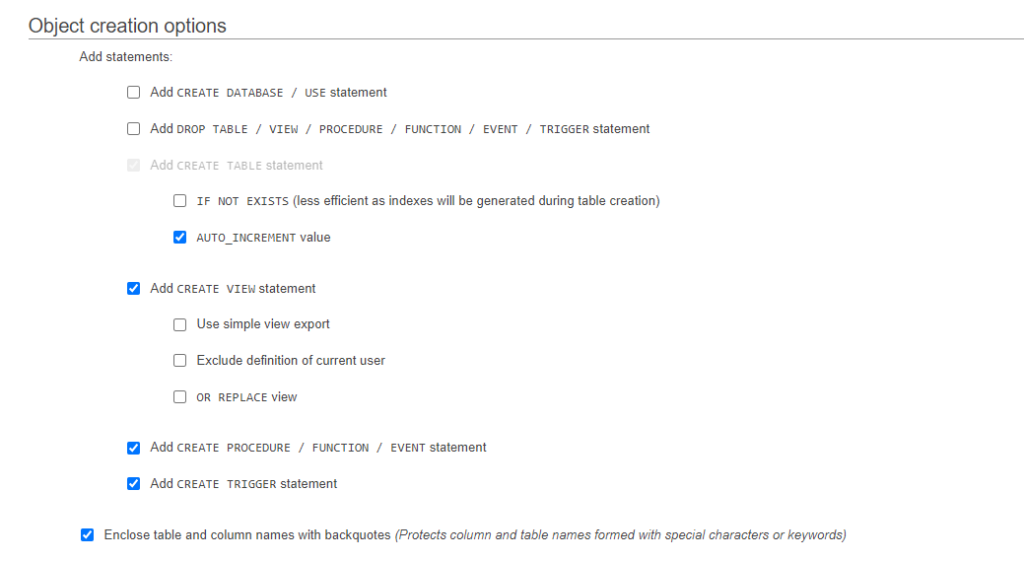
Next, you have the Object creation options section. It mainly deals with the statements that will be added to the backup, which concern the way the SQL file will recreate the database’s contents.
For example, the CREATE DATABASE and USE statements can save you some time when you need to restore the data to a new empty database. If, on the other hand, you plan on restoring the data into an existing database, you can have the DROP statements overwrite the old data.
If the IF NOT EXISTS option is enabled, your backup will check for matching tables before trying to create them, and with the AUTO_INCREMENT checkbox, you can append the backed up data to existing tables.
In the Data creation options section, you’ll find more settings related to data restoration. There are a few advanced options that may require a tweak in certain cases. However, for most website owners, the default configuration should work fine.
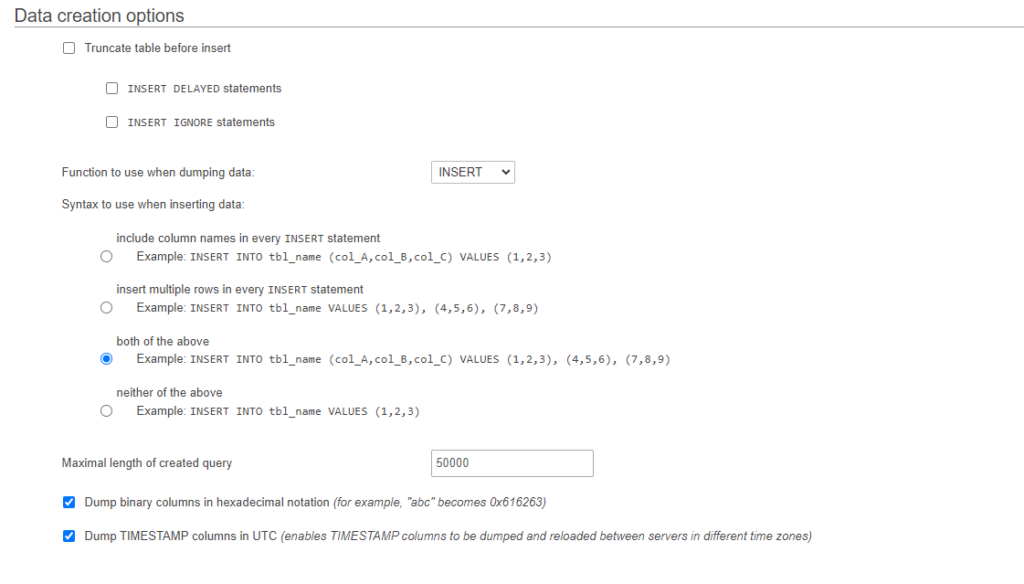
After you’re done tweaking the settings, click Go to generate the backup.
Multiple database backups
The steps to back up multiple databases are pretty much the same as those for dumping a single one. The difference is, instead of selecting a database from the menu on the left, you need to go straight to the Export tab from the homepage.
If you’d like to back up all your databases at once, set the export method to Quick and the format to SQL, and click Go to have phpMyAdmin generate the backup. If you select the Custom method, you will be choosing which databases to back up. Click Unselect all and mark the ones you want to back up using the Ctrl/Cmd key.
Further down, in the Format-specific options section, you can decide whether to dump data from the selected databases, back up the structure only, or both.
The rest of the settings are the same as the ones you see when you’re exporting a single database.
Database Backups With MySQL Workbench
MySQL Workbench is another free database management tool. You can set it up on your home computer (it’s available for Linux, Windows, and MacOS) and control your databases remotely.
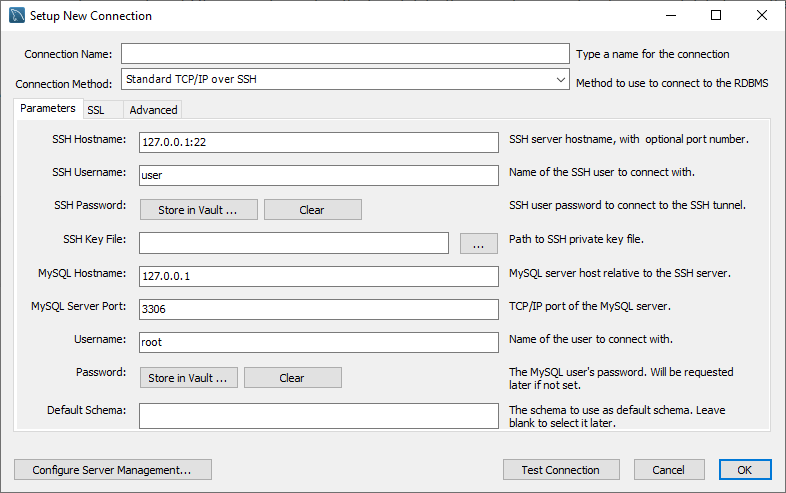
You’ll first need to connect to your hosting account. There’s a + button in the MySQL Connections section on the homepage.
Next, you have to determine how you’re going to connect to the server. The best option is to use the standard TCP/IP protocol over SSH. This way, the communication will be encrypted, and your data will be safe.
You’ll have to provide the SSH login credentials as well as the ones for your MySQL user account. After you fill in all the required fields, click Test Connection to ensure everything works. If it does, hit OK to save the the settings.
After you connect to the server, open the Administration tab in the Navigator section and click Data Export.
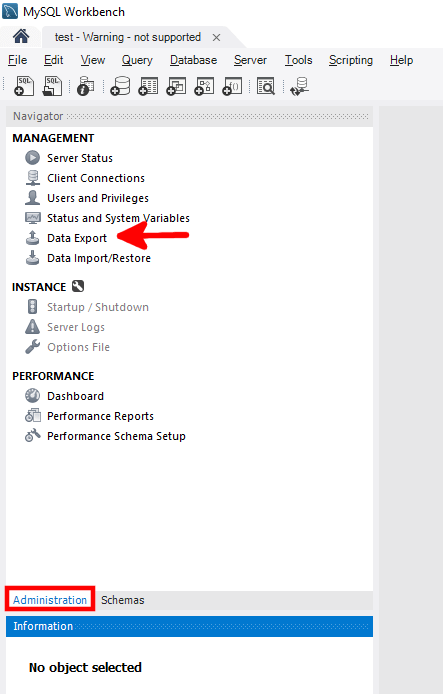
In the next window, you’ll see the databases your user can control and the different export options.
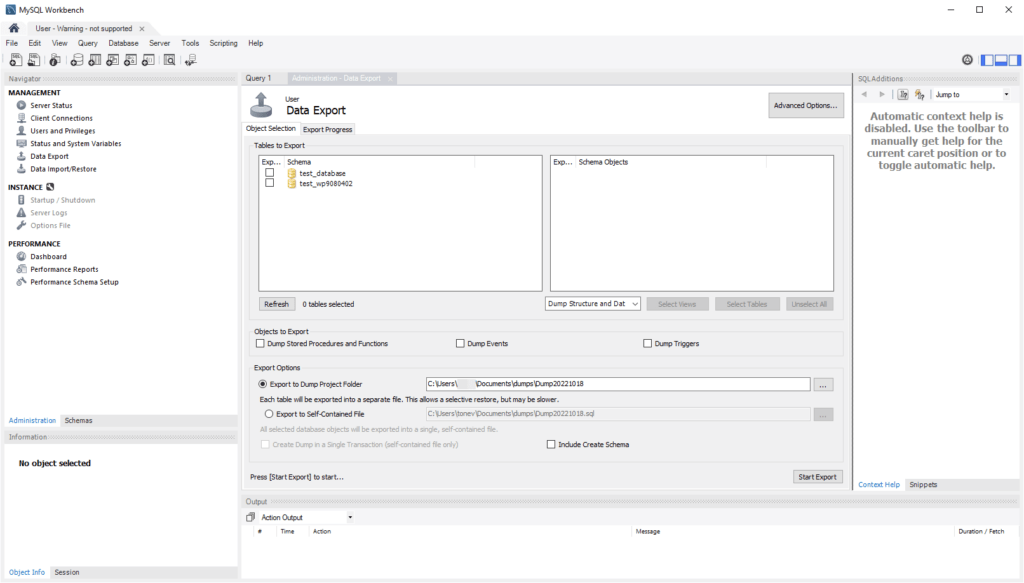
You can select the databases you want to with the using the checkboxes next to them. And when you click on a database, you’ll see all its tables, so you can exclude specific tables from the backup.
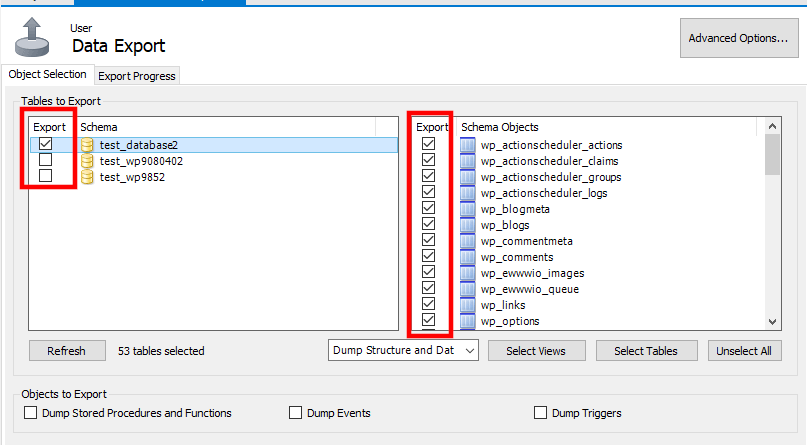
Below the lists of databases and tables, you have a drop-down menu letting you decide whether you want to back up the database, the structure, or both. When you’re ready with the configuration, click Start Export.
Database Backups in SPanel
SPanel strives to cover every aspect of modern website building and development. This includes database management, which is why every SPanel server comes with phpMyAdmin preinstalled.
However, we wanted to ensure you have even more control over your site’s data, which is why, you have quite a few tools in the MySQL Databases section inside SPanel’s User Interface.
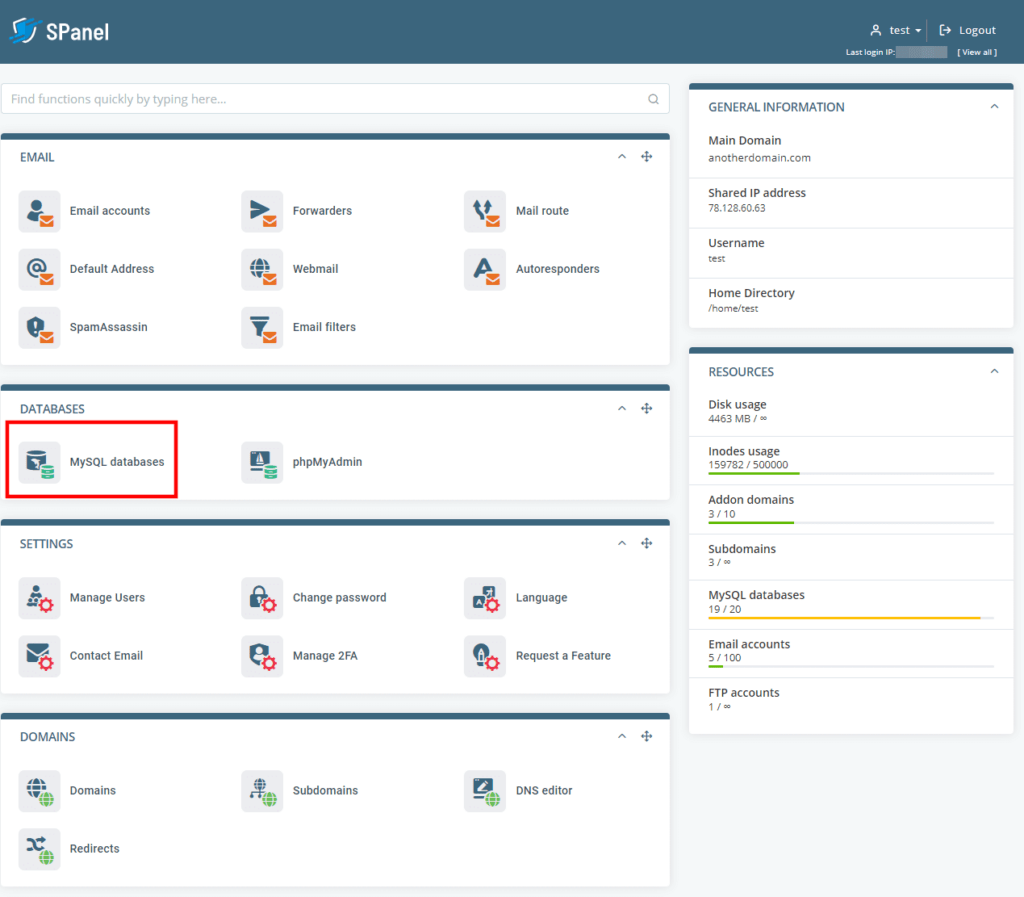
To get to the User Interface, you can either use the account’s login credentials at https://[the account’s domain name]/spanel/ or log in to your server’s Admin Area and select Manage from the Actions drop-down menu next to your account.
In the MySQL Databases section you’ll see a list of all the databases on your account. Locate the one you want to back up, open the Actions drop-down menu, and select Export & Download Database.
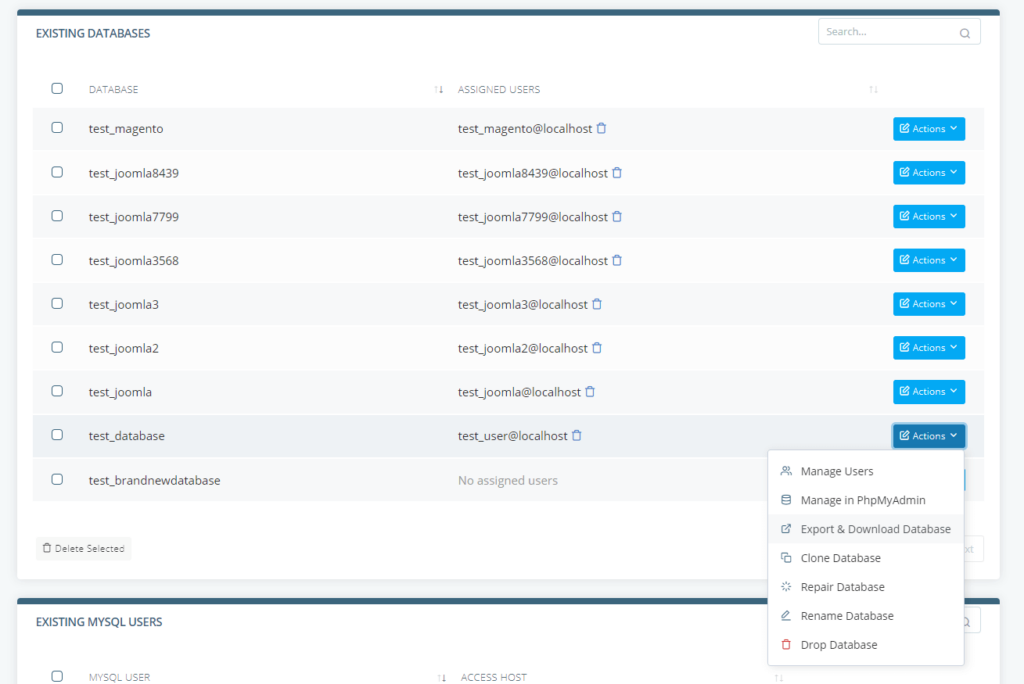
SPanel will put the data into an SQL file and save it inside the account’s home directory. Then, a popup lets you download the file for local storage and remove it from the server.
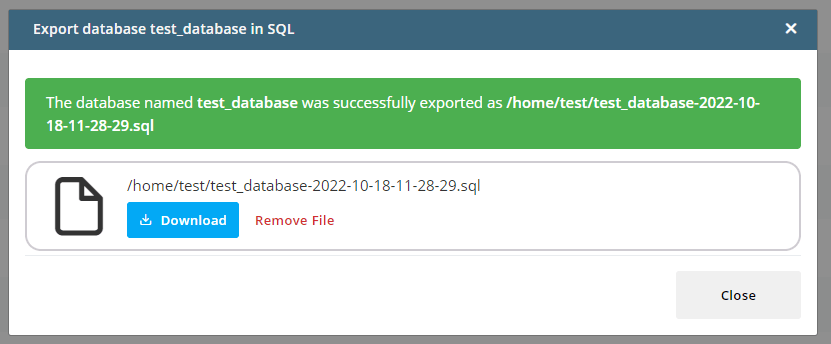
This is the quickest way of backing up a database in SPanel, and it’s probably the one you should go for when you want to play it safe before making any changes to your website. It’s not the only method, though.
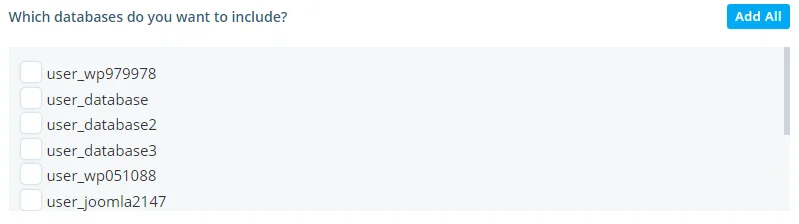
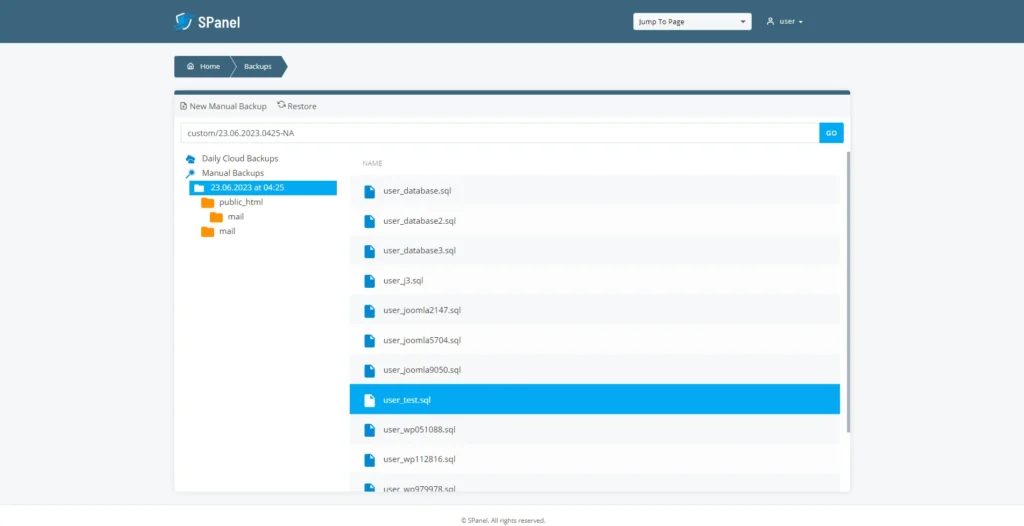
If you want more options, go back to the SPanel user interface homepage and click Backups > New Manual Backup. Under Which databases do you want to include? section, you have a list of the existing databases on your account. you can select the ones you need via the checkboxes or click Add All to back up all of them.
Further down, you have a range of options, letting you configure anything from the backup’s contents to the encryption and compression mechanisms. You can even send it to a remote location by entering the target server’s FTP credentials.
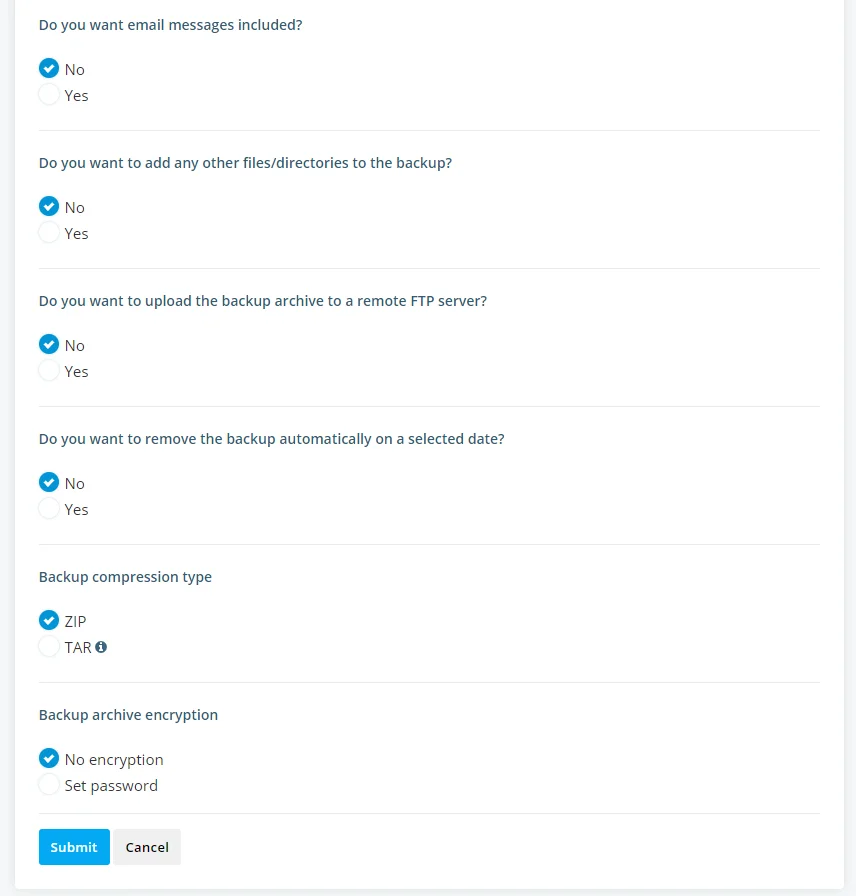
Click Submit, and a few seconds later, the archive will be available under the Backups > Manual Backups section. Your last backup is at the top of the list.
In addition to the manual backups they create themselves, every SPanel customer at ScalaHosting has daily secure copies of their files and databases, which are stored in a remote backup location.
They’re not in the same data center as your production site, so even if the system crashes and the entire server fails, you can recover the information in seconds. If your backed up databases are stored in a cloud environment, you have multiple servers working simultaneously to guarantee that the data can be restored should the need arises.
Automatically Back Up a MySQL Database in Linux
If you use a self-managed web hosting service, you are unlikely to have a tool for creating automatic database backups. You’ll have to create one yourself, which will probably sound a bit intimidating. If you’re not used to working with Linux, the prospect may sound even more daunting.
However, once you understand the logic, you’ll see that there’s nothing scary about the task.
In essence, our backup solution revolves around a simple script that uses the mysqldump utility to dump selected databases, compresses them with gzip, and, after naming them according to a predetermined convention, saves them to a backup folder on your server.
There are several options for creating the script. You can use a text editor on your local computer and then upload the script to the server. If your server comes with a control panel, you can also use the File Manager and the built-in editor to set it up. And for those who prefer to use the command line for these sorts of things, there are text editors like GNU nano and Vim.
We’re creating a shell script, so the file must have an .sh extension (e.g., dbbackup.sh). You can situate it in any directory on your server.
In addition to creating new backups, the script is also responsible for deleting old ones. All this in no more than a few dozen lines of code. Here it is:
#!/usr/bin/bash
# Date format
DATE_FORMAT=$(date +”%Y-%m-%d”)
# MySQL login credentials
MYSQL_HOST=”localhost”
MYSQL_USER=”[Your MySQL account’s username.]”
MYSQL_PASSWORD=”[Your MySQL account’s password.]”
# Backup directory
LOCAL_BACKUP_DIR=”[The directory reserved for storing backups.]”
# Retention period for the backup files
BACKUP_RETAIN_DAYS=07
# Database name(s)
DATABASES=”[The name of the database. If you want to back up multiple databases, simply separate them with spaces]”
# Creating the backup directory
mkdir -p ${LOCAL_BACKUP_DIR}
# Using mysqldump to back up the databases and gzip to compress them
for db in $DATABASES; do
mysqldump \
-h ${MYSQL_HOST} \
-u ${MYSQL_USER} \
-p${MYSQL_PASSWORD} \
–single-transaction ${db} | gzip -9 > ${LOCAL_BACKUP_DIR}/${db}-${DATE_FORMAT}.sql.gz
done
# Removing backups once their retention period runs out
DBDELDATE=`date +”${DATE_FORMAT}” –date=”${BACKUP_RETAIN_DAYS} days ago”`
if [ ! -z ${LOCAL_BACKUP_DIR} ]; then
cd ${LOCAL_BACKUP_DIR}
if [ ! -z ${DBDELDATE} ] && [ -d ${DBDELDATE} ]; then
rm -rf ${DBDELDATE}
fi
fi
## End
Before you save the script, make sure you enter the correct information in the placeholders above. The next step is to ensure your shell script is executable. If you use a File Manager or an FTP client, you’ll likely have a button or a context menu option. Through SSH, you can use the following command:
$ chmod +x [the name of the script file]
At this point, you may want to test the script and ensure it works. Because we have a shell script, we can only start it from the command line. You can use the sh command followed by the name of the file.
With that done, it’s time to add the script to a cron job and make sure it’s executed at regular intervals. If your server is equipped with a control panel, you most likely have a GUI-based tool for managing your cron jobs. It most likely looks something like this:
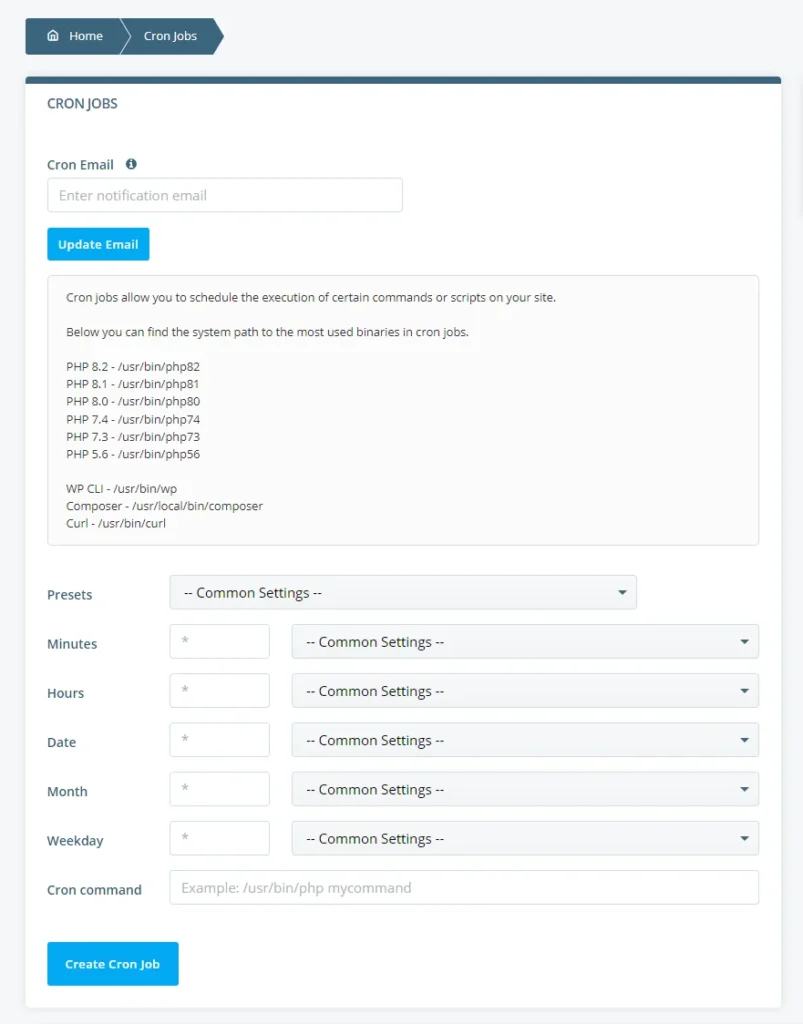
The first fields and drop-downs determine how frequently the script will be executed, and in Cron command, you need to enter sh [the backup script’s filepath].
Alternatively, you can do it all from the command-line interface. To do that, you have to edit the crontab file. Your Linux server likely has multiple text editors installed and ready to use. However, GNU nano is recognized as the easiest to use, so the command we’ll enter looks like this:
$ EDITOR=nano crontab -e
You’ll see a configuration file with all your currently active cron jobs. If there aren’t any, the file will be blank.
We want our dbbackup.sh file to be executed daily, but we don’t want it to run during the busy part of the day, when the server’s under heavy load. That’s why, we’ll schedule its execution for 2 AM. The line you need to add to your file is:
0 2 * * * sh [the filepath for your backup script]
On the next day, you can confirm whether the script has been executed correctly.
Automatically Back Up a MySQL Database to Amazon S3
The previous section showed you how to automate database backups on a self-managed Linux server. It’s a great way of getting some extra peace of mind, but the setup isn’t quite perfect.
The backups you create with it are stored on your production server. If, for whatever reason, it goes down, your backups will become inaccessible, and you won’t be able to restore them as quickly as possible and minimize downtime. Worst case scenario, you could irreversibly lose some data.
That’s why experts recommend storing your backups in a remote location.
Now, you could get yourself another server just for your backups, but this will hardly be the most cost-effective solution. If it’s situated in the same data center as the production machine, it won’t be the most secure, either.
Using one of the popular cloud storage services like an AWS S3 bucket is a much better choice. As an added bonus, configuring your server to automatically send your database backups to Amazon’s cloud is relatively straightforward.
Your first job is to make sure you have AWS CLI installed on your server.
AWS CLI is available in most package managers, so if you use Ubuntu or another Debian-based distribution, you can install it with:
$ sudo apt install awscli
For CentOS 7 and similar distros, the command is:
$ sudo dnf install awscli
And for CentOS 8 and Fedora, it’s:
$ sudo yum install awscli
Alternatively, you can download the zip archive from https://awscli.amazonaws.com/awscli-exe-linux-x86_64.zip, extract it, and install the utility manually.
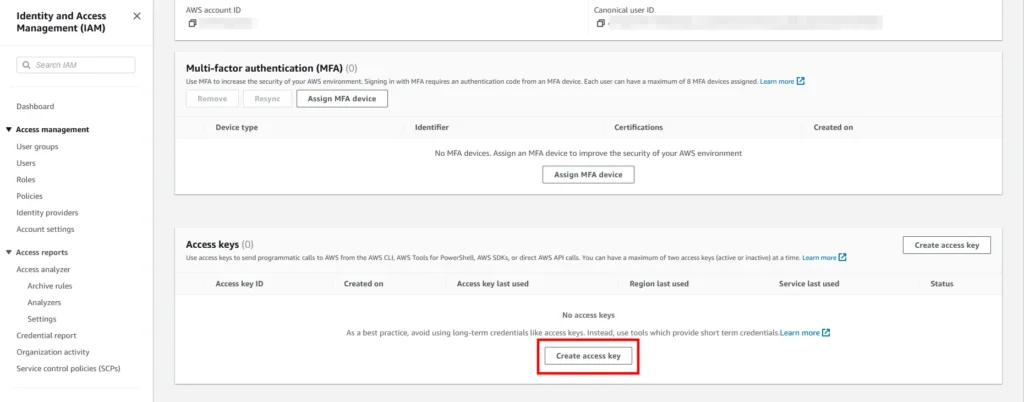
With AWS CLI installed, you need to head over to the AWS Management Console. Click on your root account email in the top-right corner, and select Security Credentials from the drop-down menu. Find the Access keys section and click Create access key.
This access key allows you to connect to your AWS account via AWS CLI. All you need to do is configure AWS CLI to use it. The command is:
$ aws configure
AWS CLI will as you for the Access Key ID, the Secret Access Key, the default region, and the output format. After you provide the information, you will be able to use AWS CLI to create a new S3 bucket and send your database backups to it.

Next, it’s time to create the bucket that will hold your backups. As you have an open shell, the easiest way to do it is with AWS CLI. The command is:
$ aws s3api create-bucket –bucket [the bucket’s name] –region [the nearest AWS location to your server]
If you prefer to use a graphical user interface, you can also set up the bucket via the AWS management console.
The code from the previous section can already take care of creating, compressing, and cleaning backups, so what we need to do now is add the functionality that sends the secure copies to your AWS S3 bucket. With it, your shell script should look like this:
#!/usr/bin/bash
# Date format
DATE_FORMAT=$(date +”%d-%m-%Y”)
# MySQL login credentials
MYSQL_HOST=”localhost”
MYSQL_USER=”[Your user’s username]”
MYSQL_PASSWORD=”[The user’s password]”
# Backup directory on the server
LOCAL_BACKUP_DIR=”[a directory on your server where you’ll store backups, e.g., home/user/backups/]”
# S3 bucket details
S3_BUCKET_NAME=”[your S3 bucket’s name]”
S3_BUCKET_PATH=”[a directory in the bucket reserved for your backups]”
# Retention period for local backup files
BACKUP_RETAIN_DAYS=7
# Database name(s)
DATABASES=”[if you want to back up multiple databases, add their names separated by spaces]”
# Creating a new directory for today’s backup
mkdir -p ${LOCAL_BACKUP_DIR}
# Setting the local and remote backup directories
LOCAL_DIR=${LOCAL_BACKUP_DIR}
REMOTE_DIR=s3://${S3_BUCKET_NAME}/${S3_BUCKET_PATH}
# Using mysqldump to back up the selected databases and gzip to archive them
for db in $DATABASES; do
mysqldump \
-h ${MYSQL_HOST} \
-u ${MYSQL_USER} \
-p${MYSQL_PASSWORD} \
–single-transaction ${db} | gzip -9 > ${LOCAL_BACKUP_DIR}/${db}-${DATE_FORMAT}.sql.gz
# Using AWS CLI to send the backup to the S3 bucket
aws s3 cp ${LOCAL_DIR}/${db}-${DATE_FORMAT}.sql.gz ${REMOTE_DIR}/${DATE_FORMAT}/
done
# Removing backups after their retention period runs out
DBDELDATE=`date +”${DATE_FORMAT}” –date=”${BACKUP_RETAIN_DAYS} days ago”`
if [ ! -z ${LOCAL_BACKUP_DIR} ]; then
cd ${LOCAL_BACKUP_DIR}
if [ ! -z ${DBDELDATE} ] && [ -d ${DBDELDATE} ]; then
rm -rf ${DBDELDATE}
fi
fi
## end
From here on, the steps are the same as the ones described in the previous section: you add execution permissions to the SH file, test it to make sure it works, and add it as a cron job.
Restoring a MySQL Database
Once again, you have several methods to choose from, and which one you’ll pick depends on many things, including your hosting platform, your technical skills, and your needs.
How to restore MySQL databases via the command line?
To restore a database from the command line, you first need to upload the backup file to your hosting account. The easiest way is via an FTP client or from your control panel’s File Manager.
You can place it in any folder you want, but to keep the commands simple, it’s probably best to save it in the home directory. After you restore the database, you can delete the backup file to free up some storage.
Next, create a new empty database and a MySQL user account with access to it. You can also use an account with SYSTEM_USER privileges.
Connect to your hosting account via SSH and use the following command:
$ mysql -u [your user account’s username] -p [the name of the database] < [the name of the backup file]
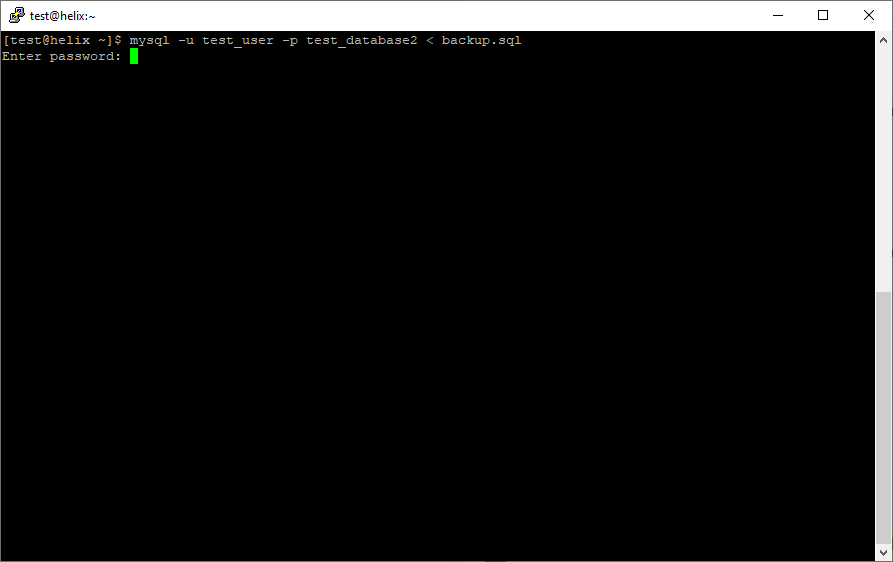
In the above example, user account test_user is restoring data into database test_database2 from the file backup.sql. There are a few optional parameters with various functions, which are explained in detail in MySQL’s documentation.
Restoring a database with phpMyAdmin
You can use phpMyAdmin’s import feature to recover data from SQL files. You need to remember that there’s often a limit on how big the backup file can be, so if you have a larger database, you’ll probably need to use one of the other methods.
To import data into an existing database, open phpMyAdmin and select the database you want to restore from the menu on the left. If the database doesn’t exist, you’ll need to create it first.
Go to the Import tab, click Choose File, and select the SQL backup from your computer.
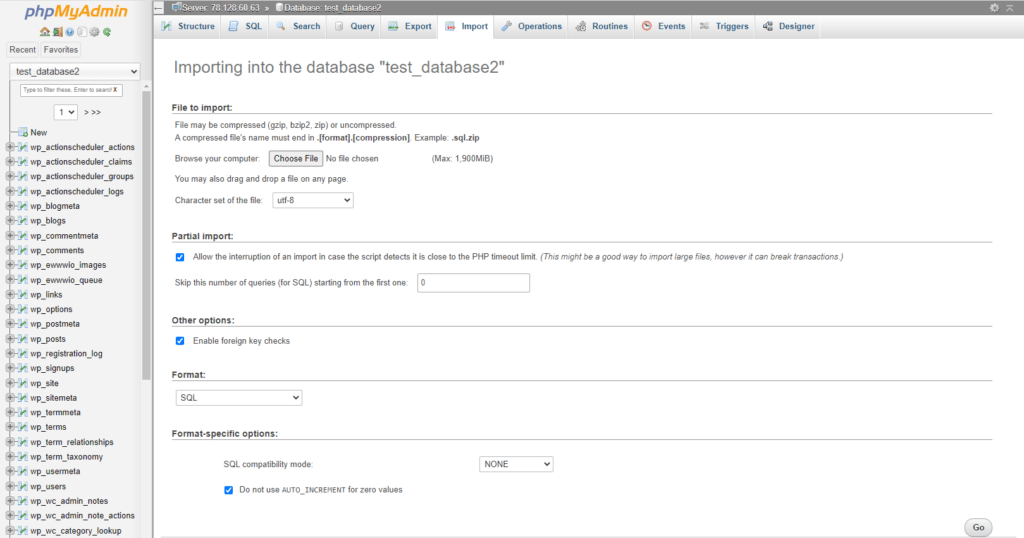
The most important option on this screen is the Format drop-down. You have to ensure it’s set to SQL. The default configuration will likely work fine for most website owners. After you click Go, phpMyAdmin will update the selected database with the information from the backup file.
Restoring a database with MySQL Workbench
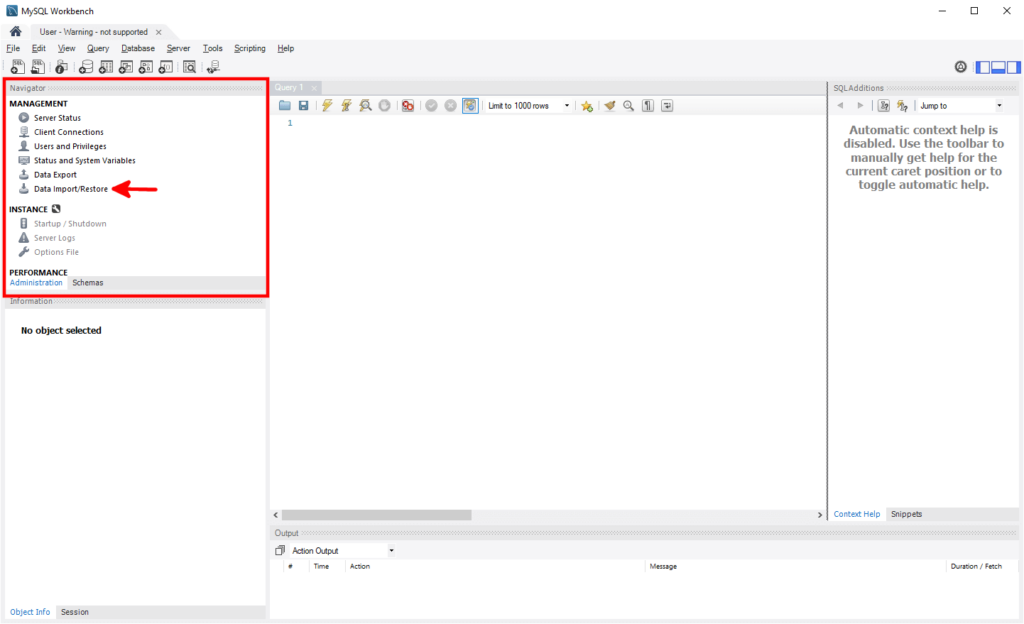
Like the other utilities we’re discussing in today’s tutorial, MySQL Workbench has both export and import capabilities. To restore a database, launch MySQL Workbench and open a connection to your server. In the Navigator section, select the Administration tab and click Data Import/Restore.
Click the Import from Self-Contained File radio button, and select the SQL backup file from your computer.
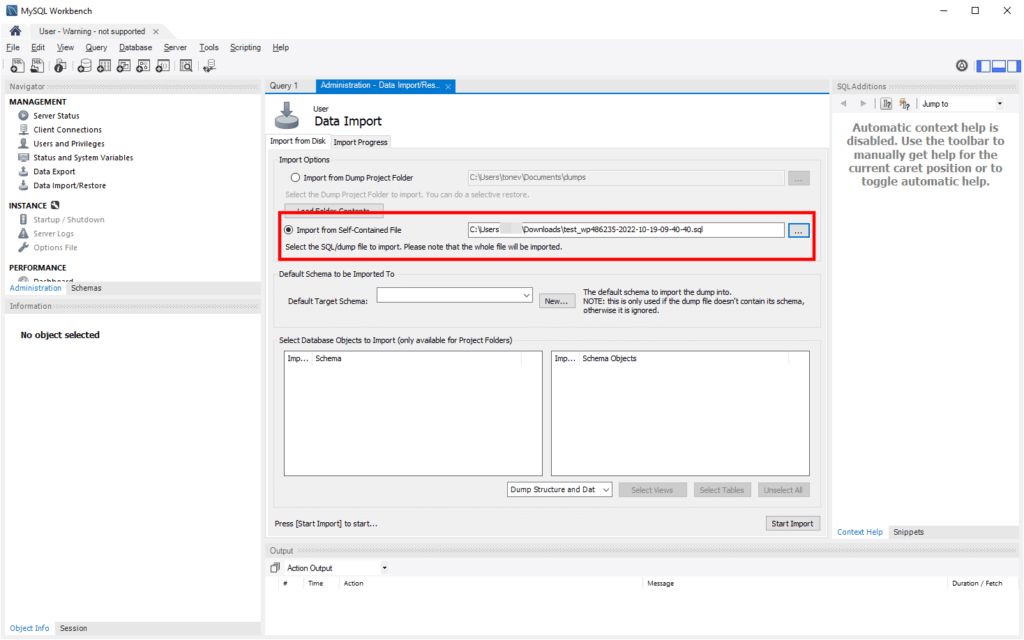
Finally, click Start Import to restore the database.
Restoring a database with SPanel
If you have an SPanel server, you can restore your database from an SQL backup file using any of the methods we’ve described so far. However, you can also retrieve the data from one of the automatic daily backups SPanel generates.
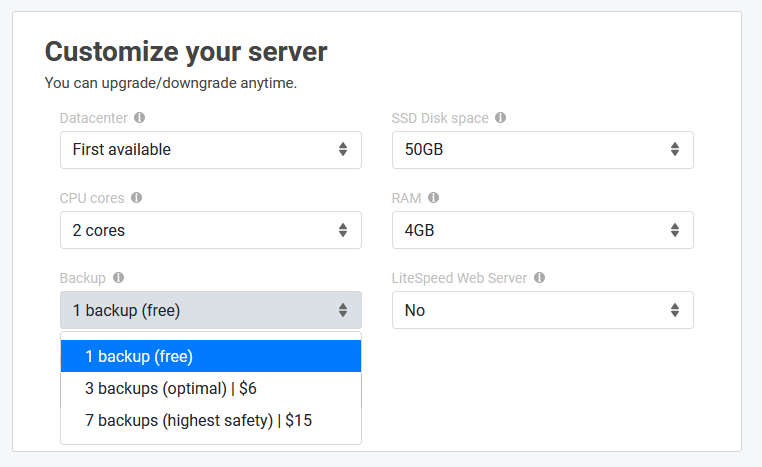
When setting up your new SPanel server at ScalaHosting, you can choose how many backups you want to have stored at any given time. By default, you have a daily backup that is kept for 24 hours. However, we also have three- and seven-day options.
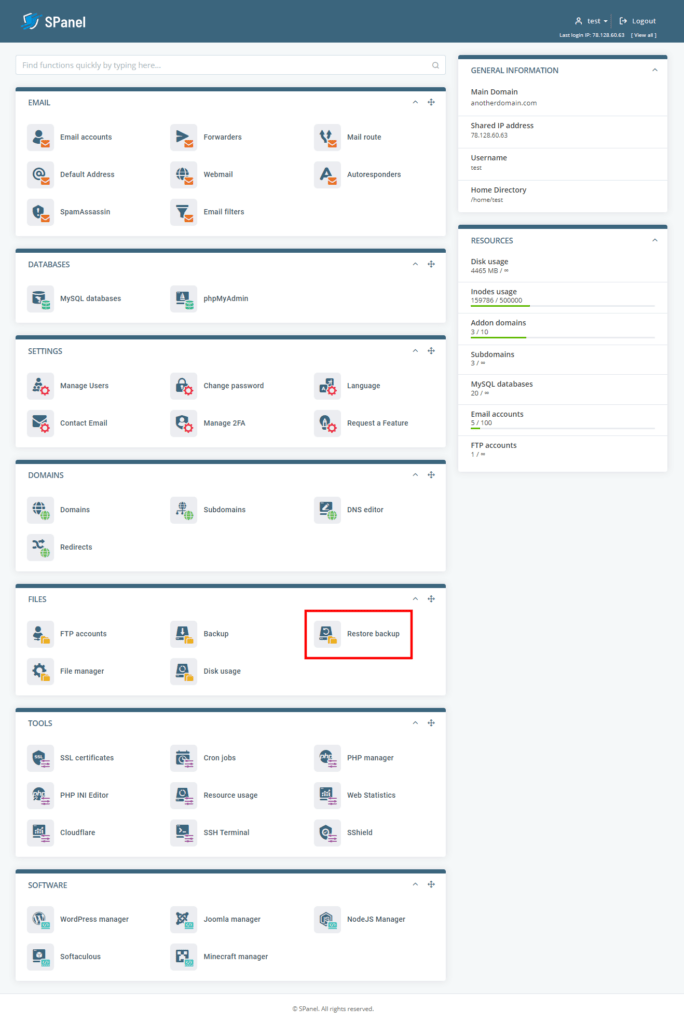
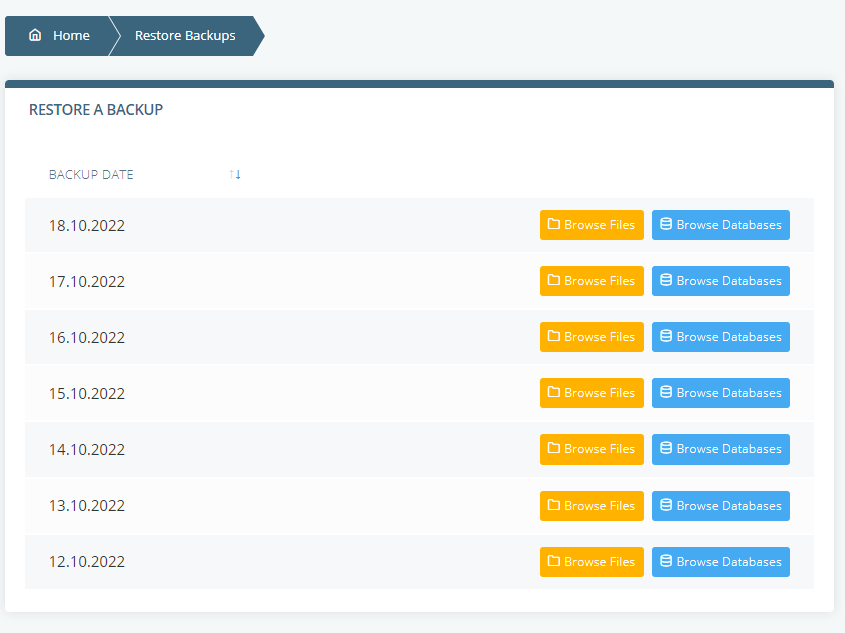
The backups are accessible via the Restore backup section on the homepage of SPanel’s User Interface.
First, choose the date of the backup you want to restore and click Browse Databases to see the dumped databases from the selected day.
Find the database you need and open the Restore drop-down menu.
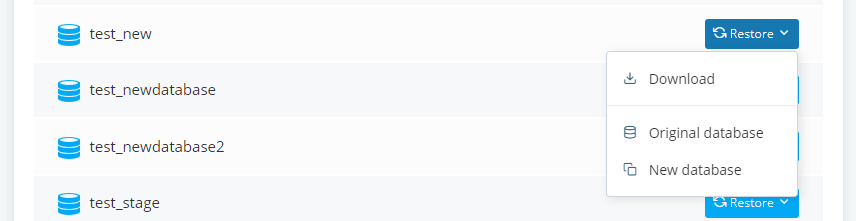
You have three options:
- Download an SQL file with a backup of the database.
- Restore the original database.
- Restore the data in another database. SPanel will open a dialog requesting the name of the database you’d like to use. You can restore the data in an existing database or enter the name of a new one. SPanel will automatically set it up for you.
Potential Problems While Trying to Backup a MySQL Database
The export process can fail and result in an error for a couple of different reasons. Luckily, troubleshooting the problem is usually pretty straightforward. Let’s have a look at some of them.
The MySQL Server isn’t working
First, you need to make sure the MySQL server is running on your hosting account. You can do it over SSH with the following command:
$ service mysql status
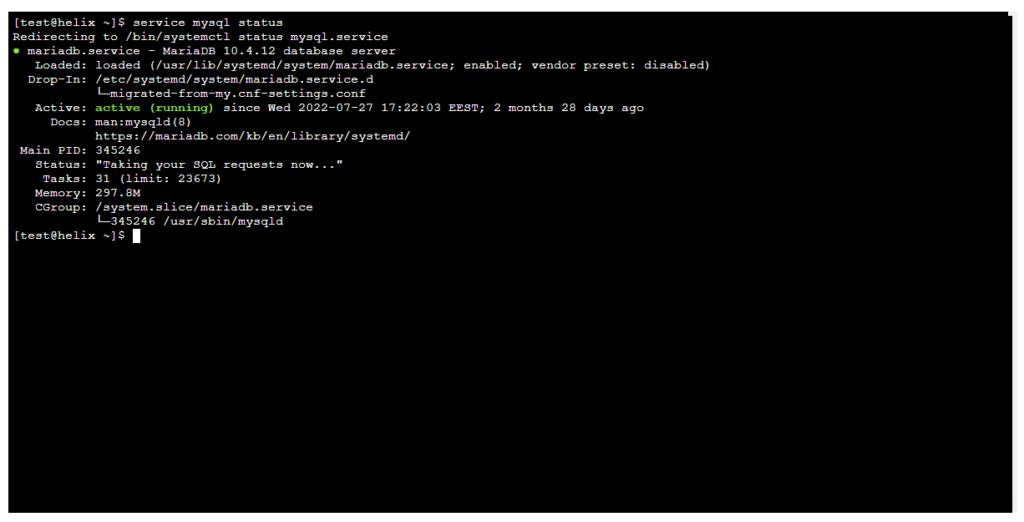
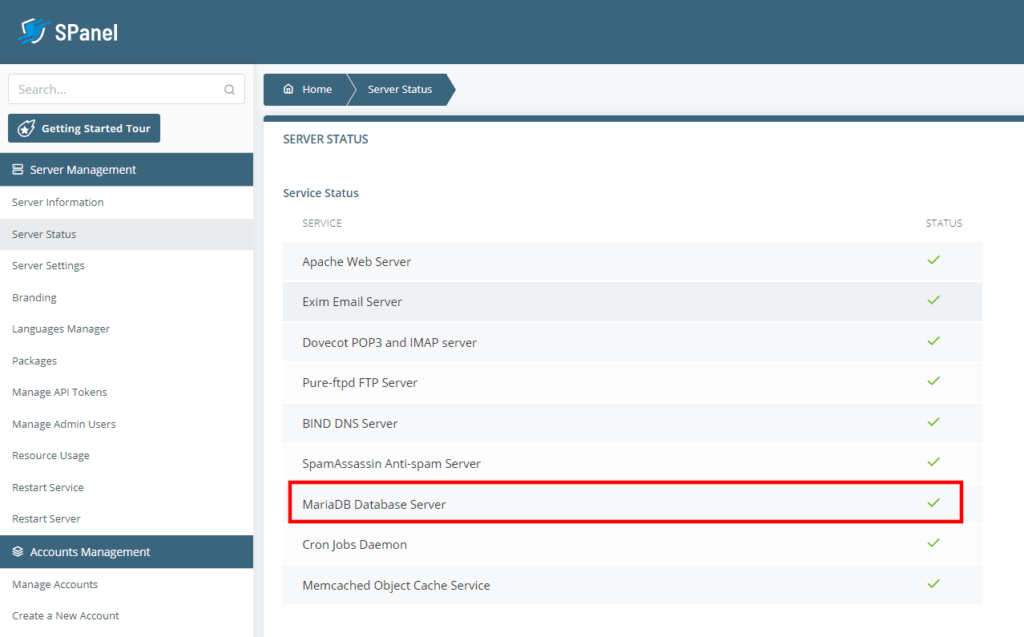
If you use SPanel, you can also check whether the MySQL installation is running from the Admin Interface. The list of essential services is available in the Server Status menu, and if the MariaDB Database Server is down for some reason, you can bring it back online from the Restart Service section.
There are corrupted tables in your database
As we mentioned already, you can use the mysqlcheck command-line utility to see whether there are any corrupted database tables. It can also fix errors in case it fails because of a broken row or table.
All you need is the -r option:
$ mysqlcheck [the database’s name] -u [the user account’s username] -p -r
Corrupted databases can also be fixed via phpMyAdmin and SPanel.
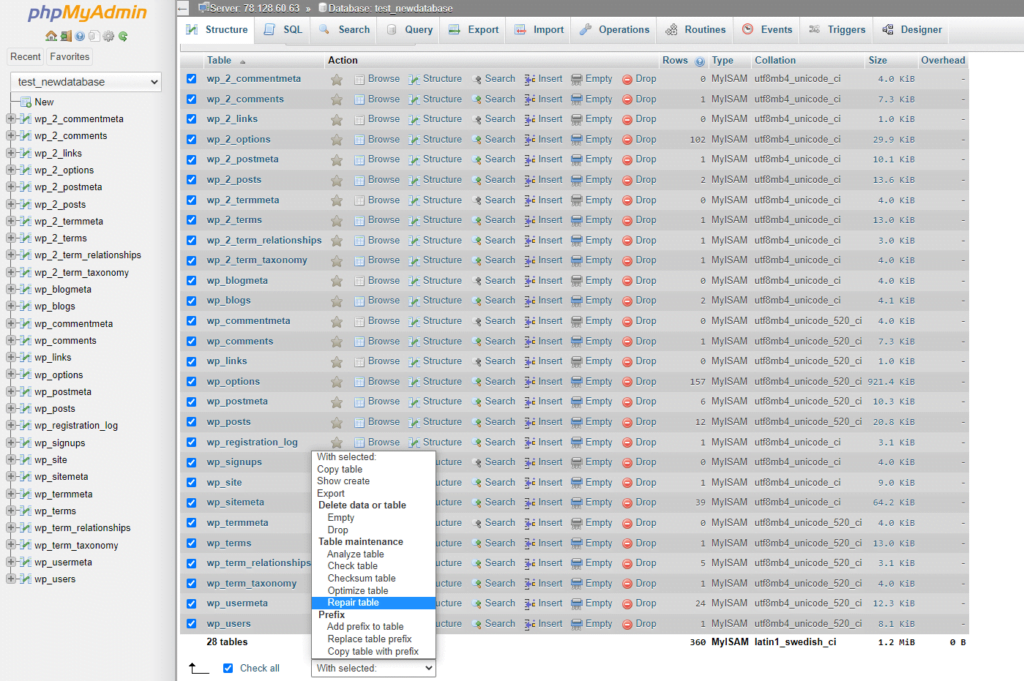
In phpMyAdmin, pick the database from the menu on the left, and you will be redirected straight to the Structure tab, where you’ll see a list of all the database’s tables. Use the checkboxes to select tables for repairs (if you’re not sure where the issues are, you can use the Check all option at the bottom) and click Repair table from the With selected menu.
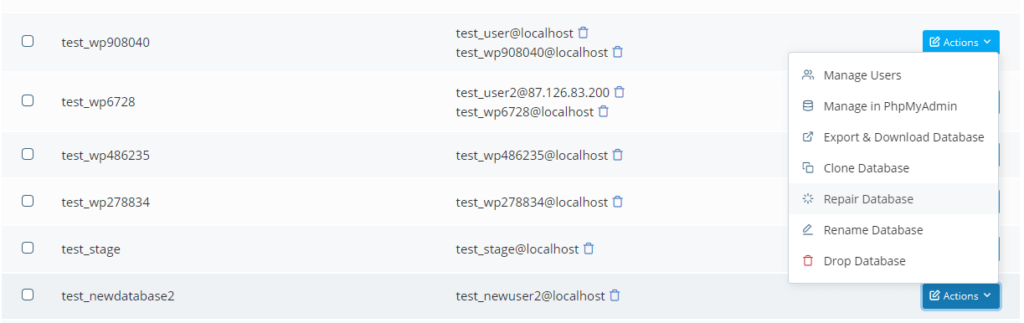
With SPanel, the process is even simpler. Log in to the account’s User Interface and go to MySQL Databases. Scroll down to the list of databases, find the one you want and open the Actions drop-down menu next to it. After you select Repair database, SPanel will locate and fix any errors that might be present in the database’s tables.
The disk is full
The backup is generated on the server, so it inevitably takes up some of your account’s storage capacity. If you exceed it while you’re creating a backup, the process will fail.
Your first option is to pipe the backup through gzip. This will reduce its size and may be enough to let you retrieve an archive with the SQL inside it. However, you should also think about deleting any unnecessary information from your account, optimizing your database, and possibly upgrading your account, so you can have more storage.