Setting Up Email Accounts and Aliases in cPanel: Step-by-Step Tutorial
Setting up a professional business email account is a crucial step for all businesses as it gives them more credibility online. Also, in today’s digital landscape, communication is key, and having a custom email address that matches your domain name, for example, info@yourdomain.com, shows professionalism and builds trust between you, your clients, and your partners.
Creating email accounts and aliases in cPanel is fairly simple, as the platform simplifies the whole process by providing a user-friendly interface for creating and managing email accounts.
From the Email section, you can create individual email accounts, each with its own username and password. In addition, you can create aliases through cPanel, which are alternative email addresses that forward messages to primary accounts.
Now that you know what you’re getting yourself into, let’s dive into the step-by-step tutorial.


Setting up Email Accounts in cPanel
This step-by-step tutorial will provide involves everything that you need to do to set up an email account in cPanel from beginning to end. Naturally, the first step is finding where to begin.
Step 1: Access Email Setup Tools in cPanel
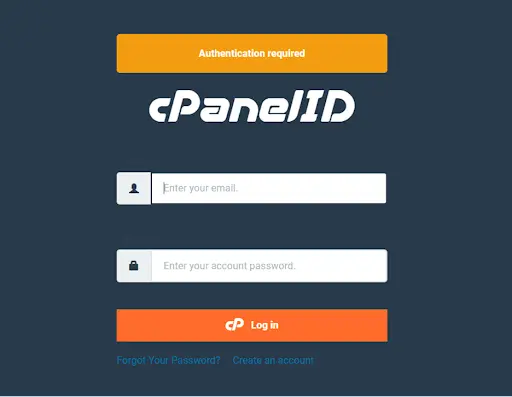
Accessing the necessary tools to begin your email setup is a straightforward process. To begin, log into your cPanel account using your credentials.
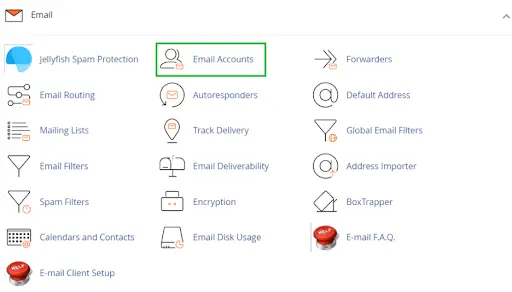
Once inside, go to the Email section, which is often represented by an envelope icon or a similar symbol. In this section, you’ll find all kinds of email management tools.
Step 2: Create a New Email Account
In the Email section of your cPanel dashboard, click on the Email Accounts option. Once you’re in, click on the blue “+Create” button.

Now, you need to choose the domain for your new email account from the drop-down menu. If you have multiple domain names, select the one you want to associate your mailbox with. Then, enter the desired email address for the domain.
After that, you need to set a password for your new email and set the mailbox quota. The quota determines how much storage your account can use. You can either set a specific quota or go for the unlimited option.
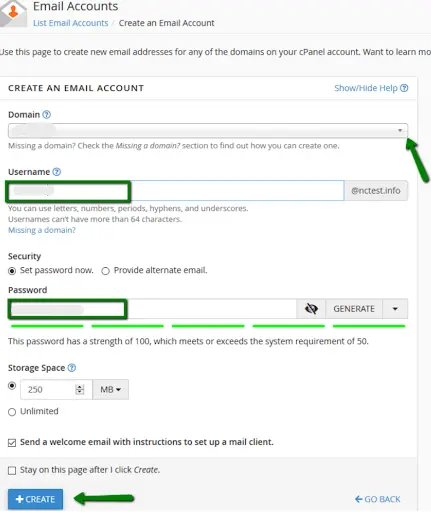
If you don’t want to create a password now, you can also provide an alternate email. This way, cPanel will send a message with a password setup link to the mailbox of your choice.
Once you’ve done everything mentioned above, click on “+Create” to finish.
Step 3: Configure Email Client Settings
An email client is an app that allows you to access, manage, and send messages from various devices. It’s a great idea to connect to platforms like Outlook or Thunderbird, as they allow you to access your emails on the go.
You can do that in two ways – via your cPanel dashboard (if cPanel is compatible with your chosen platform) or via the email client itself.
We’ll now show you how to do both.
Configuring Email Clients via cPanel
To configure email clients via cPanel, you need to do the following:
- Open the Email Accounts option in cPanel.
- Click on Connect Devices.
- Find the email client you want to use in the Application section, which you can find in the Mail Client Application Configuration Scripts.
- Review the instructions and click on Proceed. The system will download the script. Also, a prompt to open, run, or save the script file might come up. If it does – click on Run or Open to move forward.
- You might need to sign into your email by entering your password. Once you do, click Install.
- Your email client will now open, and you’ll need to log into your email account to finish the process.
Configuring Email Clients Without cPanel
In order to show you how this is done, we’ll take Outlook and Thunderbird as examples.
If Outlook is your weapon of choice – you need to do the following:
- Open Outlook on your computer.
- Go to File and then Add Account.
- Select Manual setup or additional server types and click “Next.
- Choose POP or IMAP and then “Next.
- Enter your name and full email address.
- For account type, you can choose either POP3 or IMAP (we’ll explain the difference below).
- In the Incoming Mail Server section, put down your cPanel server’s hostname, which usually has the following format: mail.yourdomain.com.
- In the Outgoing Mail Server section, put down the same server as you did in the Incoming field.
- Lastly, enter your full email address and password.
If you want to use Thunderbird as your cPanel email client, you need to do the following:
- Open Thunderbird on your computer.
- Go to Tools and then Account Settings.
- Click on Account Actions and then Add Mail Account.
- Enter your name, email address, and password. Now, Thunderbird will automatically configure your settings. However, if you want to – you can manually do that by choosing Manual Config.
- If you choose to configure your settings manually, you’ll need to choose POP3 or IMAP, enter your incoming and outgoing mail servers, and enter your full email address at the end.
Understanding POP3 and IMAP Settings
- POP3 (Post Office Protocol 3): POP3 is a protocol that downloads incoming emails from the server to your local computer, practically duplicating them. You can also set options to keep the copies for a specific period. This option is great for those who want to access their emails offline and have limited server space.
- IMAP (Internet Message Access Protocol): IMAP stores incoming messages on the email server. It allows you to view, organize, and delete emails as if you were working directly on the server. This protocol is great for users who access their accounts from multiple devices, as it syncs changes across all of them.
Step 4: Access Webmail for Email Management
cPanel offers a few webmail clients you can use, including Horde, Roundcube, and SquirrelMail. Let’s review them one by one.
- Horde: Horde is a feature-rich webmail client and offers a user-friendly interface. With it, you can view your email, sync your calendar, schedule tasks, and manage notes.
- Roundcube: Roundcube is best known for its modern and intuitive design. It offers a drag-and-drop functionality, an address book, and folder management. Roundcube is easy to use and great for email management.
- SquirrelMail: SquirrelMail is another straightforward cPanel webmail client. It’s more simplistic than Horde and Roundcube but also faster and easier to use, making it a great option for beginners.
Let’s continue how you can access your webmail to manage your online communication.
- Log into cPanel.
- Open the Email Accounts icon.
- Find the account you want to access via webmail and click the Check Email button next to the account.
- Now, you must choose the webmail client you want to use by clicking on the corresponding icon.
- Enter your full email address and password.
- And you’re done. You can now read, send, receive, and organize emails through the webmail client.
By completing these steps, you’ll do everything needed to create email accounts that match your domain name and manage them easily.
Creating Email Aliases in cPanel
To set up email aliases in cPanel, you need to complete the following steps:
- Log into your cPanel.
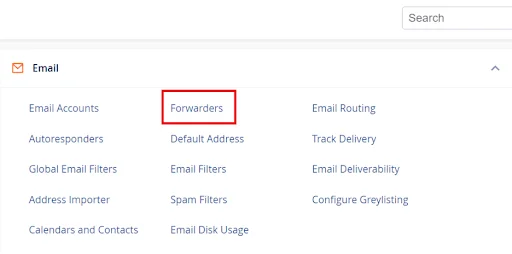
- Navigate to the Email section and click the Aliases or Forwarders icon, depending on your cPanel version.
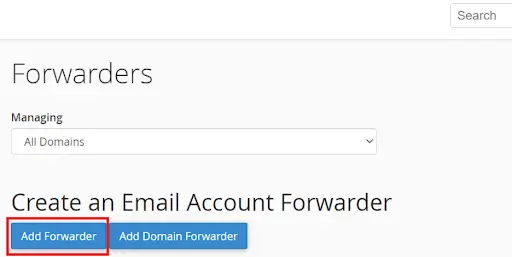
- Now, click on the Add Alias or Add Forwarder button.
- You now need to enter your desired alias in the Address to Forward field. Here, you need to enter the part of your mailbox before the “@” symbol.
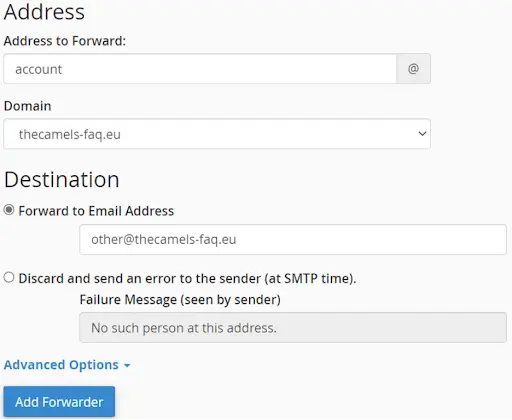
- Then, select the appropriate domain from the drop-down menu. This is the name to which the alias will belong to.
- In the Forward to Email Address field, enter the email address to which the alias messages will be forwarded. This can be an existing account on your domain or an external address.
- Finally, click on the Add Alias or Add Forwarder button to save your new cPanel email alias.
Purpose of Aliases and How They Work
Email aliases have a few important purposes, such as creating department-specific email addresses, creating temporary emails for promotions, and organizing emails for specific projects. They allow you to have separate mailboxes for different purposes without the hassle of opening a brand-new email account every time. All the messages sent to the aliases will be forwarded to a single inbox without the senders knowing the actual recipient.
By assigning aliases to specific email accounts, you can also ensure that the emails sent to those aliases are redirected to the correct destination.
For instance, you can create an alias for customer support. You can then assign it to get redirected to your support team’s primary email address. That way, all the messages sent to the alias will be forwarded to your support department without the sender noticing any change.
Configuring Autoresponders for Aliases
Configuring autoresponders for email aliases in cPanel allows you to set up automatic replies for incoming messages sent to specific addresses. To create autoresponders, you need to do the following:
- Log into your cPanel account.
- Go to the Email Section and click on Autoresponders.
- Now, click on the Add Autoresponder button.
- In the Email drop-down menu, select the domain you want to create the autoresponder. After that, choose the character set for the autoresponder message.
- Enter the name you want to appear in the sender’s field of the autoresponder into the From field.
- Now, enter the subject line of your message in the subject field.
- You can also create a formatted HTML message for your autoresponder or use plain text.
- In the Body section, enter the message you want to send as an automatic reply.
- Lastly, click on the Create/Modify button to save your configuration.
Now, whenever you receive emails on the account you created an autoresponder for, an automatic reply will be sent without you having to do anything. You can use this feature to set up things like sending an “Out of office” message whenever you’re away, sending information about your business hours, and many more.
Managing and Modifying Email Accounts
Now that you know how to set up both email accounts and aliases in cPanel, let’s move on to how you can easily manage it all.
cPanel lets you do all kinds of tasks and setups to your emails.
The infinity icon ∞ shows you that your account has an unlimited mailbox quota. Each account has a different quota, displayed right next to its domain name. Some hosting providers will allow you to buy quota increases.
Other things you can do within the Email Accounts interface include the following:
- View Restrictions – This allows you to see your email account’s restrictions if they exist.
- Delete – Here, you can delete all mail and data from your email accounts.
- Check Email – This allows you to check your messages through the webmail interface.
- Manage – You can edit an existing email account’s quota, password, and other properties.
- Connect Devices – Here, you can configure mail client access for your cPanel emails.
Changing Email Passwords and Updating Quota Limits
In this section, we’ll show you how to change the passwords on your email accounts and update your quota limits, as those two are some of the most frequent tasks that people do in cPanel.
How to Change Your Email Password in cPanel
- Log into cPanel.
- Open the Email Accounts sub-menu.
- You will see a list of your existing accounts. Find the one you want to modify and click the Manage or Change Password option next to it.
- Now, click on the Password & Security tab. Enter the new password and confirm it.
- Hit the Save Password button.
How to Update Quota Limits in cPanel
- Log into WHM.
- Go through the following path: Home – Account Functions – Modify an Account.
- Choose an account to edit.
- Select the Modify button next to it.
- In the Resource Limits heading, enter the new maximum quota in the Disk Space Quota (MB) field.
- Click on the Save button to complete the operation.
Securing Email Accounts and Aliases
Once you’ve set everything up in cPanel, it is crucial that you secure your setup. That way, you’ll be able to protect the sensitive information shared in your emails and maintain the integrity of your communication channels.
Here are some of the most powerful measures you can take to secure your email accounts and aliases in cPanel:
- Strong Passwords: Make sure that you and everyone who uses the email accounts in cPanel have strong passwords in place comprising a mix of letters, numbers, and special characters. Also, everyone must regularly update passwords and avoid using words/phrases that are easy to guess.
- Two-Factor Authentication (2FA): Always use 2FA whenever you can. Two-factor authentication provides an additional layer of security, as it requires users to provide a secondary form of verification. This can be your computer, smartphone, or any other device that you have physical access to.
- Phishing Awareness: Phishing attacks are a common and easy way for hackers to get into your email accounts and steal your data. This is done by sending out suspicious links and attachments. Make sure you educate yourself and your employees on such attacks, and don’t open links or download attachments sent from unknown sources.
- Email Security Protocols: Use email security protocols like SPF (Sender Policy Framework), DKIM (DomainKeys Identified Mail), and DMARC (Domain-based Message Authentication, Reporting, and Conformance) to further protect your accounts.
- Antivirus and Anti-Malware Protection: Protect your email accounts and aliases by installing reliable antivirus and antimalware software that can scan attachments and links for potential threats. These programs can detect and mitigate malicious software and give you an additional layer of protection.
Best Practices After Setting up Email Accounts and Aliases in cPanel
| Set up Spam Filters | Spam filters will help you reduce unwanted emails from getting to your inbox. There are many powerful filters you can choose from, so pick one that has a proven track record of working and that allows you to create your own filtering rules. |
| Troubleshooting | Troubleshooting emails involves many variables. To do it correctly, you’d need to check many things, including incorrect information (typos), anti-spam rules, firewalls, blacklists, server settings, network issues, etc. |
| Regular Maintenance and Updates | It is imperative that you keep your email settings up to date as new patches or upgrades come with features that improve your security and fix certain issues. |
There are many other cPanel alternatives that also allow you to set up professional email accounts and aliases. These can be standalone control panels or web hosts that offer their own panels, like, for example, ScalaHosting.
ScalaHosting does not only provide cPanel on all its web hosting plans, but also comes with its own cloud management platform called SPanel. In addition to a custom control panel, you also get lightning-fast email servers, robust security measures like SShield, and advanced spam protection.
Conclusion
All in all, setting up email accounts and aliases in cPanel is pretty straightforward. Since cPanel comes with a beginner-friendly interface, anyone can find their way through its dashboard and complete the tasks they need.
You can use cPanel as your web hosting and server dashboard via ScalaHosting’s Business Email Hosting. You can also make use of our proprietary control panel, SPanel, as it’s one of the best and most beginner-friendly control panels on the market.
FAQ
Q: How often should email passwords be changed?
A: Cybersecurity experts recommend that you change your password every three months. However, if a situation arises where you need to change it immediately, don’t hesitate to do so, even if three months haven’t passed.
Q: How do you learn the domain name of a cPanel mail server?
A: To find the domain name of your cPanel server, log into your account and click the Server Information link in the General Information section. There, you will see your server name and additional information about your server.
Q: How do you troubleshoot common email setup issues?
A: First things first, you need to identify the issue. Then, check if your connection is stable. If it is – confirm that all your settings are accurate. Additionally, check your login credentials to ensure that your username and password are correct.

