Updates can be a real pain. Installing them isn’t always as straightforward as you might think, and they can sometimes introduce bugs or features that are tricky to get used to. On the other hand, we all know how important updates are.
It’s a good thing, then, that WordPress has a comprehensive auto-update system that can take care of pretty much everything for you.
Today, we’ll see how to take advantage of it.
Why Are WordPress Updates So Important?
As annoying as they can be, updates serve three very important purposes:
They introduce new features and functionality
WordPress hasn’t stopped evolving ever since it appeared back in 2003. Every new version brings new features and tools that not only enable you to build better websites but also simplify many day-to-day maintenance tasks. We’ll see a perfect example of this in a second.
They patch security vulnerabilities
Being the most popular content management system in the world, it’s no surprise that WordPress falls into the hackers’ sights quite often. Every day, security experts comb through the hundreds of thousands of lines of code to find security vulnerabilities and patch them before they can be exploited. The only way for these patches to arrive on your website is via updates.
They improve stability and performance
Technology evolves all the time, and WordPress needs to keep up with it. The global open-source community working on WordPress puts the newest advancements to use to ensure maximum performance and stability for the CMS. You need to install the latest version of the WP core and all the plugins and themes to take advantage of the extra speed and reliability.
How Does The WordPress Auto Update System Work?
The built-in auto-update functionality is a classic example of how WordPress evolves to make your life easier.
Up until 2013, all WordPress updates were manual. You needed to check for new versions yourself, and installing them wasn’t always a particularly painless exercise. WordPress 3.7 introduced a new auto-update functionality that ensured all security and performance patches could be installed in the background.
However, it was only responsible for minor security and maintenance updates. If you wanted the major new releases, you still had to install them yourself.
This left quite a lot of websites running old versions of the CMS. Many people assume that manually updating WordPress is a complicated task, and they prefer to keep their old installations with their limited functionality, less than ideal performance, and in some cases, poor security.
In 2020, the WordPress development team decided to help them out. First, they introduced automatic updates for themes and plugins with WordPress 5.5. A few months later, with 5.6, they brought along an update feature that automatically installs all major versions of the CMS.
Things You Need To Bear In Mind Before Enabling Auto Updates
Every update, even a minor one, overwrites files and makes changes to some of the critical components of your WordPress website. That’s why it’s essential to have a working backup and be sure that you can restore the site to its functional state in case something goes wrong.
You can set up automatic backups using a plugin. However, if the damage is significant enough and you lose access to the WP dashboard, you might struggle to restore the site back to its original state.
Backups created by your web hosting control panel are much more reliable and easier to restore. If your hosting plan includes automatic backups, make sure you’re familiar with the restore procedure before making any changes to your website.
How to Manage Core Auto Updates
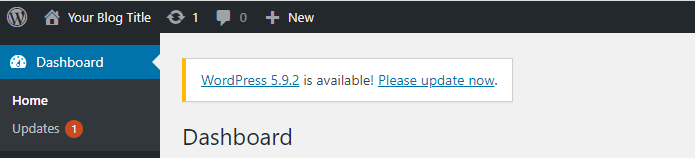
WordPress does a really good job of notifying you whenever there’s a new version available. There’s a notification at the top of the WP dashboard’s homepage, and the number of components that can be updated is displayed next to the Dashboard > Updates menu on the left.
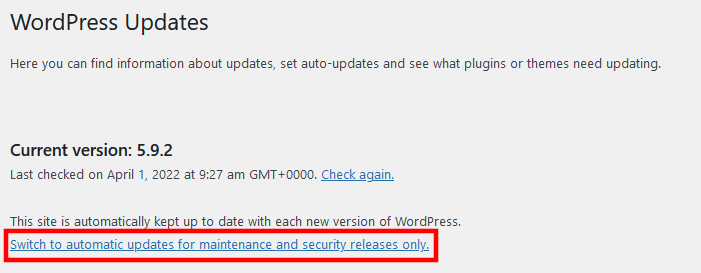
If you go to the Updates page, the first thing you’ll see is the current WordPress version, along with information on when WP last checked for an update. Further down, you have a message telling you how your core auto updates are configured at the moment.
By default, WordPress installs all new versions of the core automatically. However, if you want, you can switch to auto updates for maintenance and security releases only by clicking the link highlighted in the screenshot below.
WordPress relies on a cron job that automatically checks for new versions and security releases. Whenever an update is available, WordPress briefly puts the site in maintenance mode and installs the update with no intervention from your side.
How To Manage Plugin and Theme Updates
Unlike the core, themes and plugins aren’t updated automatically by default. There’s a good reason for this.
Because they come from vendors and developers of all shapes and sizes, you can’t really be sure how well supported a theme or a plugin is. As a result, users tend to be less enthusiastic about installing the latest version of their add-ons.
All that being said, updating themes and plugins is just as important as updating WordPress itself. That’s why WP can now auto-update them.
Auto updates for themes
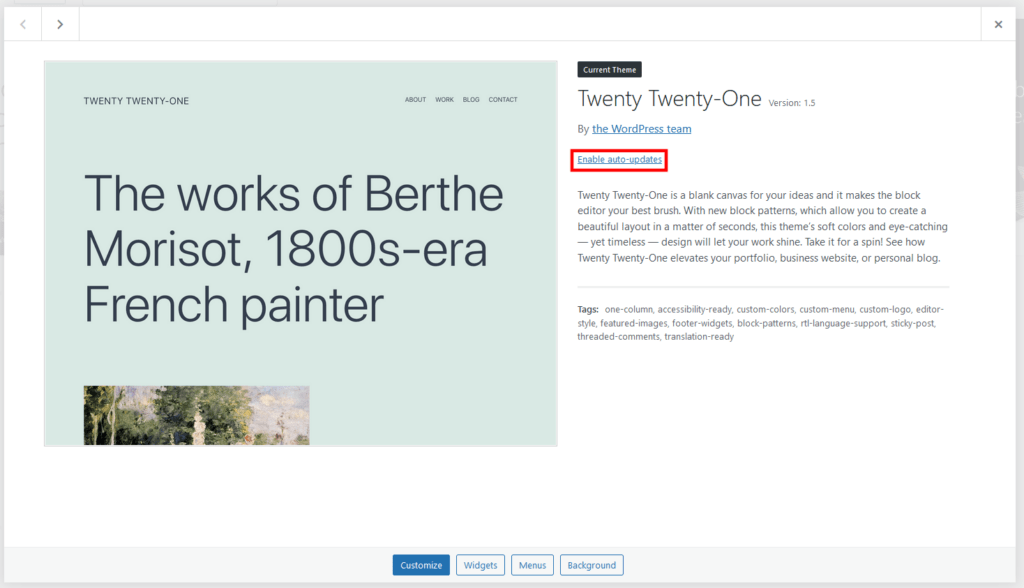
To turn on automatic updates for a theme, go to Appearance > Themes inside your WordPress dashboard. Hover the mouse cursor over your preferred design and click Theme Details.

On the popup that appears, you’ll see an Enable auto-updates link. Click on it to have WordPress take care of the theme’s updates.
Auto-updates for plugins
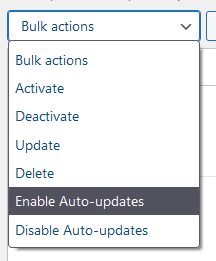
Plugin auto updates are even easier to manage. Simply go to the Plugins page inside the WP dashboard, where you’ll see a list of all installed plugins. If you want to turn on automatic updates for individual plugins, you can use the Enable auto updates links.

If you want to enable auto updates for multiple plugins at once, you can select them and use the Bulk Actions drop-down menu.
How to Disable Auto Updates in WordPress
Turning off auto updates is not recommended, but you can do it if you need to. With the themes and plugins, you simply need to undo the steps from the previous section. Go to the respective pages and click Disable Auto Updates next to your selected add-ons.
Turning off all automatic updates for the core is a bit more complicated as it requires modifying the wp-config.php file. This is WP’s primary configuration file, so it might not be a bad idea to back it up before you make changes to it, just in case.
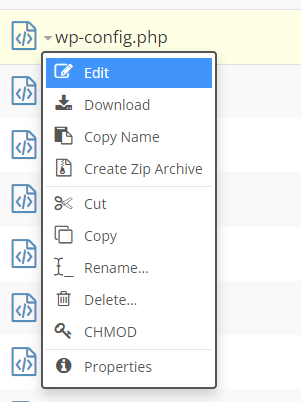
The wp-config.php file is located in your website’s document root (if you’re hosting it under your main domain, it’s the public_html folder), and you can access it via both SSH and FTP. However, because you can edit files on the spot with your web hosting control panel’s File Manager, this will probably be the method most people go for.
You can open a file in the File Manager by right-clicking on it and selecting Edit.
To disable WP’s auto updates, add the following code snippet above the line that says “/* That’s all, stop editing! Happy publishing. */“:
define( ‘WP_AUTO_UPDATE_CORE’, false );

Don’t forget to save the file to apply the changes.
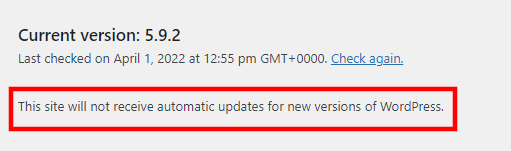
If you go back to the Updates page in your WordPress dashboard, you’ll see a message telling you that you will not receive automatic core updates.
WordPress Auto Updates and SPanel
If you use SPanel, ScalaHosting’s proprietary management platform for Virtual Private Servers, you have one more way of controlling automatic updates for the WordPress core, themes, and plugins.
The WordPress Manager available in SPanel’s User Interface can install the world’s most popular CMS in seconds. You can also reset admin passwords for existing installations and set up staging environments for your WP projects.
Next to every active WP installation, you have a couple of toggle switches. The first one controls Security Lock – a unique feature that locks down your files and improves your site’s security.
The second one is for the WordPress auto updates.
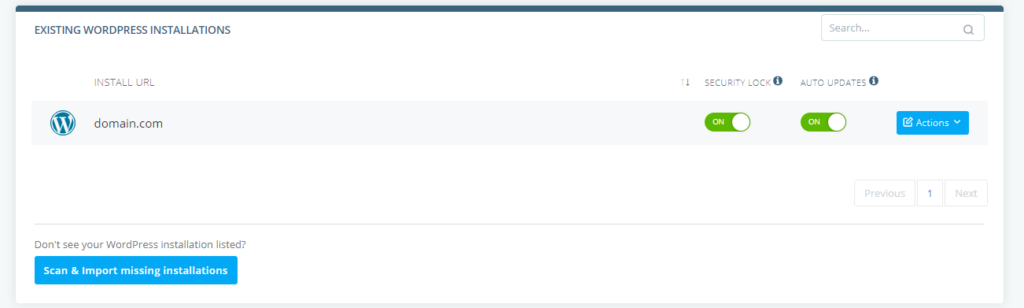
If it’s enabled, SPanel will automatically update both the WordPress core and the themes and plugins installed on it.