Performance Optimization Techniques for Drupal Hosting
Although it was originally conceived as a messaging board application, Drupal grew into a fully-fledged Content Management System (CMS) pretty quickly. It was first rolled out to the public back in 2001, meaning it’s older than WordPress and Joomla – two of its main open-source competitors.
Despite its age, it’s still renowned among website owners for its flexibility, versatility, and powerful features. However, these virtues will only help if your Drupal site is optimized for the best possible performance and user experience.
This may sound daunting at first, especially if you have no previous experience with the CMS, but once you get going, you’ll see that it’s really not that complicated.
However, before we get to it, let’s remind ourselves why website speed is so important.
How Does Speed Affect Your Drupal Website
When people talk about the benefits of performance optimization, they often mention SEO.
And rightly so. Google does take into account the loading speeds when it ranks pages and has even been finding new ways of objectively measuring performance. If your metrics are off, you’ll struggle to reach the top of the search engine results pages, which could be a massive obstacle to your progress.
And why is Google so hard on slow websites?
Every time you land on a website that is taking more than a few seconds to load, you are more likely to click away in frustration. Google doesn’t want to serve pages that frustrate users, so the slower ones are relegated to the bottom, and the more responsive ones are usually the ones you see first.
It’s not just about the search engine rankings, though.
Getting a user to land on your site is a battle, but the real challenge is to ensure that once they’re on it – they stay and interact with it as much as possible. That’s how your project grows and gains proper traction with users.
For that, you need both relevant content and an excellent user experience, with the latter depending heavily on quick loading speeds.
All in all, your website performance directly affects the project’s chances of success.
Another thing mentioned less often is how speeding up your site can help keep your budget on a leash. Streamlining various aspects of its operation will make it more resource-efficient.
You will be able to reliably serve a larger volume of traffic without the need for an expensive server. The money you save on hardware can be used to build a larger following or improve the website’s look and feel.
Now that we’ve gone through the benefits of improving your site performance, let’s see how to actually achieve that goal.
Using a Content Delivery Network (CDN)

A content delivery network can speed up your website and ensure it displays consistent performance regardless of the visitor’s location. After the service is activated, the CDN will automatically take static sections of your web pages and put copies of them on a network of servers distributed worldwide.
How might that help? Let’s have a closer look.
CDN providers nowadays offer hundreds of locations in all corners of the globe, but for the sake of explaining how the service works, we’ll give you a simplified example.
Your primary hosting server is in the Netherlands, Europe. Your CDN provider takes the static assets from it (like images, CSS stylesheets, JS files, etc.) and puts copies on one server in Chicago, another one in Singapore, a third one in Australia.
When a visitor from Canada visits the page, the static files are delivered from the North American server. When the request comes from Tokyo – it’s processed by the server in the Asia Pacific region.
This setup has multiple benefits:
- Faster loading speeds
Your primary hosting server still delivers the dynamic content, but the really heavy stuff like media, CSS, and JS files don’t need to travel across the ocean, so they pop up on the user’s screen much more quickly.
- Consistent performance regardless of the user’s location
When you’re picking a hosting solution, you often get to choose where to deploy your server. In doing so, you’re effectively prioritizing some visitors over others. That’s because, with a single server processing all requests, users near the machine will get better performance than the rest. This is inevitable in light of the differences in the distance data needs to cover before it reaches its destination.
If a CDN handles most of the content, this problem is practically eliminated, and you can build a project with a truly global outreach.
- Better scalability and flexibility
There are many CDN providers out there, and the competition is stiff. This drives innovation and ensures companies implement new techniques to keep their customers happy.
For example, most of them have built clever load balancing mechanisms into their networks to handle traffic spikes and surges that would otherwise severely slow down or even knock over your site.
- Improved security
The vast network of servers allows CDN providers to absorb a lot of traffic. Many use the setup to implement filters and DDoS protection features that make your site more resilient to attacks.
Furthermore, your CDN can implement secure encryption of all the data traveling between your site and its visitors, and it can act as a web application firewall.
To enable a CDN on your Drupal website, you must first pick a provider and sign up for an account. There’s an overwhelming array of options on the market, all with different features and prices. If you’re just getting started, however, it may be a good idea to first consider the free tier offered by Cloudflare.
On the one hand, it allows you to take advantage of the infrastructure of one of the biggest CDN providers in the world at no cost, and on the other, implementing it is pretty straightforward, especially if you’re using a server management solution like ScalaHosting’s SPanel.
Setting Up a Solid Caching Strategy
Caching is the first port of call for pretty much every website owner who’s after a better performance. The way it improves loading speeds is reasonably straightforward.
When a user lands on your site, this sends requests for all the elements on the page to be loaded. The server processes them, and once the data is delivered, the page appears on the visitor’s screen.
If caching is enabled, however, copies of some of the responses are stored in a temporary storage facility called a cache. Then, when a second user lands on your page, the server delivers the cached data straight from the cache instead of processing the same requests again.
On the one hand, this lowers the number of requests the server needs to process, and on the other, it allows for data to be served to the user more quickly.
So, how does Drupal do it?
Your Drupal website layout consists of the main content retrieved from the database as well as blocks containing things like the logo and branding, widgets, menus, etc. Out of the box, Drupal can cache both entire pages and individual blocks.
To make sure the functionality is enabled, log in to the Drupal admin panel at https://yourdomain.com/admin and navigate to Configuration > Performance.
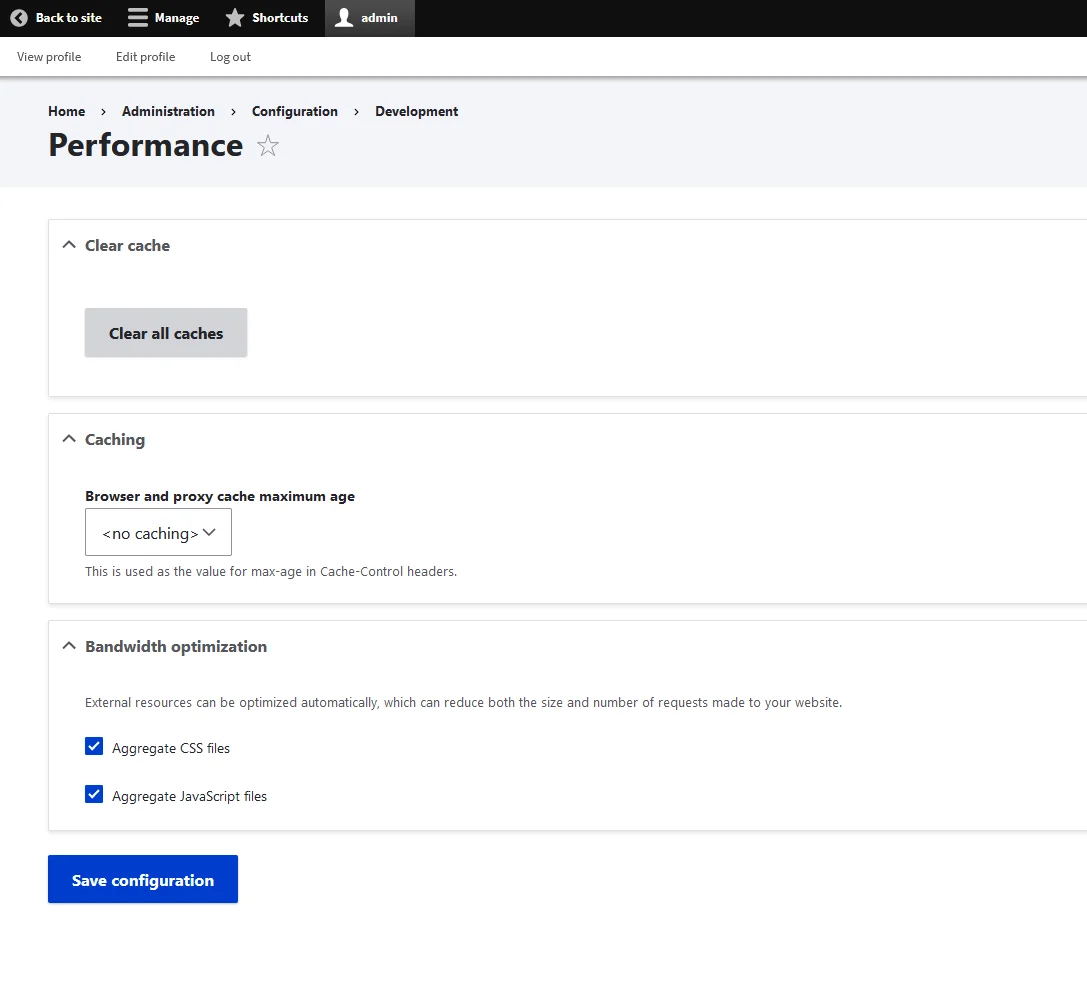
All you need to do to enable caching is to select how frequently the cache will be refreshed from the Browser and proxy cache maximum age drop-down menu. For most websites, it’s recommended to keep it between 6 and 12 hours, though your choice should obviously depend on things like the nature of your site’s content and how often it’s updated. Once you pick the right interval, click Save Configuration and hit Clear all caches.
Drupal won’t indiscriminately cache everything, though. Modern websites often server data that must be retrieved from the database on the spot and is unique for every single user and session. This kind of information may be available in both the main content and inside individual blocks (e.g., a “Who’s online” widget). Caching this isn’t always advisable, which is why blocks and pages can automatically be flagged as non-cacheable.
For many website owners, Drupal’s built-in caching should be enough. However, the options don’t stop there.
A range of modules can implement different solutions and take advantage of technologies like Opcode caching and Memcache. Making the most of them will require a bit more research, but the performance benefits are visible, especially on larger websites.
Image Optimization & Lazy Loading
Over 60% of the data your server sends to the visitor’s browser consists of images. They are crucial for the user experience and can make your site and brand more easily recognizable, but their effects on the performance shouldn’t be underestimated.
The larger the files are – the slower the website. There are dozens of techniques for optimizing images even before you upload them to the server. Editing apps like Photoshop, for example,have specialized settings that compress the file without compromising quality. However, there are more efficient ways to optimize images.
You need a solution that automates the process, and when it comes to Drupal, many agree that the best option is the ImageAPI Optimize module. The more experienced among you may prefer to install it through a command line tool like Composer, but the majority will probably opt to use the convenience of the graphic user interface.
To get it from the official repository, you need to click on the latest release and then choose the archive format you want to use. After downloading it to your computer, log in to your Drupal admin panel and click Extend > Add new module. Select the file for upload and click Continue. After the module is installed, you’ll have to activate it.
It should be noted that the ImageAPI Optimize module isn’t designed to work by itself. As the official documentation explains, the add-on has spawned the birth of eight sub-projects, each offering a different processor for optimizing images.
There are subtle differences in functionality, and if you have the time, you can test a few of them to see which ones work best for you.
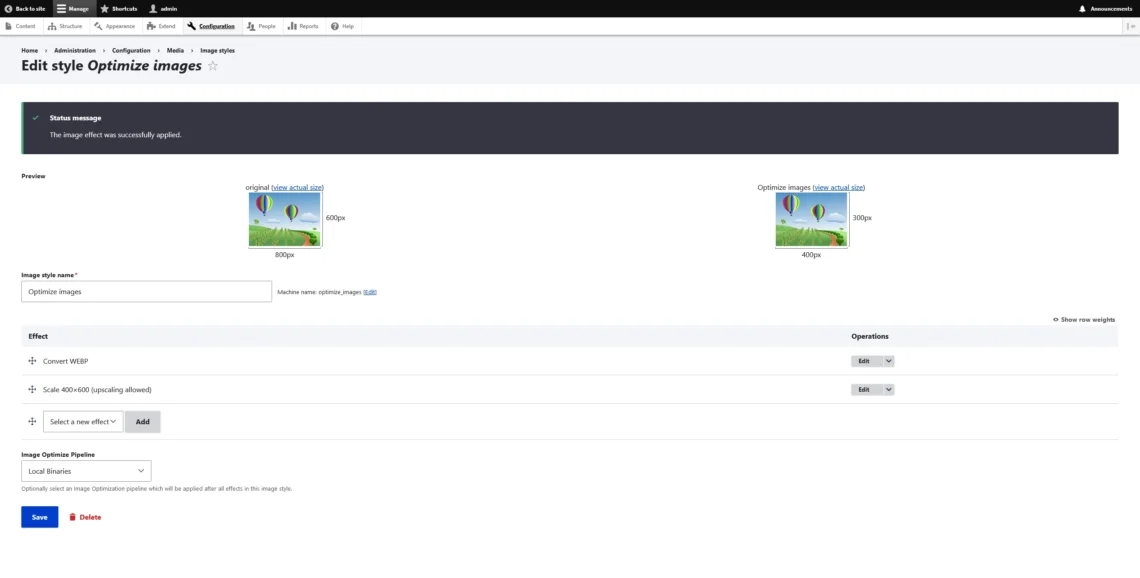
When the main ImageAPI Optimize module and the processor modules have been installed and activated, you need to go to Configuration and click Image Optimize pipelines. Create a new pipeline and make sure it uses the processor enabled by your processor module.
Next, it’s time to activate the various image optimization techniques your modules offer. Return to Administration > Configuration and click Image Styles under the Media section. When you add a new style and pick a name, you’ll decide what effect it’ll have on your multimedia.
A single style can have multiple effects. You can have photos resized, cropped, converted into a more lightweight format, etc. Remember to choose the correct option from the Image Optimize Pipeline drop-down.
While on the subject of images, you may want to research the options for enabling lazy loading. This is a performance-enhancing technique that delays the image loading until the user scrolls down to them. Instead of showing the entire homepage, the server will only process the elements visible on the screen. This means fewer requests to respond to and better performance.
Several modules can enable lazy loading on your Drupal website, and one of the best ones is called Lazy-load. It uses the lazysizes library, and after you install it – you’ll see a new menu in the Configuration section inside the admin panel. Go to Text Formats and Editors, click the Configure button next to the format you want to edit (e.g., Full HTML), and select the Lazy-load Images and iframes checkbox.

Minification & Compression
If you’ve ever seen programming code (be it an HTML document, a PHP file, or a CSS stylesheet), you will have noticed there are a lot of comments (indicated by a # sign) and plenty of empty lines and white spaces.
These are important for making the code more readable for human beings, which, in turn, is essential when a programmer needs to add a new feature or find a bug. However, the comments and white spaces are not necessary for rendering the web page on the user’s screen.
At the same time, they take up a lot of space. So much so that they could be slowing your site down. The process of deleting comments and blank spaces from the code to speed it up is called minification. And yes, there are tools that do it automatically for you.
Before you start, however, there’s one thing to consider – you still want your code to be easy to read, so before you deploy your minification tools, it’s a good idea to create a backup of all your site files. That way, you’ll have a copy of the output code that can be altered more easily.
Next, you can choose one of the modules that cleans your code from all elements that are not strictly related to what users see on the screen.
Among the most popular add-ons are Minify Source HTML and Minify JS.
The former works out of the box and hooks up just before the end of the rendering process to minimize the size of your site’s HTML files. With the latter, you have a specialized menu where you can see all your JS files and pick the ones you’d like to minify. It’s available in the Drupal admin panel under Configuration > Development > MinifyJS Settings.
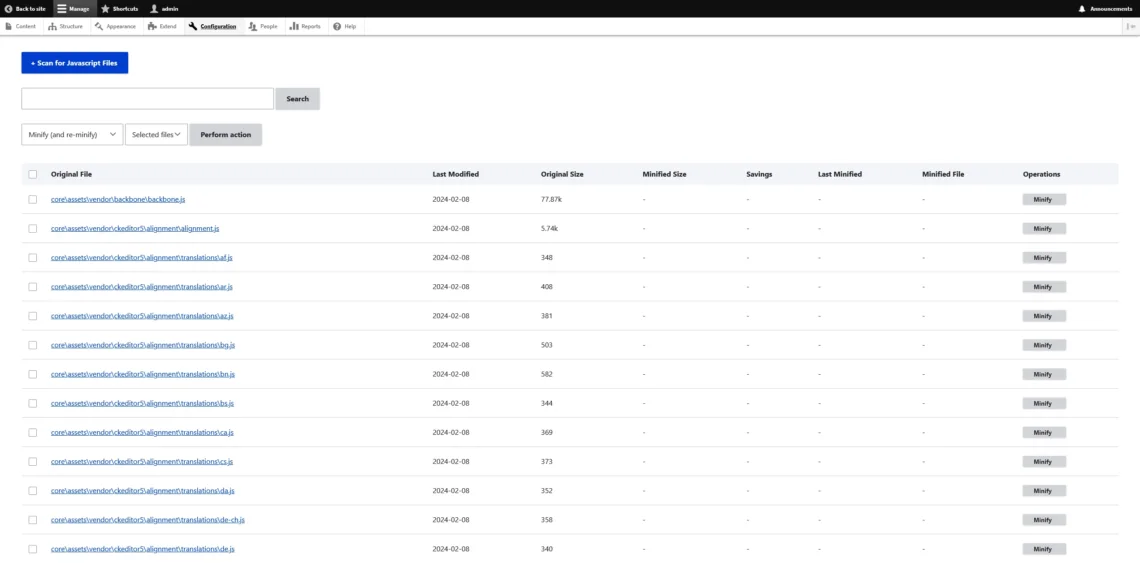
The module also gives you detailed stats on exactly how small your files are. The effects on the performance should be visible pretty much immediately.
Auditing and Maintaining Modules
Drupal wouldn’t be what it is today if it wasn’t for its modular architecture. A global community of developers, fans, and companies work on making the platform as versatile as possible. They do it via modules, and unlike other CMS solutions, like WordPress, where you have an all-in-one approach to many problems, with Drupal, the add-ons are often designed for more specific tasks.
The optimization tricks we have covered so far illustrate the point perfectly.
With WordPress, you can find a performance-enhancing plugin that optimizes the images and minifies all the code in one go. With Drupal, you need one module (with one or more complimentary processors) for image optimizing, a second for minifying HTML files, and a third one just for JavaScript.
This may not seem like the most efficient solution, but it has one significant advantage – you can only implement the functionality you need without any extra features taking up valuable resources.
The challenge is to stay on top of them at all times. To do that, you should review your list of modules regularly, check what each of them does, and remove the ones you don’t currently need. The more modules you have – the more complex the website and the heavier the load on the server, so any old add-ons that no longer serve a purpose are best deleted.
While at it, you’ll also want to check for updates to the Drupal core and any of your modules. In addition to adding the newest security patches, software vendors also use updates to introduce stability and performance enhancements that can help you improve your site’s loading speeds.
Choosing the Right Web Hosting Account
One thing we want to emphasize – none of the performance-enhancing techniques will be efficient enough if the hosting service isn’t powerful enough to support your site.
When starting your first-ever project, the temptation is to always go for a cheap shared service and minimize your investments. Shared hosting does indeed give you an affordable platform where you can install Drupal and build a relatively simple website.
However, don’t forget that if you start getting more serious traffic, the limitations presented by your shared plan will soon become apparent. In a shared environment, the resources of a single server are utilized by all the users situated on it. This means your website performance always depends on other people’s actions, and the loading speeds are rarely consistent.
That’s why, as your website grows, it makes more sense to move to a Virtual Private Server (VPS). It will give you an entire virtual machine reserved for you only. The system resources it comes with are always available to you, so you know exactly what sort of performance you can expect at any given time.
The hosting environment is fully isolated from other projects, and you have a dedicated IP, which helps with security and email deliverability. Best of all, a virtual server can be easily scaled and adapted to your dynamic requirements.
Unlike a physical server, you can change the hardware resources of a virtual machine with a couple of clicks.
So, when you exceed the limits of your VPS’s current configuration, you upgrade it and instantly get the power you need – no need to copy files or swap storage devices. The upgrades are seamless, and although virtual servers aren’t as cheap as shared plans, the price is much more approachable with the evolution of this technology.
In fact, the Entry Cloud package at Scala offers easy access to a fully-featured VPS for just $14.95/mo – a rate that many other providers offer for shared accounts.
ScalaHosting and Drupal

Drupal is considered the third most popular standalone, self-hosted content management system, right after WordPress and Joomla.For over two decades, the app has helped thousands of projects lift off the ground.
We’ve seen a fair few of them thrive on our infrastructure, as well, so it’s fair to say we know what a Drupal website needs to run well. Hence, we have a few plans dedicated specifically to Drupal projects.
We used our decades of experience to configure our Cloud VPS solutions to provide the best environment for developing and launching a Drupal website.
Because our virtual servers are deployed on a state-of-the-art cloud infrastructure, you can have a fully custom VPS configuration that suits your specific requirements. You just use sliders on the order page to pick the number of CPU cores, the operating memory, and the storage you need.
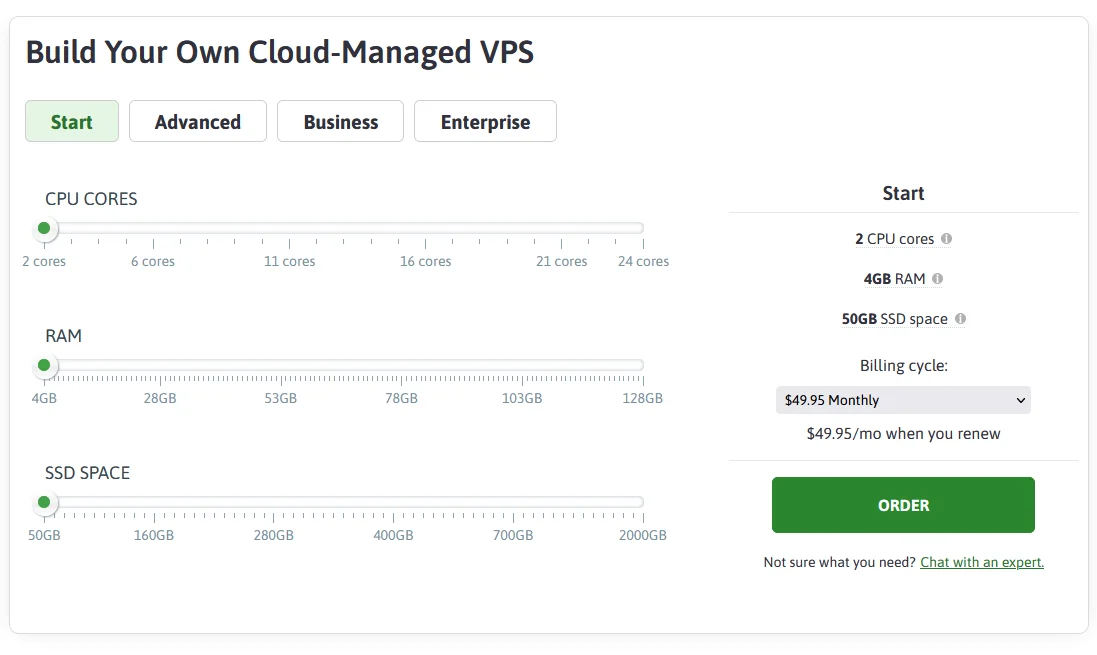
When you need to upgrade, you can again choose the exact amount of CPU, RAM, and/or disk space and keep it in tune with your website consumption. You won’t pay for the power you don’t use, making the solution much more cost-effective.
Ease of use is also built-in. Both shared and VPS-based Drupal hosting packages give you a control panel equipped with the Softaculous auto-installer. You can set up Drupal in a few clicks and start work on your site immediately.


If you opt for a VPS package, you can also use SPanel – an all-in-one server management platform built by ScalaHosting and designed to give you complete control over everything your virtual machine hosts. You can create and manage email and FTP accounts, upload, edit, and delete files, create databases, edit domains and their configuration, and many more through an intuitive graphical interface.
If you want to learn more, don’t hesitate to contact our sales specialists.
Conclusion
Drupal is renowned for its versatility, reliability, and scalability. It’s one of the biggest and most long-lasting projects in the open-source world, and it will likely continue to be the driving force behind many high-profile websites.
You can also grow a successful project on top of it, but this will only happen if you manage to reap all the performance the CMS has to offer. While you won’t need much advanced technical skills, there is still a learning curve that will require you to be thorough and meticulous.
FAQ
Q: Why is my Drupal website slow?
A: A slow Drupal website is either not optimized or running on an unsuitable hosting platform. First, check the server load, review your site’s resource consumption, and upgrade your plan if necessary. Then, you can optimize elements like images, CSS and JavaScript files, and modules until you reach Drupal’s full potential.
Q: Is Drupal good for my website?
A: Drupal is renowned for its versatility. It’s suitable for a wide range of different projects, and even if a particular functionality isn’t available out of the box, there are tens of thousands of modules and over two thousand themes that can give you the look and features you’re after.
Q: How do I test the performance of my Drupal website?
A: Many online speed testing tools thoroughly analyze every single aspect of your website performance and deliver detailed reports on what may need fixing. Sometimes, you even get specific tips on how to improve the performance of the different components powering your site.

