Although WordPress is relatively easy to get used to, the websites you create with it are actually pretty complex. A lot can go wrong if you need to move a project from one host to another, so it’s definitely not something you should approach lightly.
That said, there’s nothing complicated about the steps themselves. You just need to be meticulous when you’re following them.
Let’s dig in.
What Are The Methods for Transferring a WordPress Website From One Host to Another?
Usually, when you need to do something WordPress-related, you have two options: use a plugin or do it manually. Transferring a website from one server to another is no exception.
You can choose from a range of add-ons that can create a backup of your website’s files and databases and let you quickly restore them through the WP admin dashboard. You can also do it yourself, relying on the tools provided in your web hosting control panel.
Choosing between the two methods may seem straightforward at first. You might think that an automated tool is unlikely to get things wrong, especially if you have a more complex website with a lot of data.
The thing is, this is not always the case.
The plugin is the more straightforward option. It’s quicker, and all you need to do is click some buttons in the WordPress dashboard. However, add-ons are not infallible. Some of them are developed as a side project by enthusiasts, so they are not exactly immune from bugs.
Even the professionally-designed ones can sometimes clash with other plugins and fail to restore the data exactly as it should be, especially if your site is a bit more complex.
By contrast, the steps for manually migrating a website are the same, regardless of traffic, the number of plugins, posts, pages, comments, etc. It is a more hands-on approach, and you do need to be more careful. However, it doesn’t require any particularly advanced technical skills, so even the less experienced among you may want to try it, especially if they have the time to ensure everything works.
In the end, it’s up to you to pick your approach. However, before you start, you need to tackle the most important task – finding the right hosting service.
Finding a New Hosting Plan for Your WordPress Site
People tend to switch hosting providers for three main reasons:
- They’re unhappy with the price.
- They don’t get the quality of the service or the support they get.
- They need more hardware power.
All three factors are equally important, and not one of them should be underestimated. The budget is an obvious consideration, but it shouldn’t be the only one. There will be little point in saving money if your site is too slow and has a poor user experience. You also need to get your money’s worth of features and tools that make the tricky task of managing a website just a little bit easier.
Often, the dilemma is between a shared hosting plan and a VPS.
Shared plans‘ main appeal is the price. For just a few dollars a month, you get a hosting service suitable for a small blog or business website. It’s far from the most powerful solution, but shared hosting is often the perfect launchpad for a WordPress project.
However, if you’ve outgrown your shared account and have serious plans for your website, you’re better off going for a virtual private server. The virtualization layer, guaranteed resources, and dedicated IP improve security and make for much more consistent performance.
Go for a managed server, and you won’t need to worry about the complexity of setting everything up, either. You get a control panel with all the tools you need at your fingertips.
A virtual server will always be more expensive than a shared plan, especially if you want an easy-to-use managed solution. However, thanks to its scalability, you can get a cost-effective service that will support your site in the long run. As long as you have the budget, it’s a superior service.
Whatever type of hosting you choose, you need a provider you can rely on. 24/7 support has become the norm nowadays, but unfortunately, the same can’t be said about quick response times.
At ScalaHosting, we want to avoid that, which is why our support experts are available 24/7/365 via Live Chat, where they can answer technical questions and solve minor issues on the spot. For more complex inquiries, you can use our ticketing system. With a response time of just 15 minutes, you can be sure that your requests will be handled quickly and efficiently.
Speaking of the ticketing system, if you’re moving to ScalaHosting from another provider, you can ask our technicians to migrate your website for you. All you need to do is submit a ticket with the login credentials to the old server and schedule the transfer at the most convenient time for you. Our experts will move your files and databases and ensure everything works before notifying you. Best of all, they’ll do it completely free of charge.
If you insist on doing it yourself, you can simply read on.
Manually Transferring a WordPress Website
A couple of things need to be migrated to have your website hosted on a new server – the site’s files and the data in the MySQL database. Let’s take a look at the exact steps:
1. Download your site’s files from your old host
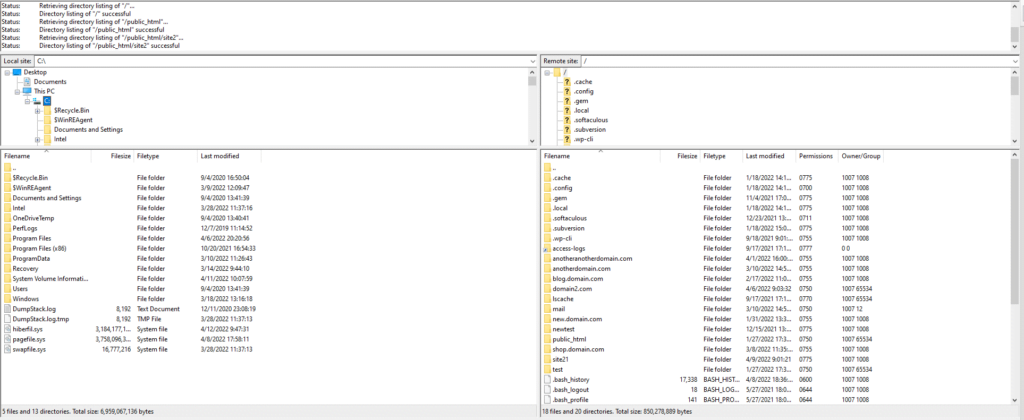
Usually, you have two ways of accessing your site’s files. You can do it with the File Manager embedded into your web hosting control panel, or you can use an FTP client. Because you need to download all your site’s files in bulk, your best bet would be to use an FTP application.
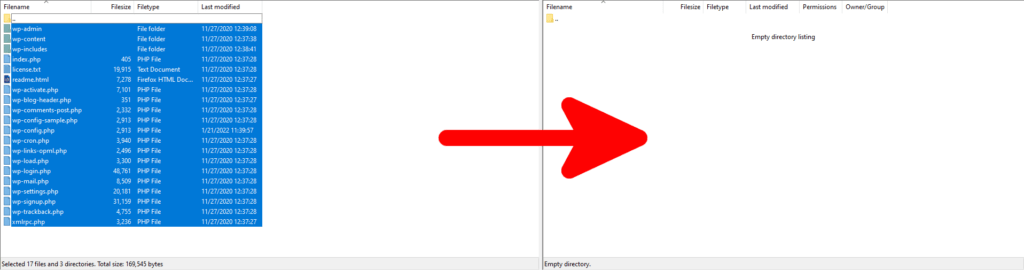
The interface differs from client to client, but after logging into your account, you usually see a window divided into two panes. On the left-hand side, you have your local files and folders, and on the right, you see the contents of your hosting account.
Use the right-hand side pane to access your site’s document root folder. If you host it under your account’s primary domain, it should be the public_html directory.
Press ctrl+a (or cmd+a for Mac users) to select all files and folders, right-click on them, and choose Download.
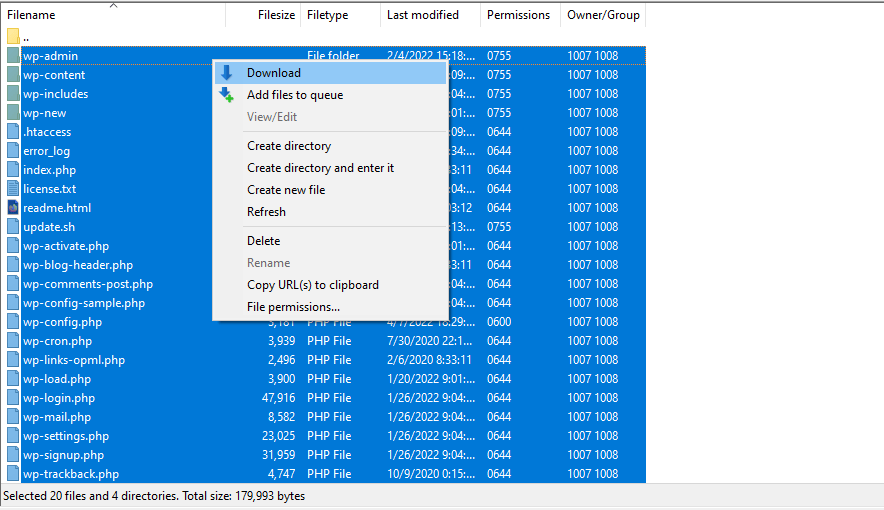
The FTP client will download all your site’s files and folders to the local folder in the left-hand pane.
You now have a copy of your site’s files on your computer.
2. Export your database
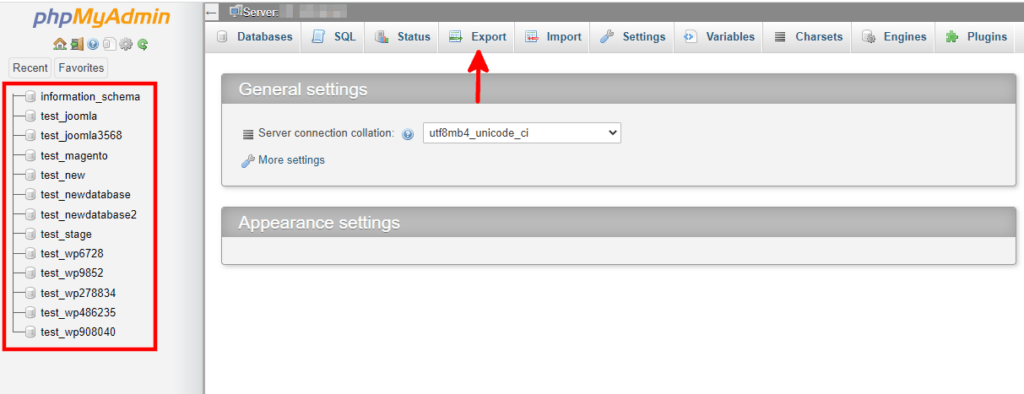
In addition to the File Manager, your hosting account’s control panel usually has a tool called phpMyAdmin. It’s a powerful open-source database management platform that gives you complete control over the MySQL databases hosted on your account.
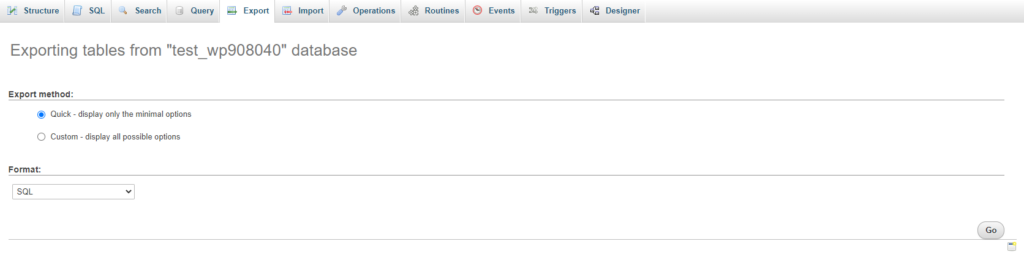
Among its many features, you’ll find a tool that exports your database’s tables and entries into an SQL file. To access it, open phpMyAdmin, select your site’s database from the menu on the left, and click the Export tab.
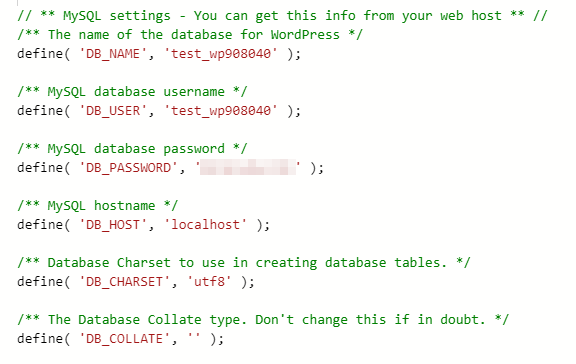
If you don’t know the name of your WordPress database, you can find it in your site’s wp-config.php file. It’s located in the document root folder, and you can open it with the File Manager.
The line you’re looking for looks like this:

Going back to phpMyAdmin, under the Export tab, you’ll see two radio buttons. With the Custom button, you can see and configure all available settings for the exported file. However, for many, the default Quick option should work fine. From the Format menu, select SQL and click Go. PhpMyAdmin will export the data, and your browser will download the file to your local machine.
3. Upload your site’s files
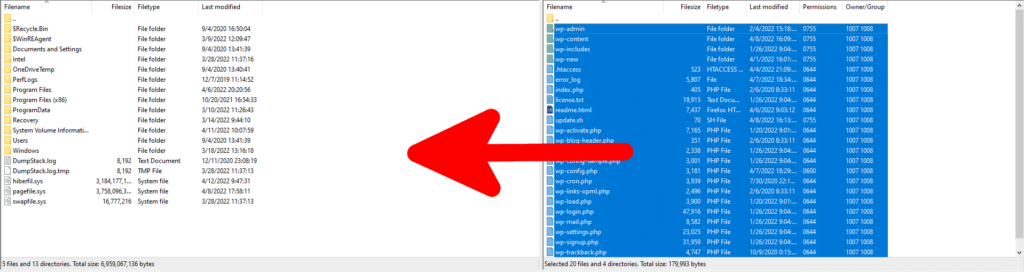
It’s now time to put all the data on the new server. We’ll start with the files. You can once again use an FTP client. With most applications, uploading files and folders to the hosting server is as easy as drag-and-dropping them from the pane showing your local data to the one displaying the remote server.
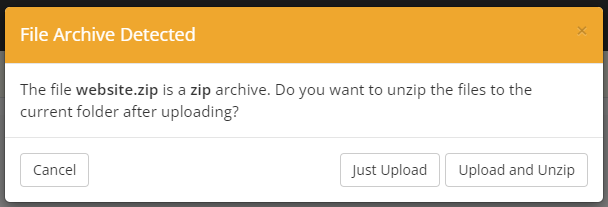
Another option is to use your control panel’s File Manager. Some managers allow you to upload ZIP archives and extract them straight on the server, which may be the more convenient approach.
Remember to situate the files in the domain’s document root.
4. Create a new database and import the data inside it
WordPress needs a database to work correctly. Unfortunately, you can’t simply move the database from one server to another. You need to re-create it on the new hosting account and import the data into it. Thankfully, there’s nothing too complex about the process.
In most cases, you’ll find a tool for creating a database inside your hosting account’s control panel. The design may differ depending on the control panel, but it will most likely look something like this:
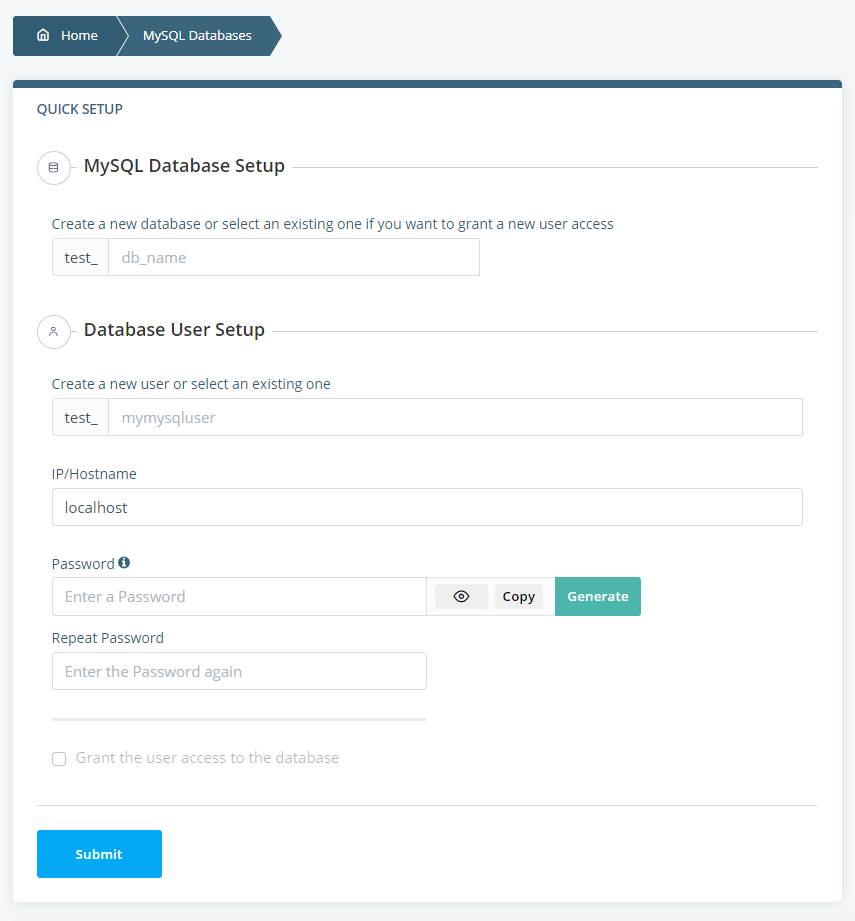
In addition to a database, you’ll also need to create a MySQL user account with access to it. WordPress needs it in order to work with the database. You can re-create the database and user with the same name and login credentials as your old installation.
If you’re not sure what your site has been using so far, you can find the information in the wp-config.php file. You can also create a new database and MySQL user and edit the configuration file later.
With the database created, it’s time to fill it with the data exported from your old hosting account. You can do that via phpMyAdmin.
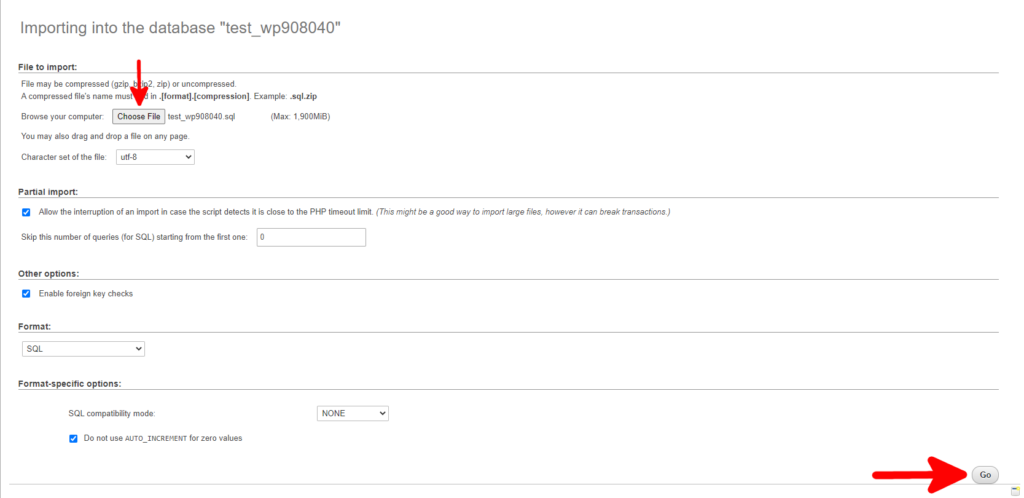
Once again, after you opening phpMyAdmin, you need to select the new database from the menu on the left before proceeding to the Import tab. You have a few more options here, but most of you can leave them in their default state.
Simply click the Choose File button, select the SQL file from your local computer, and click Go to import the data.
5. Test the site to make sure it works well
At this point, your domain should still be pointing to the old server. Before changing its settings, you might want to make sure the site works well at the new host. You can use your operating system’s hosts file to load your site in your browser, and with the help of a browser extension, you can make sure there are no broken links.
It might not be a bad idea to open the wp-config.php file and make sure all the information is correct. If you’ve used a different name for the new database, you need to update it, along with the MySQL user’s login credentials.
6. Point your domain to your new hosting account
After ensuring everything works as expected, you can change the domain’s nameservers and point it to your new host. The changes may take a few hours to propagate worldwide, but soon, your domain should start resolving to the new server.
Transferring a WordPress Website With a Plugin
If you want to avoid doing all this yourself, you can use a plugin. Go to the official WordPress plugin repository, and you’ll see that there are quite a few add-ons that promise to help you transfer your website from one hosting account to another.
Some of them are pretty popular, as well. The All-in-One WP Migration plugin, for example, has over 4 million active installations and quite a few positive reviews. The plugins offer all sorts of features, and they have slightly different designs.
However, with most of them, the mechanisms are similar. You install the plugin on your old WordPress website and use it to create a backup of all the data. You usually get the information in the form of an archive file which you can save on your computer.
The next step is to install WordPress on your new hosting account and add the migration plugin. Inside the dashboard, you can import the data from the archive you created at the old installation.
It is the more straightforward method for moving a WordPress site from one server to another. However, you may want to have a good look at all the plugins before you proceed. Check whether the plugin you’ve chosen can migrate all the data for you. Although they appear to save time at first glance, limitations like the inability to migrate other add-ons and themes may leave you with hours of extra work.
Also, since everything is automated, you should be extra careful when making sure that the site works on the new hosting account. Once again, it’s a good idea to use your computer’s hosts file and re-point your domain only when you’re certain the migration is a success.