WordPress is dominating the market when it comes to building websites, being the top software choice for over 450 million online projects. The content management system is free, immensely flexible, and well-suited for different types of pages.
But perhaps the strongest selling point of the app is its ease of use. WordPress emerged in times when building a website required extensive technical knowledge or hiring a professional. WP removed all boundaries for the average user to become a developer in no time.
Our focus today is on WordPress installation and one-click installers – the best way to quickly start an online site.
What is a one-click installer for WordPress?
Just as the name suggests, one-click installers are helpful tools that allow us to easily configure a range of different web applications. Hosting companies usually offer such platforms in their control panels, allowing you to install popular solutions like WordPress, Joomla, Drupal, Magento, and many more.
One-click autoinstallers can save you heaps of time and possible errors that come with manual software installation. That’s why they have become an essential part of any user’s online experience.
Before you Install WordPress
There are a couple of things you need to secure before starting your journey with WordPress, namely a domain name and hosting package.
Your domain is basically your site URL, the textual identification of your project destination. It consists of two or more parts (labels) – the main one contains your chosen name, and the latter is your extension.
There are hundreds of different possible suffixes, which also signify the type of your domain. There are top-level extensions (.com, .net, .org, .info), country-specific ones (.de, .fr, .co.uk), and some fancy new generic TLDs (.shop, .club, .xyz).
IMPORTANT: While not absolutely needed from the get-go, registering a domain name before you start working on a website is extremely helpful. Without one, your pages have to be accessed with a combination of your server IP and username, and many site elements may not work properly.
Finding the right hosting provider should be your primary mission. Not only can your host help with the domain registration, but it also ensures the proper environment to host your WordPress website – server configuration, network security, operating system, and more. Be sure to choose a provider that offers a free control panel with a software autoinstaller or a similar tool that can help you with the WP installation.
How to Set Up WordPress with a One-click Installer?
Now that you have your domain name and hosting plan, it’s time to get on with the WordPress installation. You can do so following the easy steps below:
- Log into your control panel.
- Under Tools, locate the Softaculous option (or the alternative platform your host uses).

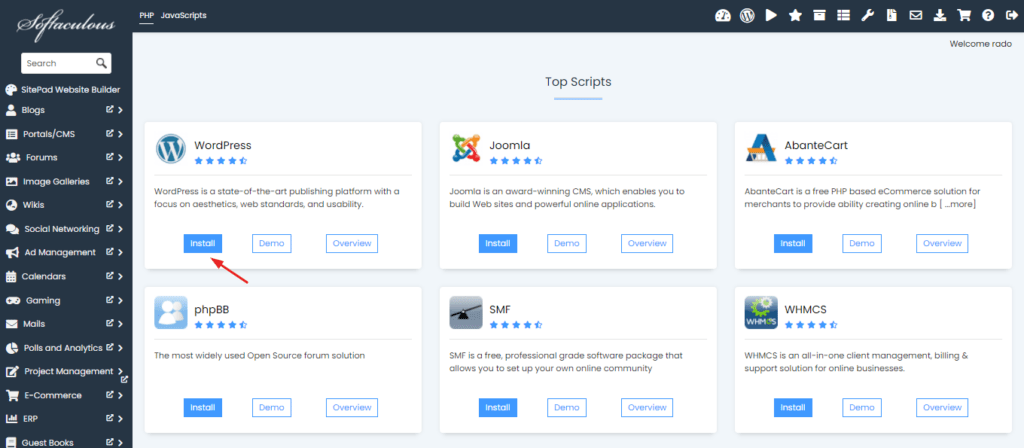
- On the next screen, you can see all the different categories and apps you can install with a quick route to the most popular ones. Naturally, WordPress should be the first option you see.

- Click on the blue Install button
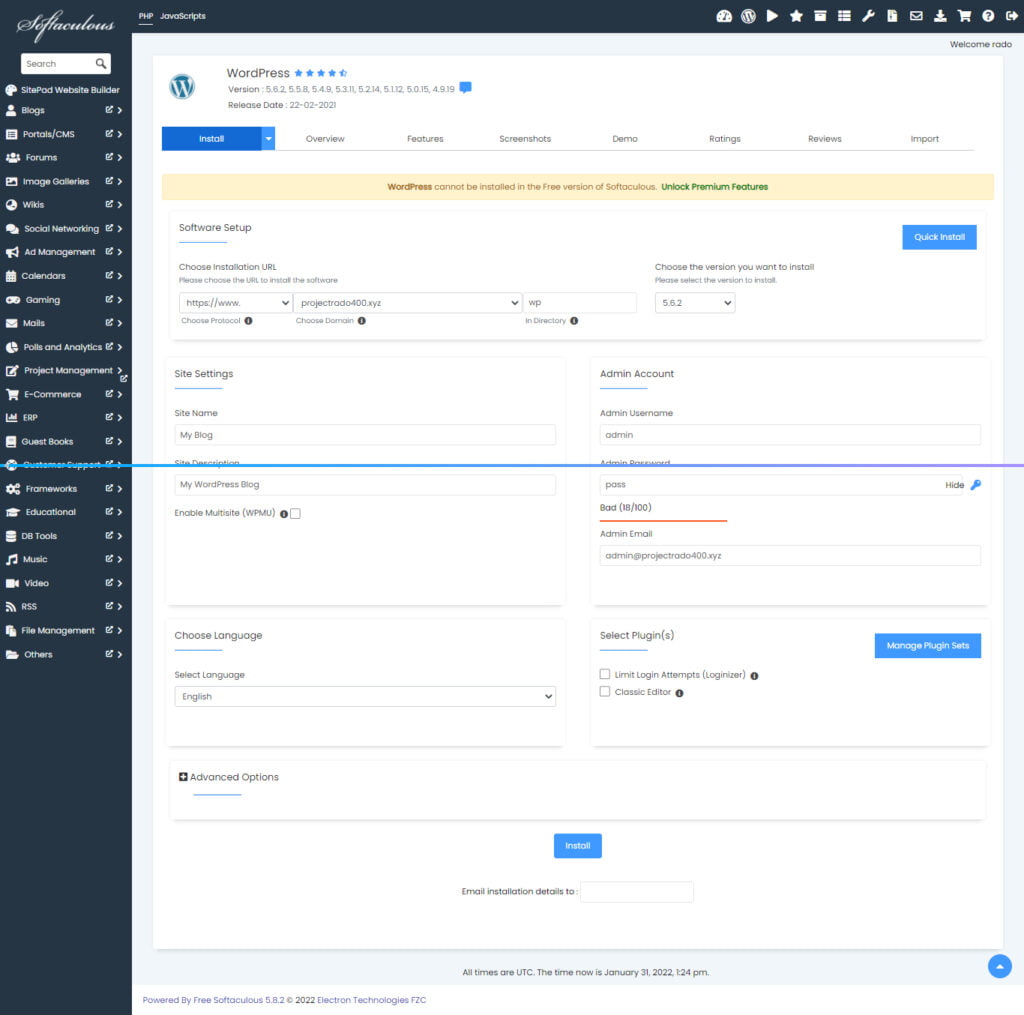
- You are now in the setup wizard. Here, you can choose everything to get started – WordPress version, URL path, site name/description, admin credentials, and even some helpful plugins to install.

IMPORTANT: Make sure to change the default admin username and password to something strong and memorable. Keeping them as they are poses a very high security risk and makes it effortless for attackers to infiltrate your account.
- Hit the Install button, wait for a few moments, and you are good to go!
Depending on your hosting provider, you might have alternative ways to install WordPress. One such host is ScalaHosting.
ScalaHosting and WordPress Installation
As a company that has been strongly involved in self-developed web hosting solutions, Scala has many successful creations behind its back. Along with the industry-leading platform for server management (SPanel), the host integrates a unique assistant for WP users.
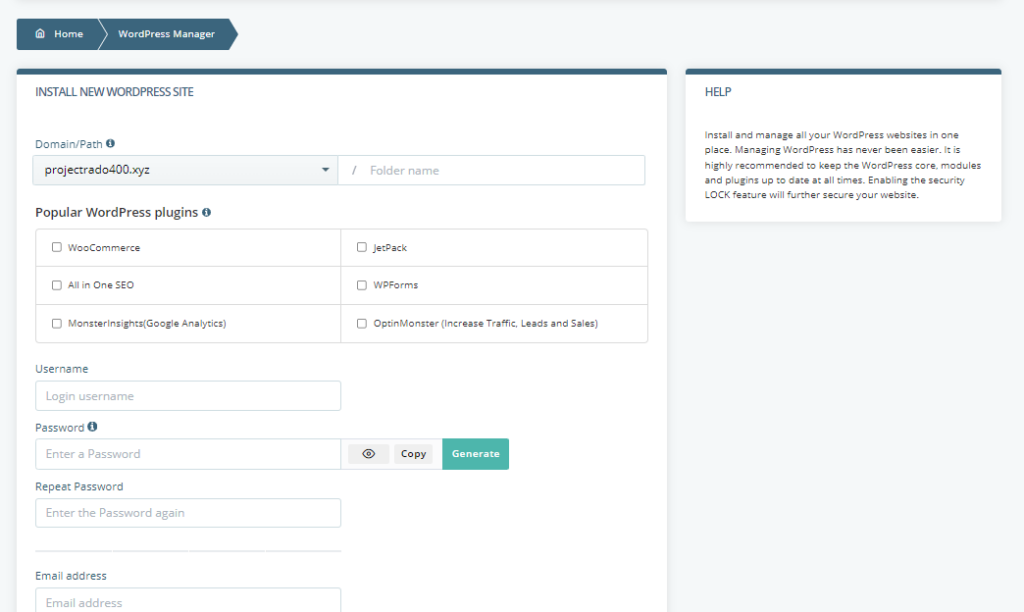
SWordPress Manager is a lightweight tool that allows you to set up the popular CMS with even fewer steps than the Softaculous one-click installer. Additionally, you can configure automatic updates, change admin credentials, and apply a security lock over site edits.
To get started your WordPress project:
- Log into your SPanel.
- Choose the SWordPress Manager option under Tools.

- You are now at the setup wizard screen. There are just a few fields you need to fill in concerning admin details and possible plugin installs.

- If everything is input properly, the Install WordPress button on the bottom will become active, and you can finish the setup process.
Want something even faster than a one-click method for installing WordPress? Contact the ScalaHosting Support, and we will gladly configure WP for you!
