Implementing Caching Solutions for Improved Drupal Hosting Performance
If you’re just starting your first-ever Drupal project, you should know that ahead of you lies a constant battle to improve website performance.
As your site attracts more visitors, you’ll need to adapt your hosting infrastructure and implement various performance-enhancing solutions to keep loading speeds high. If you don’t, you’ll slip behind the competition, and your business will suffer.
However, even before traffic levels pick up, there are a few tasks you can tackle to ensure you’re squeezing every last drop of performance from your Drupal installation.
Implementing a caching solution is the first job on that list.
Introduction to Caching in Drupal
Drupal is a Content Management System (CMS) that creates dynamic websites. Even though dynamic websites look relatively simple, behind the scenes, they are fairly complicated systems that rely on multiple components to work correctly.
For example, a single web page request on your Drupal site triggers a process with multiple stages. Broken down, it looks like this:
- Routing
The web server determines the resource the user wants to reach. More often than not, it’s a PHP file.
- PHP processing
The file is passed to the PHP interpreter, which processes the code inside it.
- Bootstrapping
During this phase, Drupal sets up its environment, connects to the database, and loads any required configuration files.
- Dispatching
The CMS determines which components need to deliver the requested data and initiates them accordingly.
- Content generation
The components generate the content, which could be in the form of HTML markup but may also consist of database queries, template rendering, etc.
- Theme rendering
It’s up to the theme layer now to use the template files and stylesheets to apply the visual representation of the requested page.
- Response generation
Finally, Drupal has a ready-to-go web page, which it passes to the web server, and the web server then sends it back to the user’s browser as an HTTP response.
This is just one request for one web page. Now imagine it happening thousands of times a second.
Caching aims to optimize the process by eliminating many of these steps.
When a user requests a specific page, the server and your Drupal installation go through all the stages outlined above. However, while it’s doing it, the caching solution you’ve implemented takes some (or all) of the generated data and stores it in a temporary storage facility called a cache. Then, when the next visitor comes and requests the same page, instead of making the server go through the entire process again, the stored data is served straight from the cache.
The actual mechanisms for doing that depend on the type of content, which, in turn, depends on the user.
Your Drupal site visitors can be divided into two categories – authenticated and anonymous users.
The pages anonymous users see are mostly static. This means the components appearing on their screen are the same for everyone, making caching much easier. Drupal can copy the entire HTML output generated during the response generation phase and then deliver it straight from the cache to future visitors. This is what’s known as full-page caching.
In addition to improving loading speeds, it practically eliminates the steps outlined above and massively reduces the server load.
Full-page caching is usually impossible for authenticated users because much of the content they see is dynamically generated and specific to each person.
For example, you often see a welcome message and your name in the right-hand corner of the screen after you log in to your account at a Drupal site. If you’ve used modules to build an ecommerce website, you’ll see a shopping cart next to it, the content of which is different for each user.
It’s not just about personal details, either. If a module allows your users to pick between dark and light mode, for example, every time a visitor signs in, Drupal must check their personal settings in order to render the page correctly. This, too, isn’t something you can cache.
Despite the challenges, there are caching solutions that treat the data granularly and reduce load times for both anonymous and authenticated users.
Let’s take a look at them.
Drupal’s Default Caching Mechanism
Unlike other content management systems, where you need add-ons or extensions to enable caching, Drupal provides this functionality out of the box.
To access it, log in to the Admin panel and go to Configuration > Development > Performance. The Caching section of the page contains a single drop-down menu, so there aren’t many options to play with. In fact, the only thing you can set from here is the maximum age for every bit of cached data.
You can pick between the following options:
- <no caching> – This is the default value. If it’s selected, Drupal’s default caching mechanism is disabled.
- 1 min
- 3 min
- 5 min
- 10 min
- 15 min
- 30 min
- 45 min
- 1 hour
- 3 hours
- 6 hours
- 9 hours
- 12 hours
- 1 day
What you pick from the menu determines the period between data stored in the cache and Drupal deeming it outdated. Once a piece of cached information has reached its maximum age, it’s removed from the cache. When a user requests it again, the server generates a copy and places it in the cache.
The idea is that the cached data is periodically replaced to ensure that any changes you make are visible to everyone. The maximum age of cached data should depend on how often you add new content or update an existing page.
The more regularly your site changes, the more frequently you should refresh the cache.
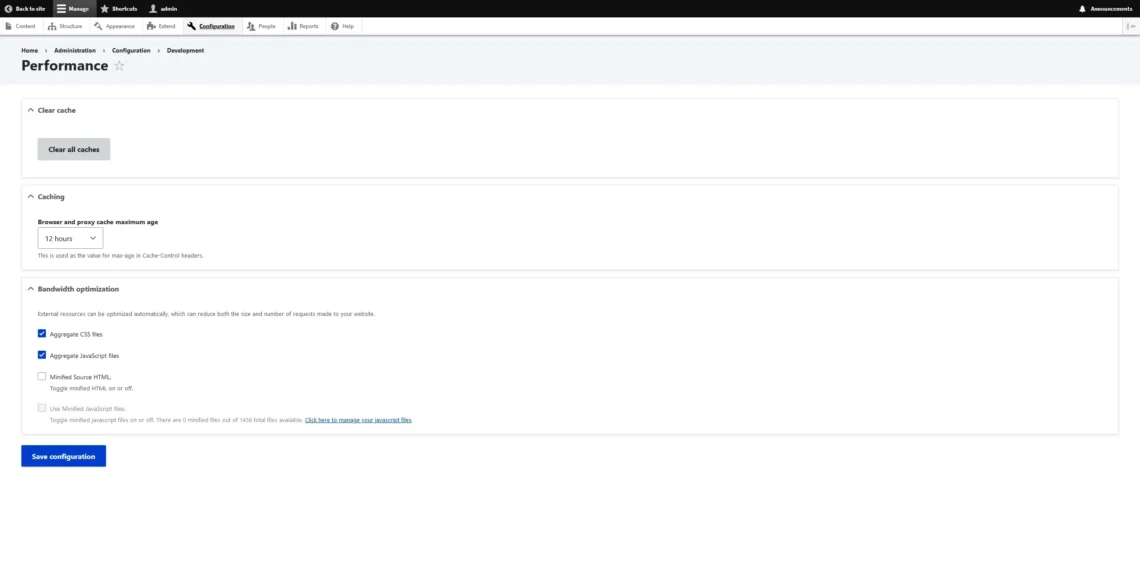
When you pick a cache refresh frequency, click Save Changes and then hit Clear all caches. With that, Drupal’s built-in caching mechanism is enabled.
But will it have a significant enough impact on your site performance?
In Drupal 8, the content management system developers introduced dynamic page caching. This advanced solution means you won’t find any caching add-ons for Drupal like you would for WordPress or Joomla.
In simple terms, Drupal can cache both dynamic and static data out of the box. Every single response generated by the CMS comes with a header that indicates whether or not the content is supposed to be cached. Everything from static files to dynamically generated elements that don’t contain any personalized information about the authenticated user gets a header flag indicating that it’s cacheable. Hence, Drupal automatically copies and saves it to deliver to future users more quickly.
The page elements containing data relevant only to the user are left as placeholders and generated for every single request.
So, out of the box, Drupal has a caching mechanism that is vastly superior to what we see in other website-building applications. However, this doesn’t mean no other solutions can make an even bigger difference. Let’s explore them.
Opcode Caching
Drupal is written in PHP. Unlike languages like Java and C, PHP is a scripting language. What’s the difference?
When Java code is deployed, a compiler takes the Java code, parses and compiles it into a binary file, which is then executed.
With PHP, the parsing and compilation are done immediately before execution. The advantages of this include faster development and better cross-platform compatibility.
The downside is that scripting languages can be somewhat slow. You can certainly see that with PHP. The parsing and compilation phases add to the overhead and could put extra load on your server, especially if they need to be processed during every single request. This is where Opcode caching comes in.
The stage after the code has been parsed and compiled is often called operation code or opcode for short. To improve performance, PHP has a feature that can cache the output during the Opcode phase and significantly reduce the volume of code that needs to be processed before execution.
In the past, using the functionality required installing an additional PHP module, which, in turn, was impossible without root access. However, since PHP 5.5, Opcode caching has been a part of the default PHP package. What you need to do is ensure it’s enabled.
There are several ways to do that, but arguably, the easiest is through a phpinfo file—a simple PHP file that you can create to gain insight into your hosting environment.
You can write the file on your local computer and upload it via FTP or create it on the server through SSH. However, most people will probably prefer to use their control panel’s File Manager.
To do that, log into your account, open the file management utility, and go to your site’s document root folder (usually the public_html directory). Create a new file and name it info.php (you can pick another name, but be sure to keep the .php extension). Double-click to edit it and paste the following:
<?php
phpinfo();
?>
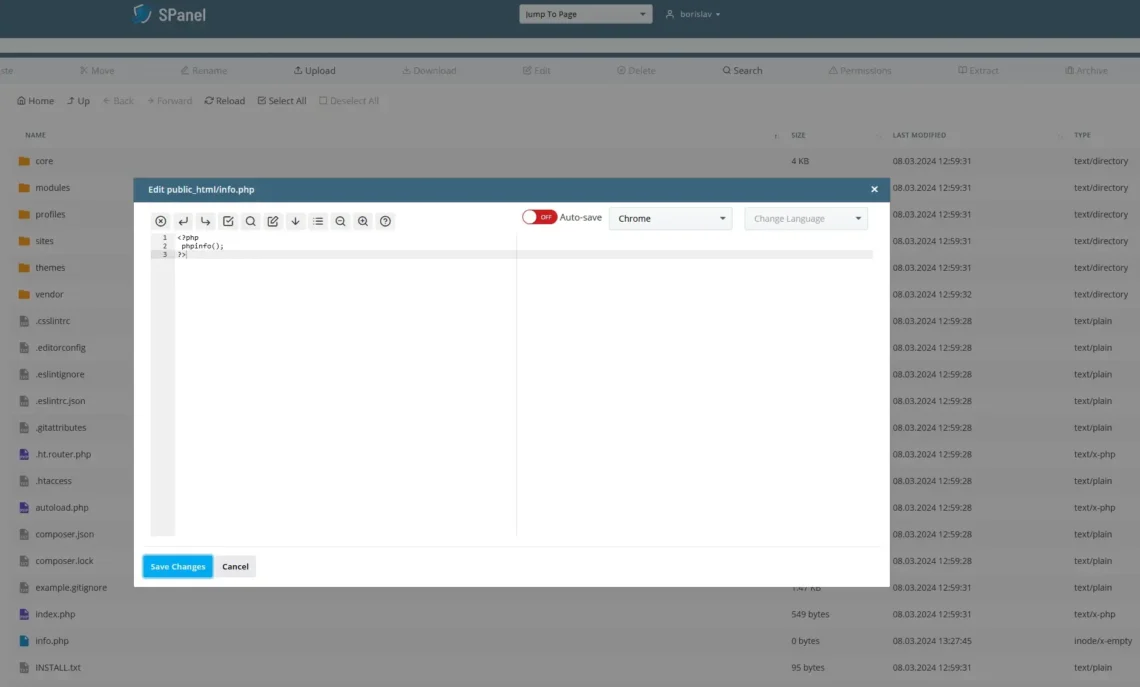
Save the file, open a browser, and go to https://yourdomain.com/info.php. You’ll see a big table containing a lot of information about your server’s PHP configuration.
NOTE: Be sure to delete the phpinfo file once you’re done making the necessary changes. Keeping it isn’t a security risk per se, but it reveals quite a few details about your site’s file structure, extensions, and settings, which could be used by attackers to exploit vulnerabilities and compromise your defenses.
In the phpinfo file, scroll down to the Zend Opcache section and review its contents.
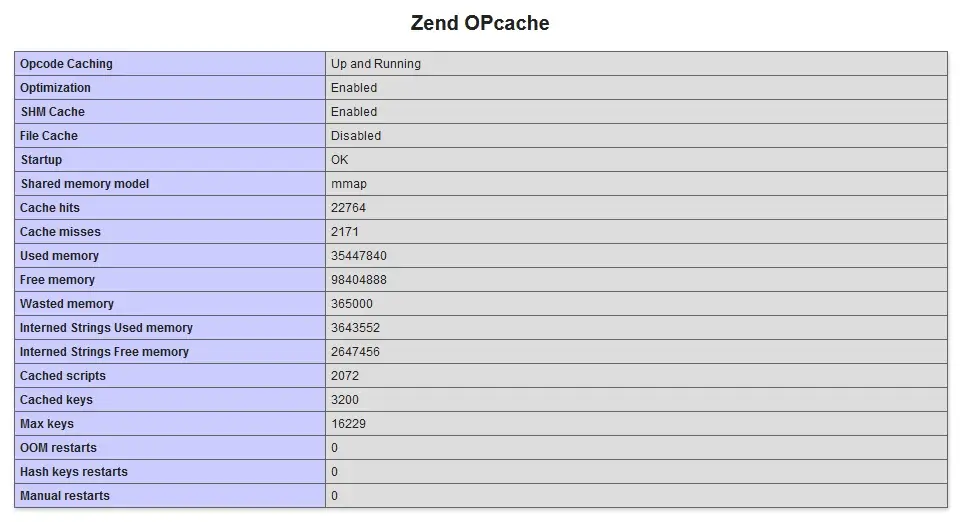
As you can see from the first line in the screenshot above, the Opcode Caching functionality on this particular server is “Up and Running.” If your phpinfo file says otherwise, you’ll need to enable it.
To do that, you’ll have to edit PHP’s main configuration file – php.ini. There are a couple of options.
- Through the command line
The php.ini file contains the core configuration of the PHP interpreter. Because it’s so important, editing it requires root access. It might not be a bad idea to ensure you have a working backup, as well, just in case you break something.
If you scroll back to the top of the phpinfo table, you’ll see where php.ini is located.
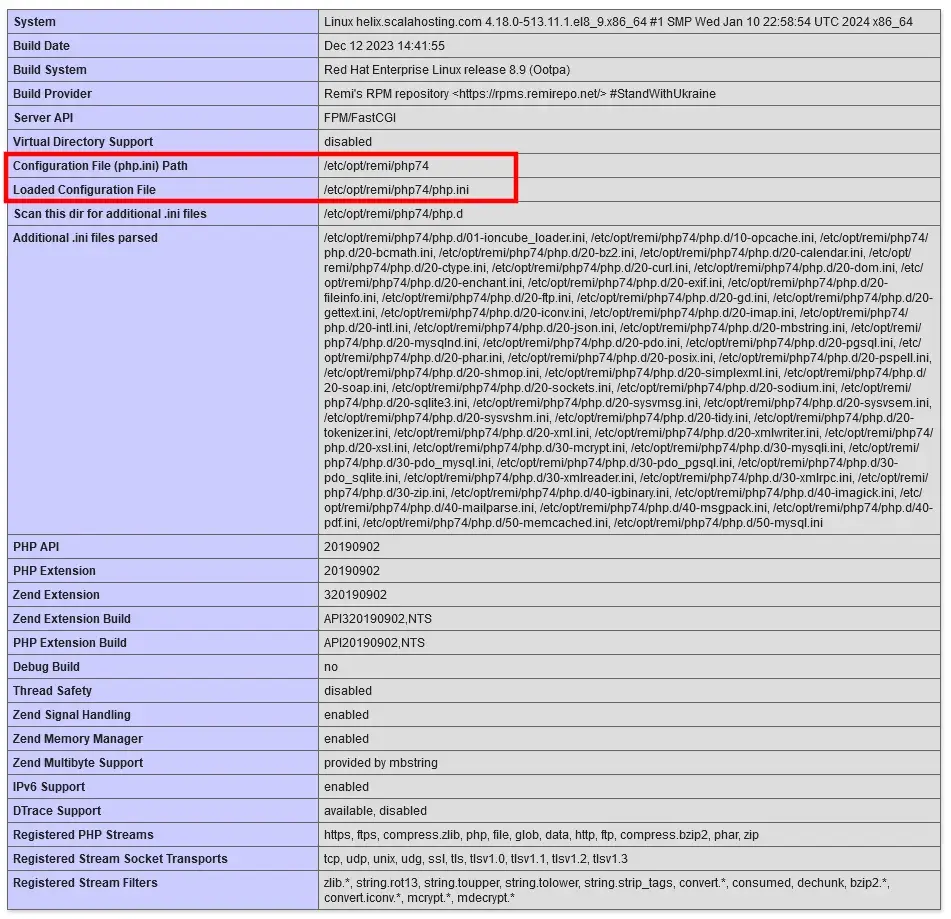
You can open the file with any command-line text editor. Because you need root access, you’ll have to use the sudo prefix. For example, if you use GNU nano, the command would be something like sudo nano /etc/opt/remi/php74/php.ini.
To enable Opcode caching, you have to find the line that says “;zend_extension=opcache” and remove the semi-colon from the beginning, which will uncomment the variable. After you save the changes and reboot the web server, Opcode caching will be enabled.
- Through SPanel’s PHP INI Editor
If you use SPanel, you can make changes to the php.ini file even without root access. ScalaHosting’s unique server management platform includes a tool designed specifically for the job.
It’s available in SPanel’s User Interface. Under the Tools section, you’ll see the PHP Manager.
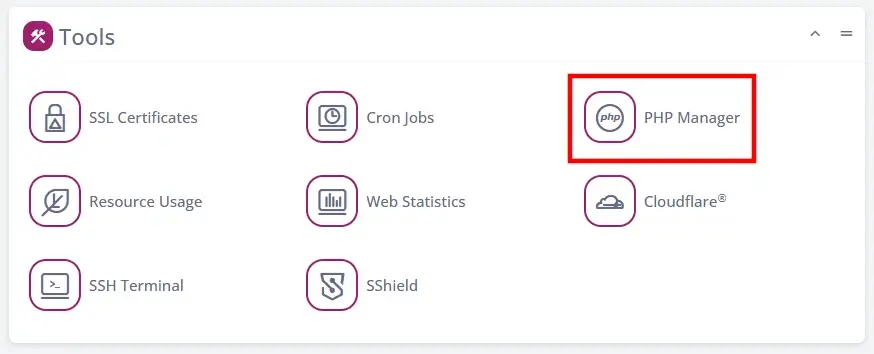
Inside, you’ll see every domain and subdomain added to your account, along with its current PHP version. Open the Actions drop-down menu next to it and click PHP INI Editor.

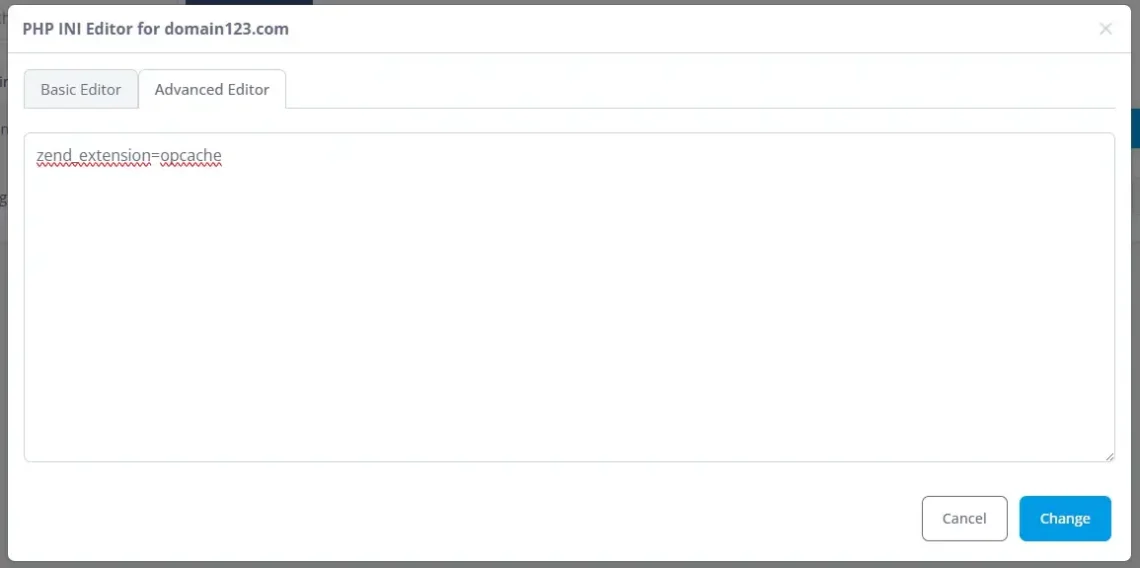
By default, SPanel shows you the Basic Editor that allows you to change things like the memory limit and the upload filesize limit. Through the Advanced Editor, you can add your own lines to the php.ini file, which is exactly what you need now.
Open it and add the following:
zend_extension=opcache
Click Change to save the changes and reboot the web server from SPanel’s Admin Interface to ensure Opcode caching is enabled.
From now on, when a request for a specific PHP file arrives, the server will parse and compile the code, but before executing it, it will store a copy in the memory. Then, when the next user requests the same PHP file, the compiled code will be executed straight from the memory. This significantly reduces the time the server needs to go through the PHP processing phase and makes the response quicker.
The Zend Opcache is a part of the default PHP package nowadays, but you can find other PHP modules that serve the same functionality. The good news if you use Drupal is that it will most likely work with your site without altering its configuration or tweaking its settings.
In addition to improving speeds, Opcode caching significantly reduces your server load, which means you can serve more visitors with the same hardware. You can get high performance from a relatively underpowered server, and even as your site grows, you’ll need fewer upgrades because you’re utilizing the available resources more efficiently. The savings you rack up could be pretty substantial in the long run.
Reverse Proxy Caching
You have probably heard of a “proxy server.” It acts as an intermediary between the client and the destination server. When a client wants to access a particular online resource, the outbound request is sent from the browser to the proxy server, which then reroutes it to the ultimate destination. The response generated by the destination servers is sent back to the proxy, which then forwards it to the client.
A reverse proxy server also sits between users’ browsers and the online resources they want to access, but the purpose is different. In such a scenario, the proxy acts as a gateway that processes incoming requests aimed at your website. A reverse proxy can act as a load balancer, which can be critical in improving scalability and reliability, especially if you run a multi-node cluster of servers.
However, it can also help improve the performance by caching entire HTML responses generated by Drupal. After the data has been cached, the reverse proxy stores it and delivers it when a new user requests the same web page. If the data is served from the cache, the user’s request never reaches the primary web server, meaning this particular connection puts no load on the hosting infrastructure whatsoever.
Speaking of hosting infrastructure, there are a couple of options for setting up reverse proxy caching. You can set up a separate physical or virtual server and configure it to work with your production machine. This is how some Content Delivery Network (CDN) service providers speed up your site.
They operate a network of servers (often referred to as edge servers or nodes) situated in different data centers in all corners of the world. The CDN takes copies of some of your site’s data and places them on all of its edge nodes. When a visitor wants to view a particular web page, the data is loaded from the edge server closest to them.
Performance is gained in two ways. On the one hand, the user doesn’t need to wait for the server to process the request and generate the required data – the page is already in the cache. On the other, the distance the information needs to travel between the server and the user’s screen is reduced (sometimes dramatically), so it arrives more quickly.
You don’t necessarily need additional servers or a CDN to enable reverse proxy caching on your Drupal site, though. You can also install a software solution that performs the same function and get similar results.
There are many options, all with their advantages and disadvantages. The exact steps you need to take to set up reverse proxy caching on your server depend on quite a few factors. For example, if you use Varnish, you’ll first need to install it and then add specific directives to Drupal’s main configuration file (found at /sites/default/settings.php) to ensure the CMS works with it.
Popular reverse proxy solutions are often available via your operating system’s package managers, so installing them shouldn’t be too difficult. However, it will most likely require root access. Some experience with the command line will definitely help, and you will almost certainly need to spend some time studying the documentation to ensure you’ve done everything properly.
Sometimes, things are much more straightforward. For example, Nginx is an open-source application that can work as a standalone web server or a reverse proxy in front of Apache. The second scenario is much more common because website owners can take advantage of the extra speed Nginx offers without completely reconfiguring their site.
The performance benefits come from Nginx’s microcaching feature. Unlike other solutions on the market, getting it to work with your Drupal site requires no additional steps. You just have to install and enable it.
Nginx’s microcaching functionality is unique because it caches dynamically generated data and keeps it in the cache for a relatively short period of time. The difference in loading speeds is significant, especially for high-traffic websites.
Setting up Nginx as a reverse proxy for Apache is easier than you think. If you use SPanel, you can do it with a couple of clicks.
Log in to your server’s Admin interface and click Web Server Manager. Go to the Nginx Reverse Proxy tab and click Switch to Nginx Reverse Proxy. An “Are you sure?” prompt will appear, and a few moments after you confirm, the Nginx setup will be up and running.
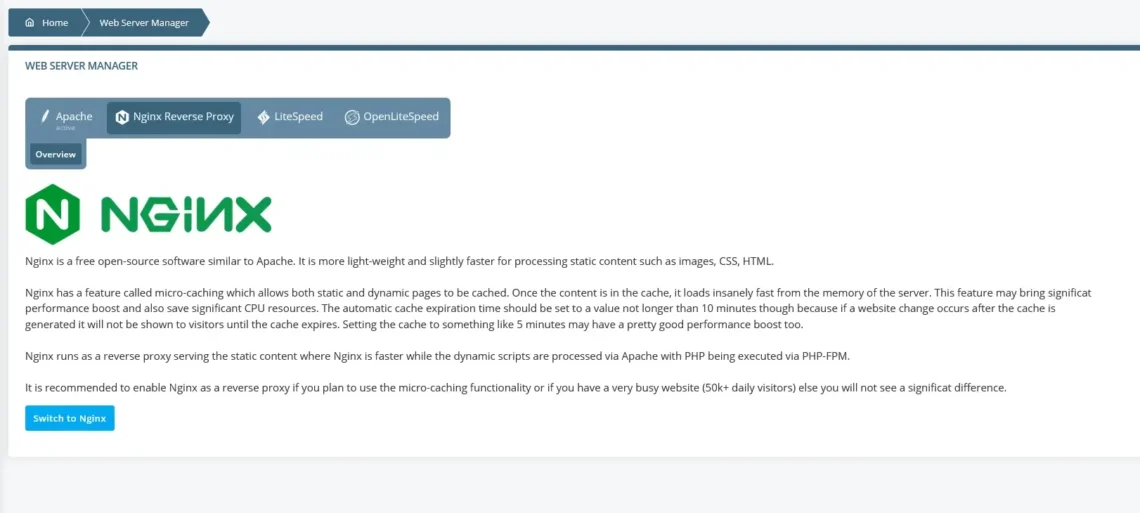
SPanel gives you some options for managing the cache, as well. You can change the expiration period, expand or reduce the space allocated to the cache, or flush all currently cached data.
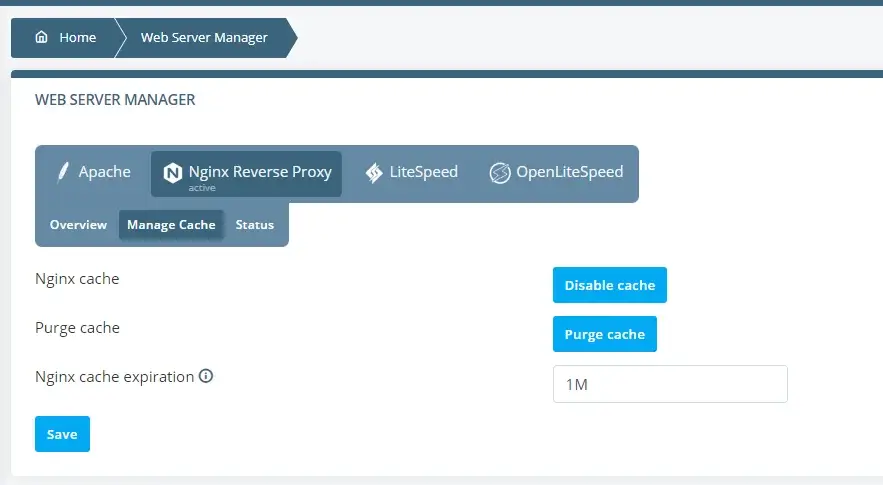
You’ll struggle to find an easier way to enable reverse proxy cache on your website.
Database Caching
Database caching refers to the practice of storing the responses to common database queries with the goal of delivering them more quickly the next time they are requested.
The data is served from memory, so it gets to the user much faster. Since it’s already in the cache, the requests don’t need to hit the database at all. The decreased load can do wonders for your site’s performance and hardware utilization.
Drupal comes with database caching functionality that is out of the box. However, with the help of additional tools, you can give your website a performance boost that will really make a difference. One such tool is Memcached.
Memcached is one of the most popular distributed memory caching services. First released in 2003, it has proven itself as a robust solution for anyone looking to see visible performance gains from their website. Fortunately, the integration with Drupal is fairly straightforward.
Your first job is to ensure Memcached is installed on the server. Your host’s support agents should be able to tell you if your package supports the technology and if you don’t feel like talking to them, you can use your phpinfo file.
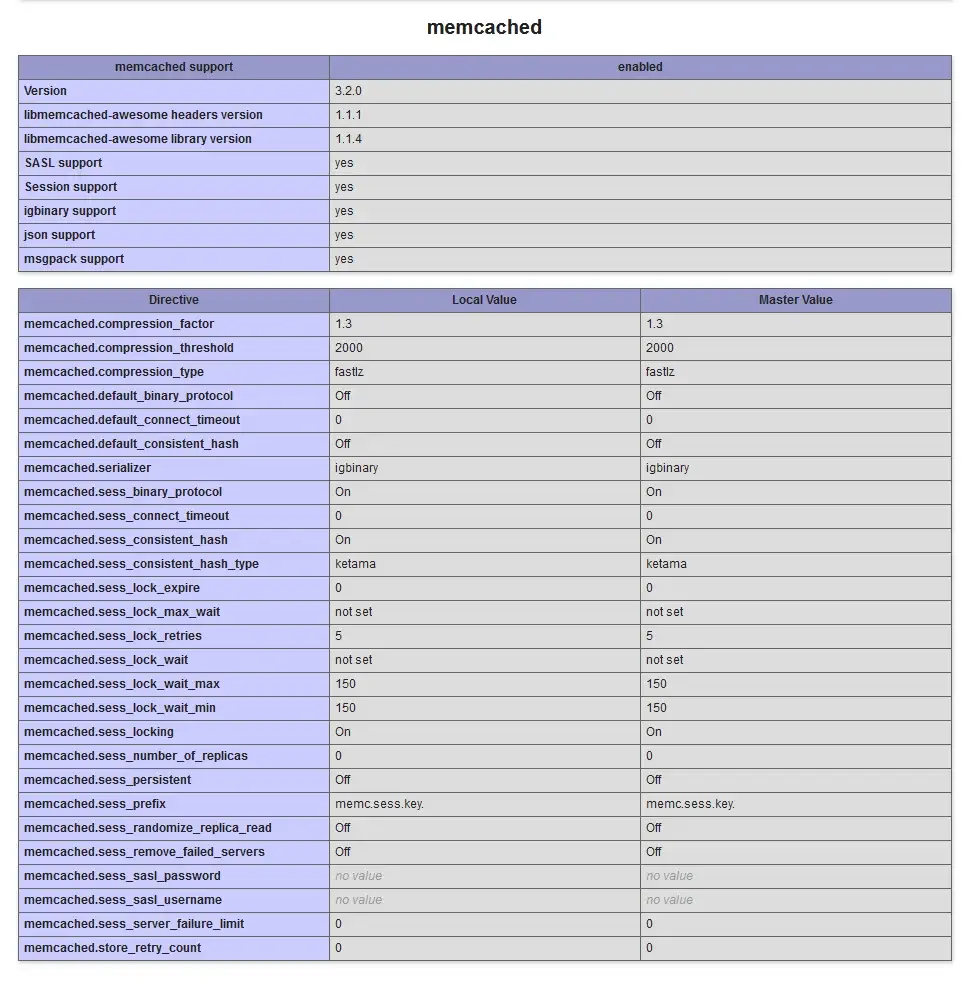
If it’s not installed, you’ll have to set it up yourself. Yet again, all you need is root access and the ability to work with your operating system’s package manager.
With Memcached installed, you need to set up the Drupal module that allows your site to work with the caching system. Log in to your account via SSH, navigate to your site’s document root, and enter the following command:
$ composer require ‘drupal/memcache:^2.5’
When the installation is complete, the module will appear on the Extend page on Drupal’s Admin panel. Select the checkbox next to it and click the Install button to activate it.
Finally, go to the Performance page and select Memcache from the Cache Backend drop-down menu. After you save the changes and clear the cache, your site will be configured to work with Memcached.
Conclusion
By effectively leveraging caching mechanisms, you can significantly reduce load times, save a few dollars on hardware upgrades, and elevate the user experience of your Drupal website to a whole new level.
The CMS helps with its built-in caching engine, which is a lot more sophisticated than what you’ll see in other apps. However, as your project grows, you’ll likely consider implementing additional caching solutions that are even more advanced.
There’s no shortage of options, and they can all help you unlock the true potential of your hosting environment. You just need to understand how they work so you can tailor them to your specific needs.
FAQ
Q: Does caching improve performance?
A: Caching is one of the quickest and easiest ways to reduce load times and make your site more responsive. In addition to boosting the speed, it also lowers the load on the server, helping with scalability and making your website more efficient.
Q: Why is caching faster?
A: Your site’s caching engine stores copies of data generated by your site in a storage facility called a cache. Instead of waiting for the web server to generate it again, the data is delivered straight from the cache the next time the same web page is requested.
Q: How does caching work in Drupal?
A: You can control Drupal’s default caching mechanism through the Performance section of your site’s Admin panel. Unlike other content management systems, Drupal can store both static content like images, CSS, and JavaScript files and dynamically generated data coming from the the app and the database.


