

ON THIS PAGE
SPanel’s branding toggle puts your company name, logo, and a neutral /hostpanel login URL on the panel – but two more settings are an integral part of the white-label job.
A branded server hostname (like server1.yourbrand.com) showcases the address that mail and FTP clients read, and branded nameservers (ns1/ns2 on your own domain) mask the DNS your clients’ domains delegate to.
Both live on the Server Settings screen in the SPanel Admin Interface and are included for free on every ScalaHosting managed VPS.
When the panel says your name but the server doesn’t
Imagine the situation:
Dimitar resells hosting to about 30 small businesses around Plovdiv under the name Northwind Hosting. He enabled SPanel’s branding the day his server went live: his logo on the login page, the panel at /hostpanel, his company name everywhere a client looks.
It felt finished.
Then a client forwards him their email setup instructions and asks, “Who is bigvendor.net?” The same client’s domain is delegated to nameservers with a stranger’s brand in them. The panel said Northwind. The mail settings and the DNS still whispered someone else’s name.
That gap is the subject of this article: the two settings beyond the toggle that close it.
Why the branding toggle isn’t the whole job
The branding switch handles everything inside the panel – the login page, the panel chrome, the webmail entry links, and the API endpoint, all moved onto your brand and the neutral /hostpanel path.
What the toggle deliberately doesn’t touch are two server-level identifiers below the panel: the server hostname, which mail and FTP clients display when a user sets up their account, and the nameservers, which a client’s domain delegates to when you host their DNS.
Neither is a gap in SPanel.
They’re the rest of the checklist – owner-controlled settings that SPanel fully supports, and the difference between a panel that wears your brand and a server that does. Complete all three, and clients see no vendor surface at all.
To summarize: branded nameservers are DNS servers named after your own domain (ns1.yourbrand.com) that your clients’ domains point to, so the delegation reads as your brand instead of your provider’s.
The three layers of a white-label SPanel server
Think of it as three layers, each branding a different thing a client can see.
| White-label layer | What a client sees it on | SPanel setting | How the category usually handles it |
| Panel name, logo, login URL | The login page and the panel itself | Branding screen (Login URL /spanel → /hostpanel) | Often a reseller-tier add-on; some panels can’t rebrand the login page at all |
| Server hostname | Mail and FTP client setup screens | Server Settings → Basic Settings (Hostname field) | Supported, but a separate manual step |
| Nameservers | DNS delegation for their domain | Server Settings → Basic Settings (Name Servers fields) + a registrar glue record | Supported, but a separate manual step |
Branding tells clients whose panel it is. The hostname and nameservers make sure the rest of the server agrees.
Finishing the white-label job? ScalaHosting’s managed VPS plans run SPanel with branding, a branded hostname, and branded nameservers included – no reseller tier, no per-account fee. Still mapping where a provider’s name can leak? The complete white-label checklist covers every surface.
Demo flow: setting a branded hostname and branded nameservers
These steps run in the SPanel Admin Interface on a ScalaHosting managed VPS. Log in as the admin user first.
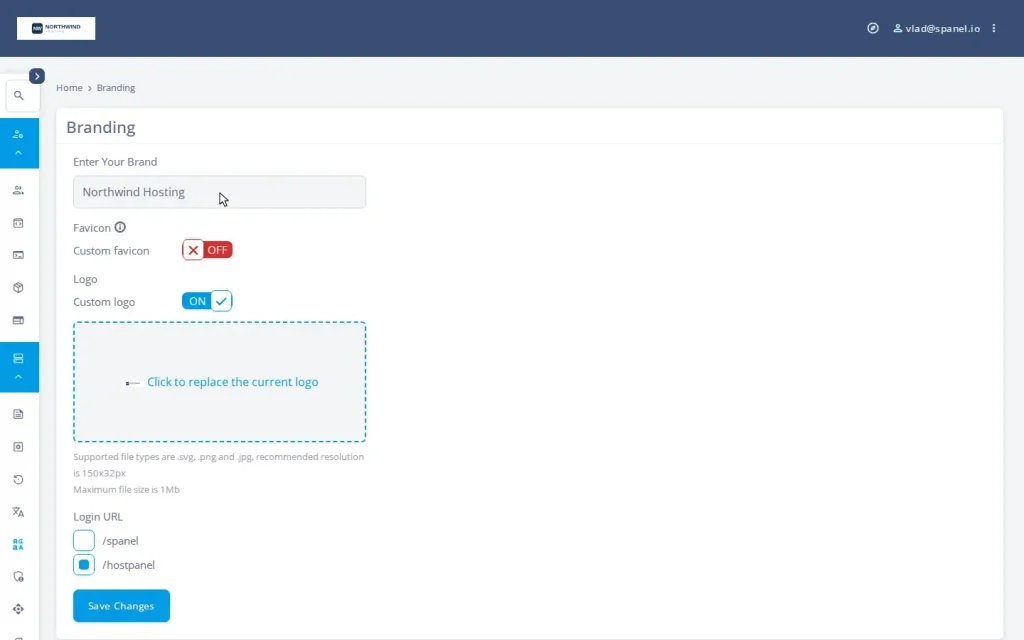
- Open the Branding screen (Server Management → Branding) to confirm your brand is already in place – the Enter Your Brand field should contain your brand name, the Custom logo switch should be on, and the Login URL set to /hostpanel. SPanel has no single master “branding enabled” switch; those three settings together are the in-place brand that the next two steps build on.
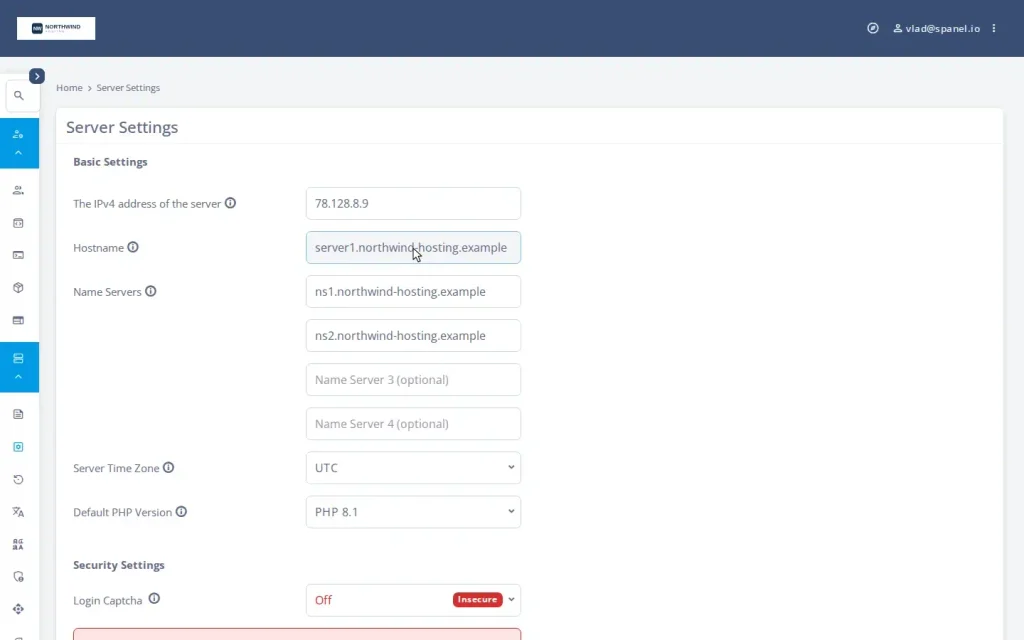
- Open Server Settings (Server Management → Server Settings) and find the Hostname field under Basic Settings. Enter a hostname on your own domain – server1.yourdomain.com rather than a vendor-flavored default – and click Apply. This is the name that mail and FTP clients will show your users.
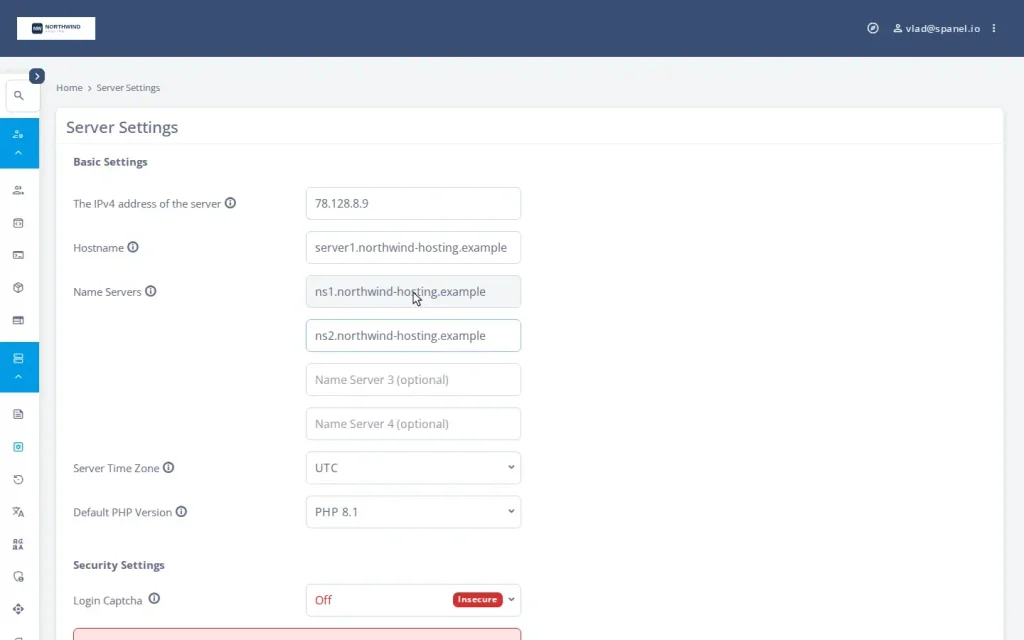
- The Name Servers fields sit just below, on the same Basic Settings screen. Set Name Server 1 to ns1.northwind-hosting.example and Name Server 2 to ns2.northwind-hosting.example, then click Apply. From now on, DNS zones SPanel creates for new accounts will use these branded names.
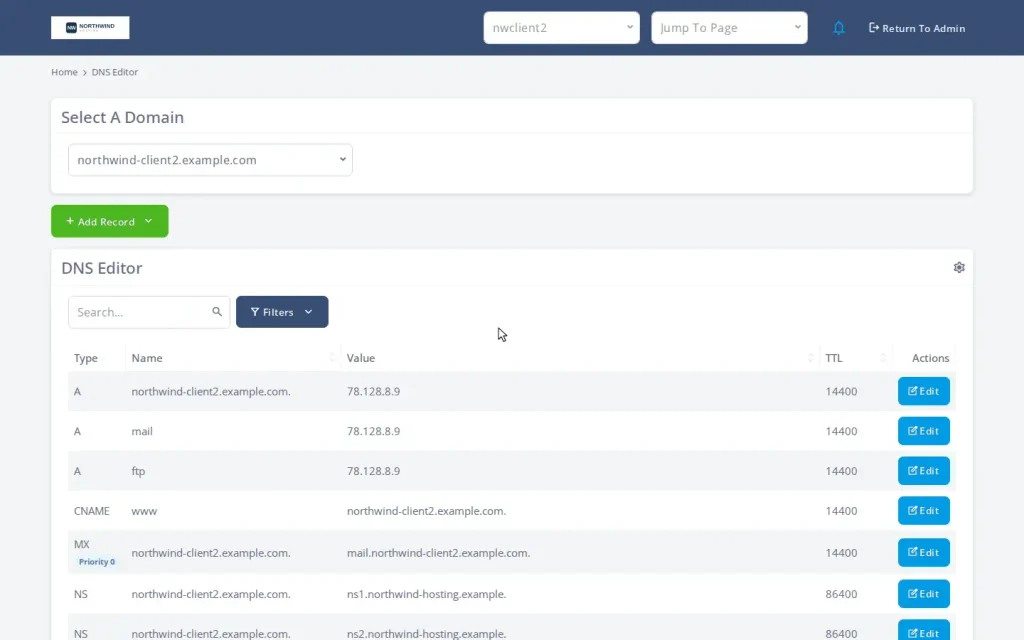
- Create a fresh client account after saving the branded nameservers, then open that account’s zone in Domains → DNS Editor in its User Interface and confirm the NS records now read your branded ns1/ns2. A zone created before the change keeps the old defaults, so use a new account to see the branded delegation your clients’ domains will point to.
One step happens outside SPanel. For branded nameservers to resolve on the public internet, you register ns1/ns2 as host records – “glue records” – at the registrar where yourdomain.com is registered, each pointing to your server’s IP. That’s a one-time registrar setup, not an SPanel screen. Once the record propagates, point each client domain’s delegation at your two branded nameservers.
What’s left after all three steps
Once you finish the checklist, the panel, login URL, webmail entry, API endpoint, hostname, and nameservers all carry your brand – the API endpoint following your branded path, as documented in the SPanel API docs.
What keeps its own name is any embedded third-party tool: the webmail client, an app installer, phpMyAdmin, as in every panel. And a neutral login path reduces casual fingerprinting of which panel you run; it is not a security control.
This setup exists because resellers asked for it. The request that prompted tighter branding lives on ScalaHosting’s public feature board, Cloud Democracy. This is where you can suggest your own desired features or SPanel, and, if they gain enough traction – you will soon see them implemented.
Branding with ScalaHosting – the Login URL, hostname, and nameservers – is included free on every ScalaHosting managed VPS, with no white-label surcharge and no per-account fee. In the wider category, white-labeling is often where the surcharges live.
FAQ
Q: What’s the difference between branding and a branded hostname?
A: Branding changes the panel – name, logo, and the /hostpanel login URL. The hostname is the server’s own name (like server1.yourbrand.com) that mail and FTP client setup screens display. Branding doesn’t change it; you set it through the Admin Interface.
Q: Do I still need branded nameservers if I already enabled branding?
A: Yes, if you host your clients’ DNS. The branding toggle doesn’t touch nameservers. Set ns1/ns2 on your own domain so a client’s delegation reads your brand instead of your provider’s.
Q: How do glue records work for ns1 and ns2?
A: At the registrar for your nameserver domain, you register ns1.yourbrand.com and ns2.yourbrand.com as host records pointing to your server’s IP. That glue lets the rest of the internet resolve your branded nameservers. It’s a registrar step, not a SPanel one.
Q: Will my clients see the SPanel name anywhere after all three steps?
A: The panel, login URL, webmail entry, API endpoint, hostname, and nameservers carry your brand. Embedded third-party tools (webmail client, installers, phpMyAdmin) keep their own product names, as they do in every panel.
Q: Can I use a fully custom login path like /mypanel?
A: SPanel’s supported branded path is the neutral /hostpanel – the alternative to the default /spanel, chosen with the Login URL option on the Branding screen. It reveals nothing about the panel software and is inherited automatically by every new domain. Use the supported /hostpanel rather than an arbitrary custom path.
Q: Is hiding the panel name a security feature?
A: Treat it as reduced fingerprinting, not security. The neutral path removes the most obvious signal of which panel runs the server, but SPanel’s security comes from SShield and the hardening stack.