Managing Email Accounts in cPanel: A Step-by-Step Guide
CPanel has been one of the most popular web hosting management solutions on the market for decades now. The multifunctional platform allows you to monitor and operate pretty much every aspect of your hosting journey – site files and databases, domain names, resource usage, security, and more. But undoubtedly, one of its most utilized functionalities concerns emails.
Today, we are going to dive deep into cPanel’s email options – what can we do, how can we do it, and how would that benefit our online project?
Let’s dig around for some answers!


Introduction to Email Account Management in cPanel
Technology nowadays has given us plenty of solutions to easily communicate – thousands of messenger apps and tools have made connecting with a prospect and discussing possible business effortless.
Surprisingly, however, email users are on the rise, and more than 4 billion people still rely on this means of communication.
Digging down, however, we can easily see why:
- More than 31% of marketers utilize email marketing, accruing over $11 billion in revenue.
- Over 350 billion emails are sent each day.
- The average open rate varies between brands and industries, with the best-performing being Hobbies (27.74%), Religion (27.62%), and Arts (26.27%).
- Around 64% of startups and small businesses rely on email marketing as a method of gaining new clients.
- 21% of businesses send emails daily, and 22% even do that 2-3 times per day.
Hundreds of statistics all imply the same – emails are here to stay! And cPanel aims to make their management as easy as possible.
Accessing cPanel’s Email Section
Navigating to your emails in cPanel is an absolute breeze:
- If you are a shared server client, you will have your cPanel login details in one of your Welcome Emails.
- If you are a VPS owner, you will get your WHM login credentials, where you can create as many cPanel accounts as you wish with the username/password of your choice.
Once in the control panel, you will see numerous sections, each containing a few options. The one you need is named Email. In this section, you can create and manage email accounts, use webmail, create forwarders, and many more.
So, let’s start with the basics.
Creating a New Email Account
Most hosting providers allow you to create unlimited email accounts, and cPanel offers a user-friendly environment to do so easily.
You just need to follow a few simple steps:
- Log in to your control panel.
- Navigate to the Email section.
- Choose the Email Accounts option.
- On the next screen, you will see the blue +Create button on the right.

- Input your desired username and password for the account.
- You can tweak the Optional Settings to define your storage quota, apply automatic folder creation, and more.
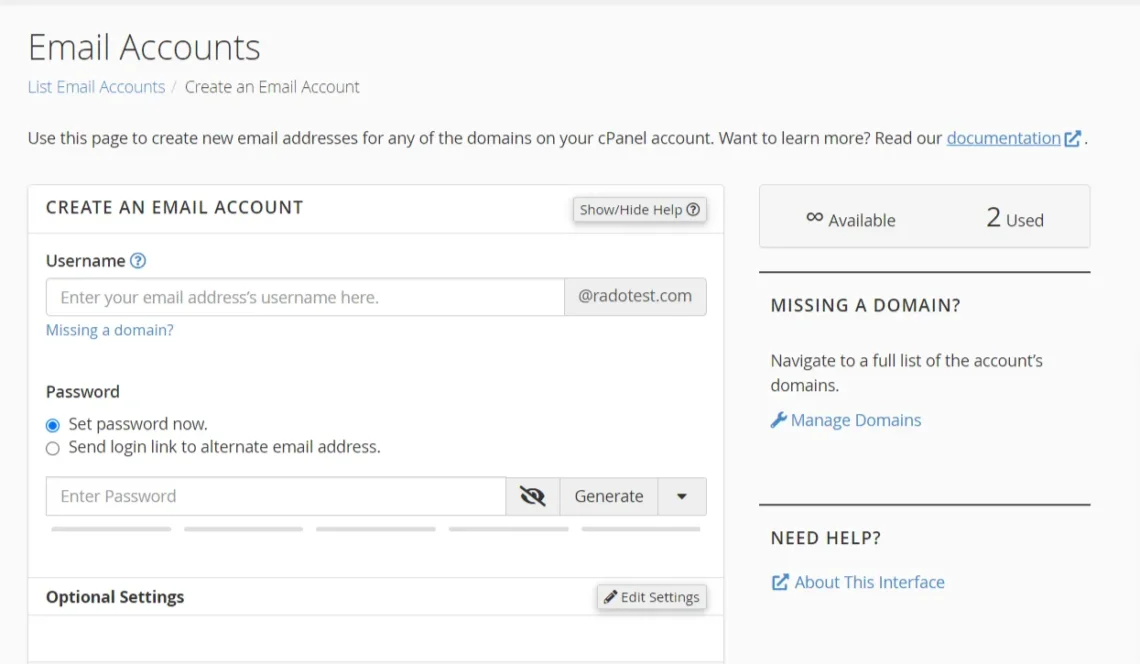
- Once ready, click the +Create button again to finish the setup.
As you can see, configuring your email accounts in cPanel is child’s play. It takes no more than a couple of minutes, and you can start using the created address immediately after that.
Setting Up Email Forwarding
Email forwarding is one of the most popular functionalities for mailboxes. It allows the users to redirect messages from one or more addresses to an entirely different one.
This simple procedure holds a variety of benefits:
- Keeps your personal/work email address private.
- Easier organization of work files and documentation.
- Saves a ton of time by only needing to check one inbox.
- Custom filtering for better email protection.
If you need to utilize email forwarding, you can do so in just a few easy steps:
- Log into the cPanel dashboard.
- Under the Email section, choose Forwarders.
- Click on the blue Add Forwarder button.
- The next screen will give you options to select a Forwarding and Destination address.
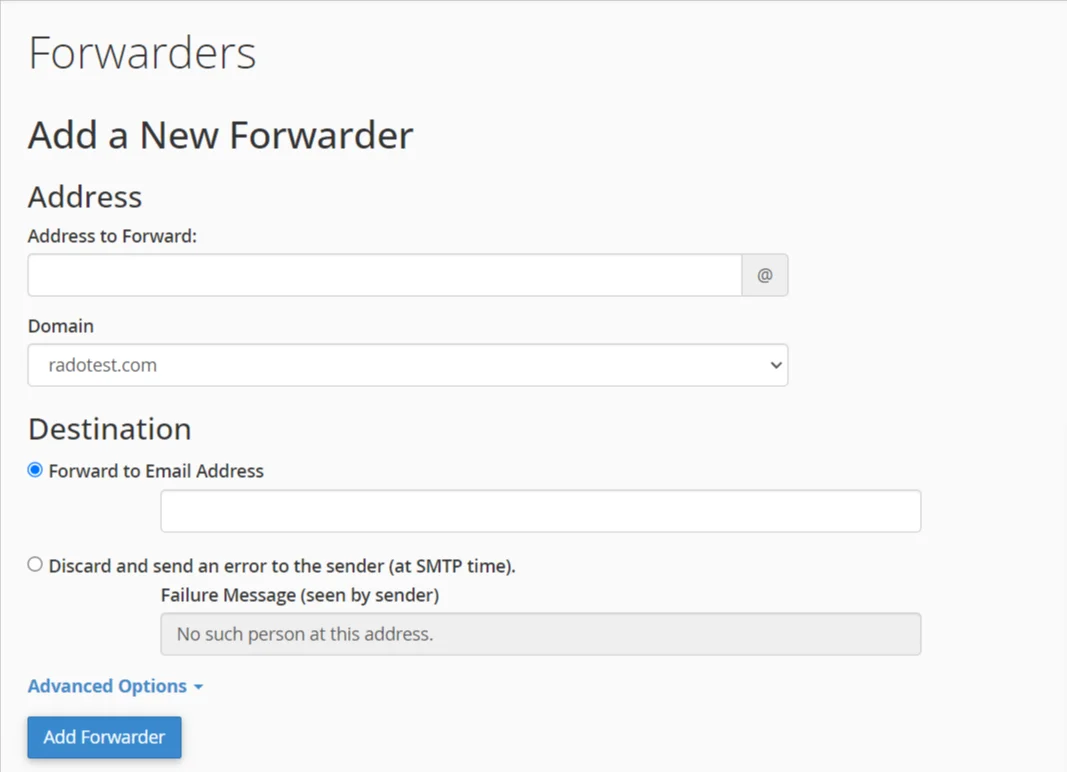
- Hit the Add Forwarder button again to confirm.
You can apply the above steps for as many email addresses as you wish, and the changes take immediate effect. You also have the option to set up domain forwarding – this option will reroute all messages from all accounts under that domain name.
IMPORTANT: Email forwarding is different from a catch-all email address. The latter collects any messages sent to misspelled addresses under your domain – for example, salesS@yourdomain.com instead of just Sales. The steps to add a catch-all email address are fairly similar to the ones for Forwarders, but you need to go to Email -> Default Address to activate the option.
Autoresponders and Vacation Messages
Be it a long-awaited holiday or an extended business trip around the world, we’ve all had times when we had to step away from our work computers and enjoy the outside world. But how do we let our colleagues and partners know that we might be unavailable for a while so they might expect a delayed response?
Easy, that’s exactly why you have autoresponders.
You can set up a custom message tied to your email account, so whenever someone tries to reach you when you’re away – they will get a reply with that automatic response.
And it’s absolutely effortless to do this in cPanel:
- From your cPanel dashboard, go to Email -> Autoresponders.
- Click on the Add Autoresponder button.

- The next screen allows you to customize your message, its subject and body, as well as the email address you wish to associate with the autoresponder.
- You can optionally add a delay for the outgoing automatic response.
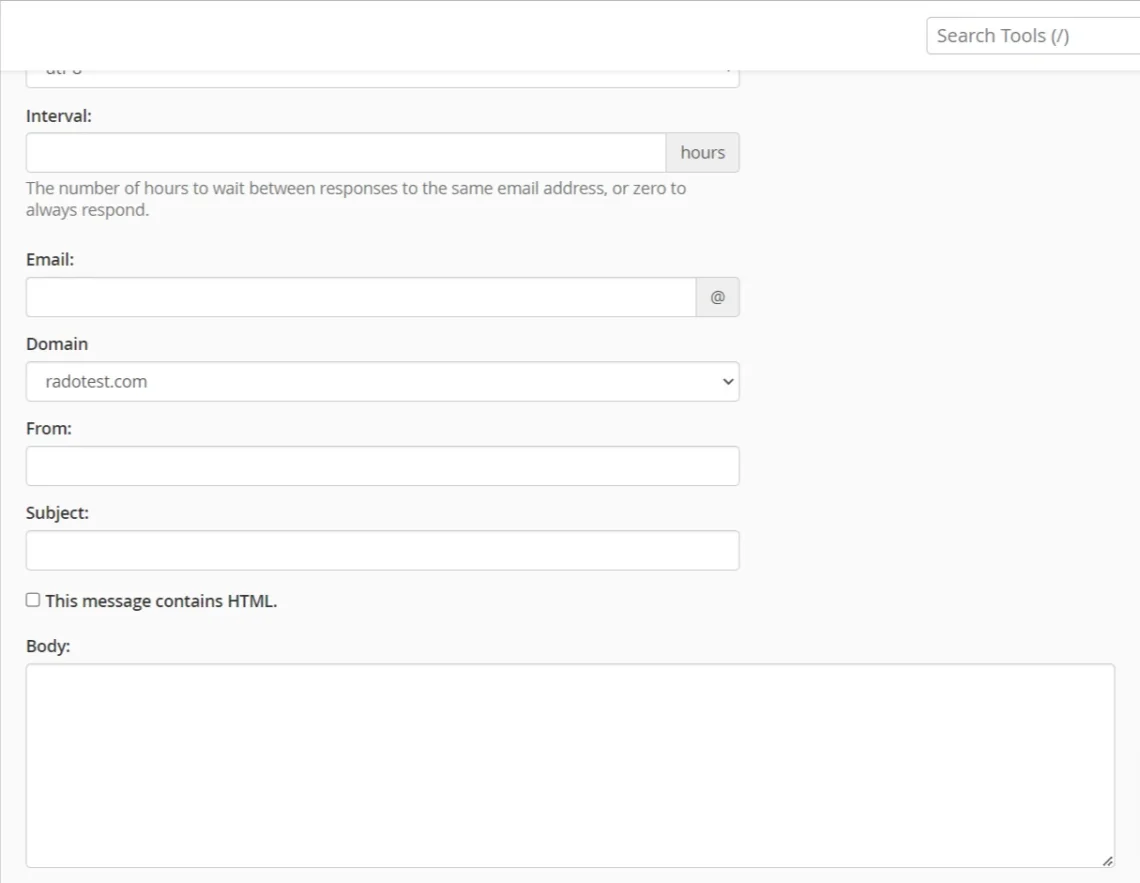
- Save your changes with the Create button on the bottom.
If you are going away on a planned holiday, you can configure the Start and End date of the autoresponder so you don’t have to remind yourself to manually remove it when you’re back.
Accessing Email through Webmail
Webmail access is a wonderful option for users to check emails for practically any device with internet access. Instead of installing and configuring a specific mail client, you can just log into your cPanel and use the integrated option – Roundcube.
Roundcube looks and feels like the average email client solution – simple, straightforward, and well-organized. The platform is completely open-source, so there are no extra charges for its use. While it might be a bit limited compared to industry giants like Outlook and Thunderbird, the app does exactly what it’s intended for and ensures you never miss an important email.
To check your messages via Roundcube:
- Log into cPanel.
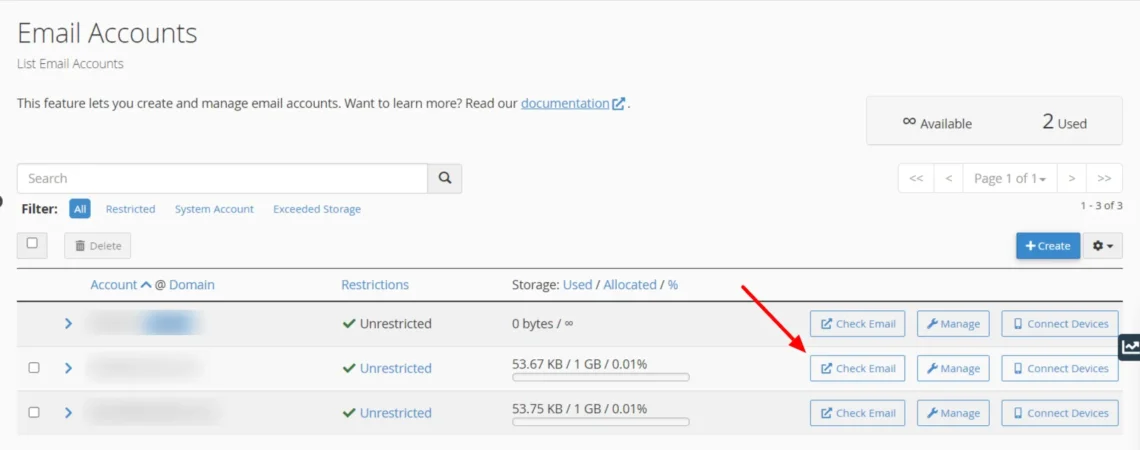
- Go to Email -> Email Accounts.
- Next to the address, you will find a Check Mail button.
- On the next screen, you can see the available options in Roundcube.
- Click on the blue Open button.

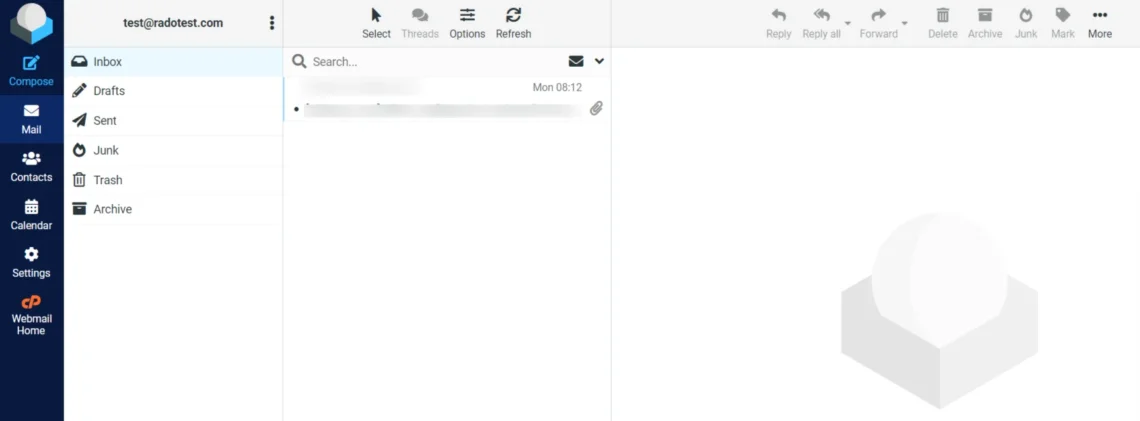
- You are now in the email interface!
As you can see, all the familiar options are here – the Inbox, Spam and Trash folders, calendars, and message settings. You can also set your own webmail forwarders and autoresponders with Roundcube.
Using Email Clients with cPanel
Going for the full email client experience, millions of people worldwide entrust Microsoft Outlook and Mozilla Thunderbird for their online correspondence. But how easy is it to integrate one of them with your email accounts in cPanel?
As it turns out – very easy!
How to Set Up Email Accounts in Microsoft Outlook
- Open the Outlook app.
- Click on Tools and then Accounts.
- Click the + sign to add a new email account.
- Enter your email address.
- Choose the option Not Outlook 365 and select IMAP.
- On the next screen, input the following settings:
Incoming Mail Settings
- Username: Your full email address
- Password: Your email account password
- Server: mail.domain.tld (replace domain.tld with your domain)
- Port: 993
- Security Type: SSL/TLS
- Authentication: Normal Password
Outgoing Mail Settings
- Username: Your full email address
- Password: Your email account password
- Server: mail.domain.tld (replace domain.tld with your domain)
- Port: 465 / 587
- Security Type: SSL/TLS
- Authentication: set to Password
- Click Add Account, and you are good to go.
How to Set Up Email Accounts in Mozilla Thunderbird
- Open the Mozilla Thunderbird app.
- On the top left, click on File -> New -> Existing Email Account.
- On the next screen, input your name, full email address, and the desired password (no spaces).
- Once you click on Continue, Thunderbird will extract the configuration from your email provider. Make sure the Incoming and Outgoing server information is correct.
IMPORTANT: If the system cannot retrieve your email configuration, go back one step and choose the Manual Config option. In such case, you should input your POP3/IMAP and SMTP settings. Your email hosting provider can help with those if you don’t have the information.
Managing Email Account Settings
Among other benefits, cPanel gives you the option to quickly find important email account settings.
To find them, you simply need to:
- Log into cPanel.
- Next to the chosen email account, click on Manage.
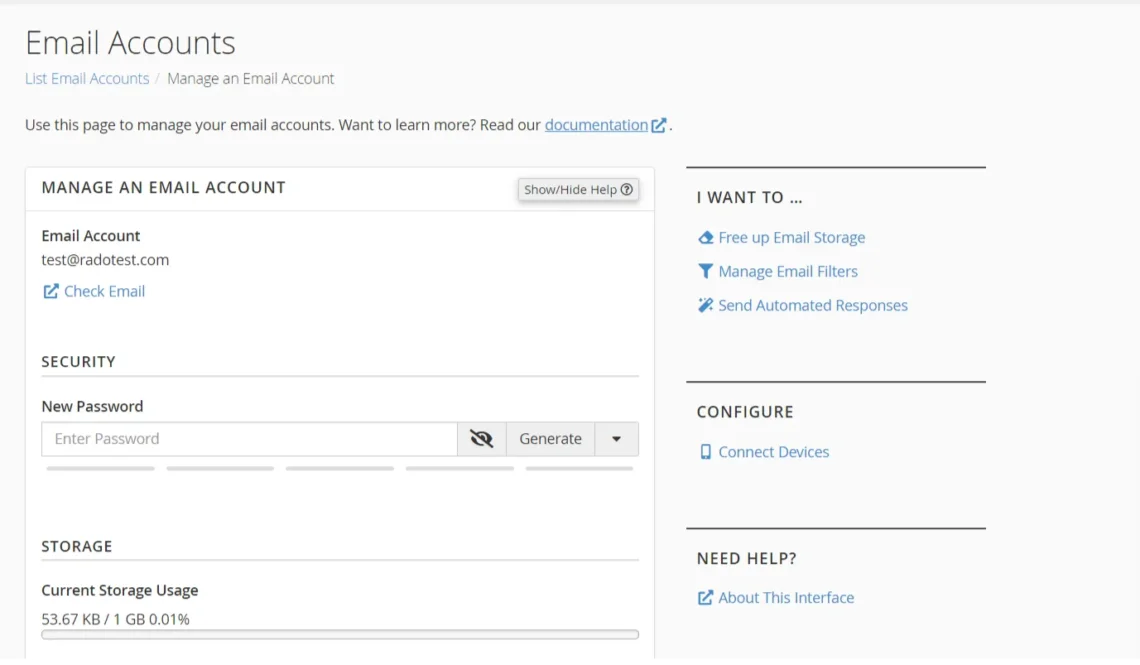
- This will take you to a new screen where you can perform some essential operations. You can check your emails, change the storage quota, manage filters, set up automated responses, and more.
Spam Management and Filtering
Email spam is one of the most prevalent online problems nowadays. Getting unauthorized messages and ads is something everyone wants to avoid, especially as spammers are getting more and more inventive in their workarounds.
Cpanel partners up with SpamAssassin to bring you state-of-the-art protection from unsolicited emails. The platform employs a variety of spam fighting techniques (like external blacklists, Bayesian filtering, fuzzy checksum) to ensure you minimize all risks to your correspondence.
On the inside, SpamAssassin looks like this:
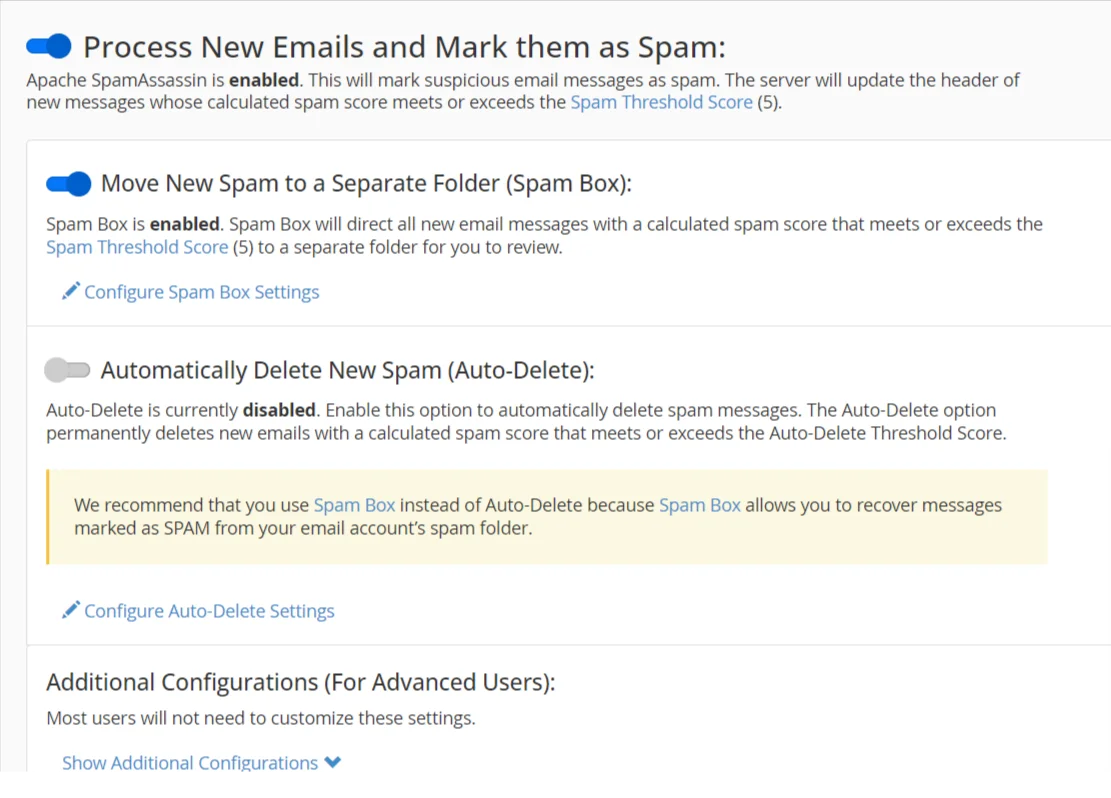
The tool is active by default, and its main filters are turned on. Unless you want to apply some specific filters, you can just leave the settings as they are. Additionally, you can put certain email addresses in a blacklist or whitelist, as well as apply filters based on the calculated spam score.
IMPORTANT: The option to delete marked spam messages is turned off by default because of false positives. If you are happy with how SpamAssassin marks all incoming emails – you can switch the toggle to On and save time on manual deletion.
Adding Email Signatures
Email signatures are a great way to look more professional and provide easy contacts to all your clients and partners. Establishing a unique signature that carries your brand elements builds trust in the audience that you are serious about your business and its public image.
As cPanel uses Roundcube as a webmail client, this is where you need to go to create your email signature:
- Open your control panel dashboard.
- Navigate to Email -> Email Accounts -> Check Mail.
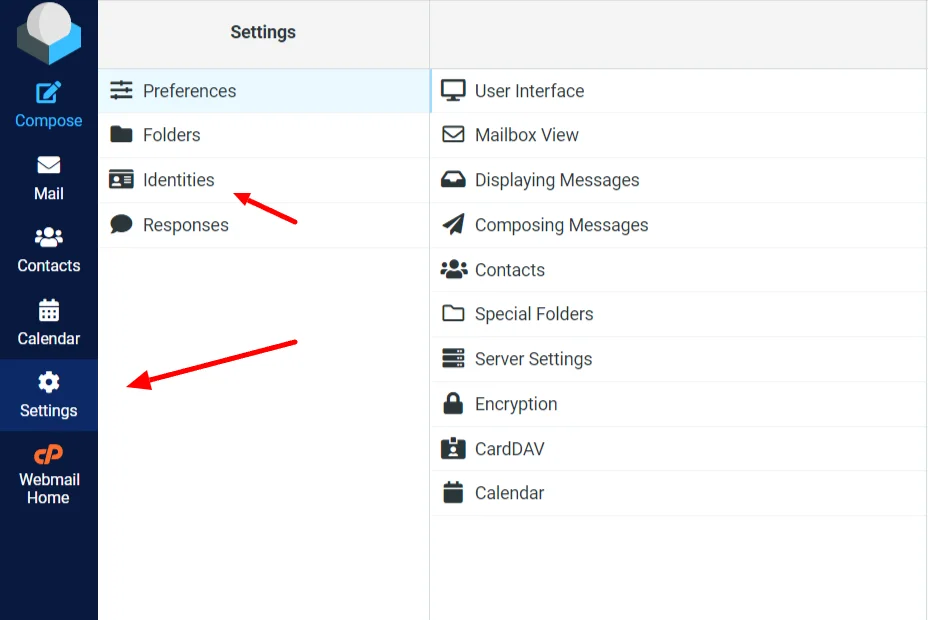
- Once in Roundcube, choose Settings on the left and then open the Identities tab.
- Select your email account and click the Create button on top.
- You will see several options you can apply to emails, and at the bottom is where you add the signature.
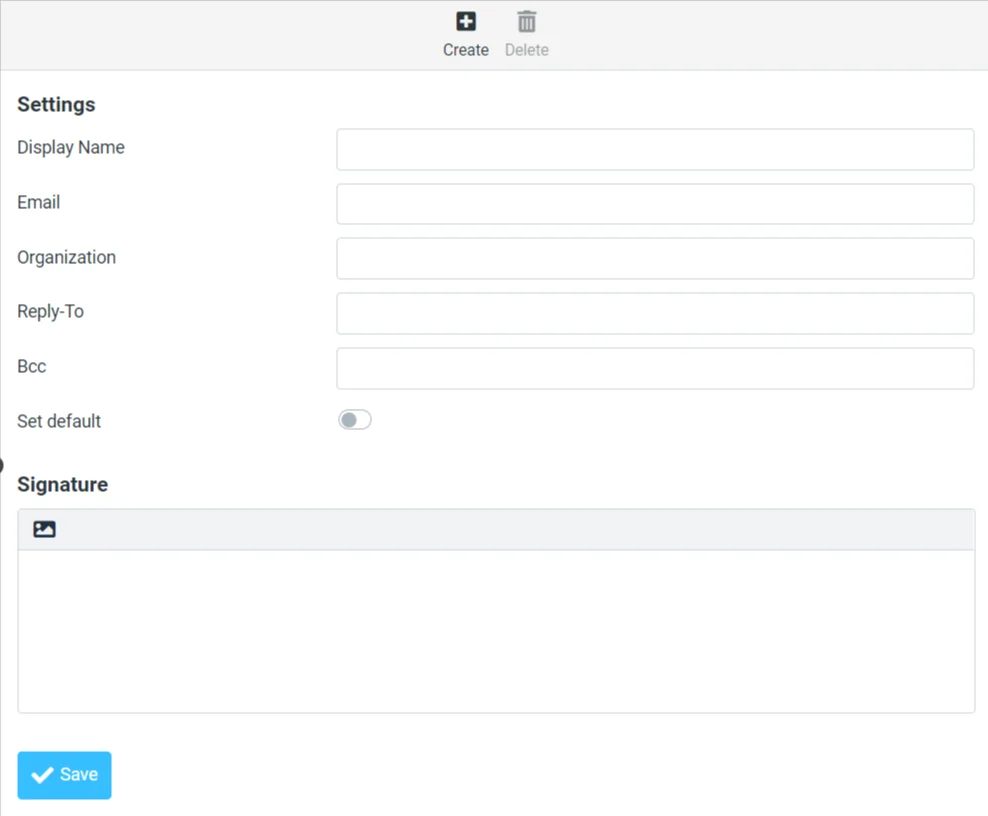
- Make sure to click Save to apply the changes.
Email Account Deletion and Recovery
Even though there are no limits to the number of email accounts you can create in cPanel, they still take up precious storage space. This is why it’s always a good idea to regularly audit your accounts and remove the ones that are inactive or unnecessary.
As you can imagine, cPanel simplifies that as much as possible.
In fact, deleting an email account takes no more than a minute.
- Log into cPanel.
- Click the Email Accounts option under the Email section.
- Now click the Manage button next to the account you wish to delete.
- Scroll down to the bottom, and right there is the button Delete Email Account.

That’s all there is to it.
Managing Email Lists and Group Addresses
Keeping your contacts neatly organized is a must if you want to maintain a smooth online communication. Mailing lists allow you to group your audience by certain factors and ensure each group only gets the relevant messages that might concern them.
The process is as simple as they come:
- Open the cPanel platform.
- Under Email, there is a Mailing Lists option.
- You will immediately see a screen where you can configure a new list. All it needs is a name and password, and you can choose to keep the group Private or Public.
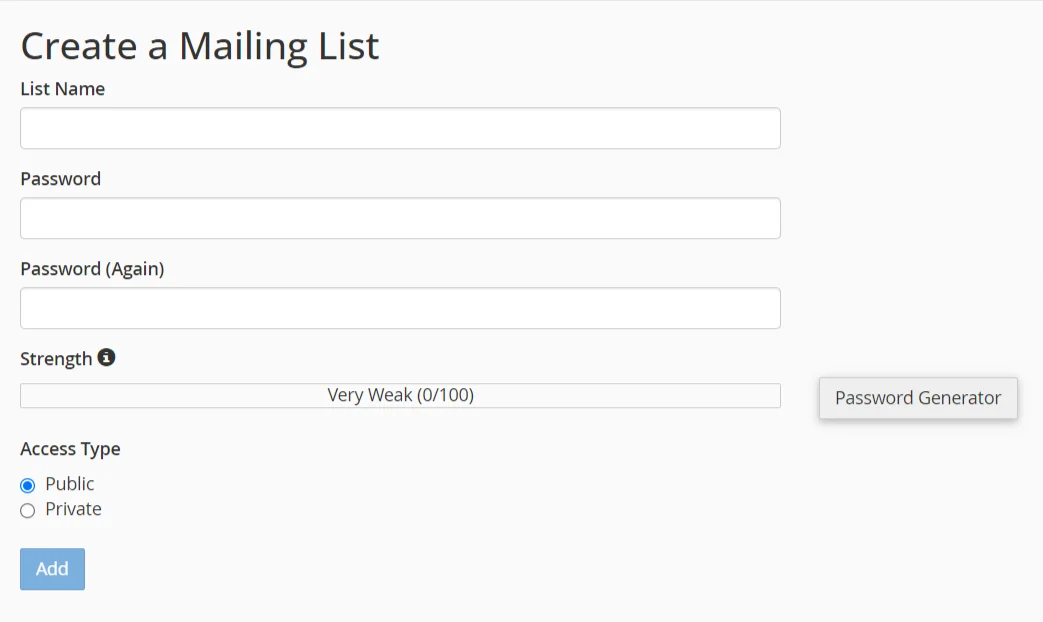
- Click Add to finish the process.
If all has been done properly, you will see the newly created email list on the main screen.
Configuring Email Authentication
Email authentication is an essential process that confirms the legitimacy of your outgoing messages. Not only that, but the integrity of the email is also closely monitored.
To ensure that only authentic messages are sent from your server, there are several standards you can apply.
- SPF – SPF stands for Sender Policy Framework and outlines the method of checking whether the sender’s mail server is legitimate. Spammers and scammers are always eager to pose as some known legitimate business, but the SPF records prevent them from doing just that – impersonating your brand. Eight main mechanisms are defined within SPF, and each can be combined with several different qualifiers and modifiers.
- DKIM – DomainKeys Identified Mail is an authentication method that aims to prevent spamming and phishing by identifying forged addresses. Think of it as a digital signature that lets the recipient know that the email was authorized by the real sender. DKIM is best combined with SPF as its standalone functionalities are closely tied to the legitimacy of the email address.
- DMARC – DMARC is short for Domain-based Message Authentication, Recording, and Conformance and is a protocol that complements SPF and DKIM. While the latter identifies if an email is coming from a legitimate source, DMARC tells the server what to do if the message is indeed marked as unauthorized.
IMPORTANT: The different authentication methods are closely intertwined, so it’s best to apply all of them instead of choosing just one from the list. Your hosting provider can help you with the proper configuration settings for SPF, DKIM, and DMARC.
Troubleshooting Email Issues
There are two main types of issues you can encounter while managing your emails in cPanel – not being able to send out messages or recipients not being able to receive them.
The most common setbacks include:
- Cannot send emails – This could be due to many reasons, but some common solutions include re-checking the recipient’s address, lack of authentication (SPF, DKIM, DMARC), incorrect SMTP settings, wrong port, or custom firewall rules.
- Cannot receive emails – Good things to check here are your DNS and MX records, email filters, blacklisting rules, or cPanel mail settings. By default, the incoming email port is 25 – make sure to check if this port is open so messages can go through. The same applies if you’ve used any other port for SMTP.
- Emails going to Spam – If your emails are consistently ending up in the recipient’s spam folder, it’s time to check what is causing this confusion – is your content up to the standards, are you using any spam trigger words, maybe your domain/server reputation is low? You should also check popular spam blacklists like Barracuda and Spamhaus to ensure it’s not a global issue holding you back.
- Emails bouncing back – email bounce backs are very useful because they tell you the exact issue that stopped your message from reaching the recipient. A simple Google search will tell you what the error means and how it can be resolved. Naturally, your hosting provider should also be able to help with such issues.
- Delayed email delivery – Delayed emails can be caused by both your or the recipient’s mail server. From your side, you can check if there are any bottlenecks or if the server is often getting too busy, so the messages end up in the queue. A third-party email service can also be a good solution and give you the smooth deliverability you are after.
Best Practices for Email Management
Following the established practices for email management can only help you ensure no messages are lost between you and your recipients.
Even though different factors come into play depending on your business and setup, there are still a few pieces of advice that work in practically any case:
- Choose a reliable email hosting provider with a good reputation and clean servers.
- Avoid opening any suspicious and unauthorized messages from unknown senders.
- Clean your inbox regularly. The same goes for your other folders, as unneeded emails just clutter your storage.
- Unsubscribe from any email lists you don’t actively wish to participate.
- Carefully set firewalls and email filters.
- Schedule emails so they can reach recipients at the most appropriate time.
- Keep your emails professional and to the point, avoid any spam triggers.
Conclusion
Cpanel is an excellent way to establish a secure email environment and bring your online communication to the next level. The platform contains a wide variety of mail options that help users easily navigate through multiple accounts, set forwarders and autoresponders, apply authentication protocols, and many more.
Alternatively, you can find all that and more with ScalaHosting’s SPanel. Our unique web hosting management platform contains all the needed options for smooth communication without the regular price increases and extra fees of cPanel.
Contact the ScalaHosting Support Team and check how we can help your emails always reach their destination.
FAQ
Q: How many email accounts can I create with cPanel?
A: There is absolutely no limit on the number of email accounts you can configure within cPanel. Many businesses operate with an increasing number of inboxes for various teams and members, so it’s only natural they have the ability to easily manage them. The only limitation comes from your overall web hosting storage – as long as your email correspondence doesn’t exceed the total quota – you are good to go.
Q: Does cPanel host my emails?
A: cPanel is a control panel platform, and as such, it doesn’t directly store your emails. This is done on the mail servers of your hosting provider, and cPanel is just a useful tool to operate them. If your host offers offsite backups, this means your backed data (including emails) is stored on a separate server for better security.
Q: Is it free to send emails via cPanel?
A: There are no extra fees to send and receive emails via cPanel. You are simply paying your provider for the hosting service, and the emails are included as part of the deal.

