In the early 21st century, business organizations and educational institutions started exploring and developing various online learning practices. Initially, the idea was to provide more flexible and efficient training and tuition.
Then, in 2020, a pandemic swept across the globe, and suddenly, online learning turned from a convenience to a necessity.
In light of all these events, it shouldn’t be surprising that Moodle’s popularity has skyrocketed in recent years. The Learning Management System (LMS) was first released in the late 1990s and has grown to be the biggest platform of its kind. Currently, it has over 460 million users in close to 240 countries.
Since you’re on this page, you probably want to join them, but before you do, you need to install Moodle on your hosting account. Today, we’ll show you how to do it.
TL;DR: Setting Up a New Moodle Project
Setting up a fresh Moodle installation may sound like a technically complicated job. The truth is, the level of complexity depends on the installation method and the environment in which you’re deploying it. Whatever the setup, the task requires no specialized technical skills or tools. Even a novice can tackle it, but to be successful, they’ll need to pay attention to the steps.
Today’s guide will cover three different scenarios on how to install Moodle:
- How to install Moodle through Softaculous
- How to install Moodle manually on a hosting account
- How to install Moodle on your local computer
We’ll cover all the details and show you exactly what to look out for.
Deciding on How to Deploy Your Moodle Project
Moodle isn’t the most lightweight platform you’ll ever see. It relies on heavy PHP scripts and quite a few database queries to operate normally. Frequent cron jobs are required for configuring notifications, grade upgrades, and automated backups, and the generation of large course files means that the project size can expand quickly.
Many users ignore all this when choosing how to host their new Moodle projects. To keep costs down, they deploy the LMS on cheap shared plans and soon face various bottlenecks and performance issues.
The truth is, Moodle can theoretically run on a shared hosting service, but the setup presents numerous limitations that can prevent you from making the most of the LMS.
For example, cron jobs can be limited to run every 15 or 30 minutes, which breaks features and causes delays. Because many users launch database queries simultaneously, the MySQL service is often under a significant load, slowing your loading speeds to a crawl.
All this assuming Moodle starts at all. It needs quite a few PHP extensions to work correctly, and if they’re not installed, you don’t always have the means to set them up.
The solution?
A successful Moodle project needs a dedicated hosting environment, and the good news is, you don’t need to break the bank to get it. The explosive development of cloud technologies means that cloud hosting solutions are becoming more and more affordable. For example, at ScalaHosting, you can get a fully managed virtual server for as little as $14.95 per month. This is marginally more than the premium shared service required to make Moodle run, but there are a few key advantages:
- Guaranteed resources
In a VPS, the hosting environment is fully isolated. You don’t share the hardware resources with anyone else, so your performance isn’t dependent on how much load other projects put on the server.
Loading speeds are faster and more consistent, and the overall operation is more predictable.
- Infinite scalability
A properly configured cloud infrastructure should give your virtual server practically infinite room for growth. There’s an enormous pool of hardware resources you can tap into, so whenever you need more processing power, memory, or storage space, an upgrade is just a few clicks away.
With ScalaHosting, you can tweak individual components, allowing for even more flexibility.
- An optimized hosting environment
Choosing the correct hosting provider plays a significant role in ensuring your Moodle project runs smoothly. For example, ScalaHosting has a range of hosting solutions optimized specifically for Moodle. Our technical experts have configured the virtual servers to provide the best possible performance and reliability for the world’s most popular LMS.
All required PHP extensions are installed, and the operating system’s settings are tweaked to ensure impeccable uptime, security, and speed.
- Easy management
ScalaHosting’s Moodle hosting solutions are fully managed, meaning our technical experts take care of things like OS updates, security patches, and core server settings. However, ultimately, it’s up to you to deploy and manage your Moodle project. To help you, we’ve equipped all our cloud VPS solutions with SPanel – an all-in-one web server management platform that helps you with all aspects of your site’s development.
This, of course, includes Moodle’s installation. Let’s see how it’s done.
How to Install Moodle Via Softaculous
In the past, installing any website building application on a hosting account meant downloading and extracting the files in the document root, setting up a new database, and configuring the app to work with the rest of the components.
An automatic installer does all of the above in mere seconds, and all you need to do to trigger this chain of events is click the mouse several times.
Softaculous is by far the most popular automatic installer. It’s widely available on most popular web hosting control panels, and using it is about as straightforward as possible.
Here’s how to install Moodle if you’re using Softaculous on an SPanel server.
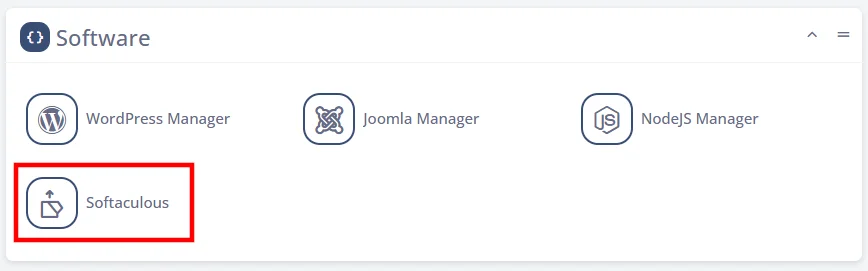
- Open Softaculous from SPanel’s User Interface.
The Softaculous app installer is located under the Software section on the homepage.
- Type Moodle in the search box and open the app’s overview.
Softaculous supports over 400 website-building applications, so the search functionality can save you a lot of time.
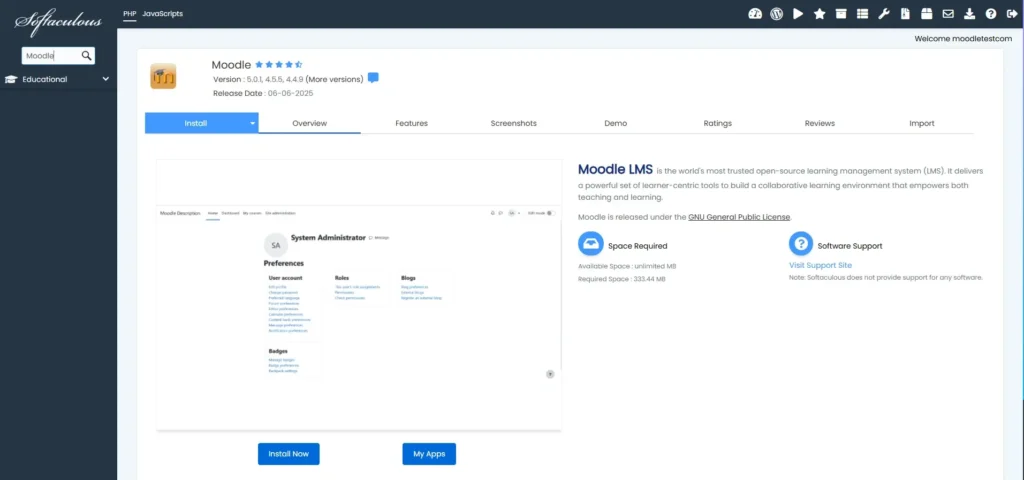
- Click Install Now and configure the installation.
First, you pick the installation URL.
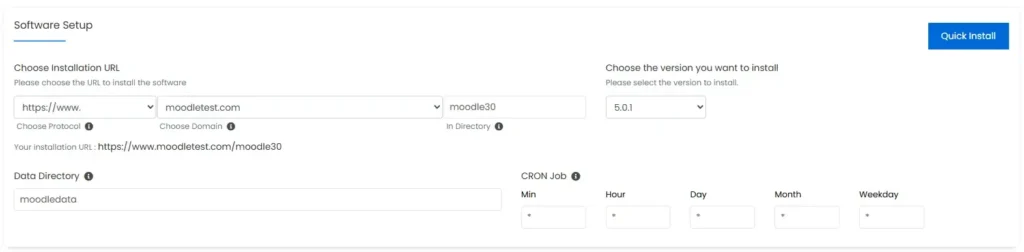
From the Choose Protocol drop-down menu, you pick whether to use HTTPS or HTTP and the www or non-www version of your domain.
The www vs. non-www debate has been raging for years, but the experts now agree that your choice should be based on personal preference. There are no technical or SEO benefits to using either.
They also agree that you should use HTTPS rather than HTTP. Your SPanel server comes with a free Let’s Encrypt SSL certificate that is automatically installed once you point your domain, so you have that requirement covered.
Pick the correct domain (or subdomain) from the Choose Domain drop-down and use the In Directory field to install Moodle in a subfolder (e.g., https://www.domain.com/moodle). Leave it empty if you want to set up the installation in the domain’s document root.
On the right, there’s a drop-down, allowing you to select the version of Moodle you’d like to install. Softaculous supports multiple iterations of the LMS, but if you want the best security, performance, and stability, it’s best to stick with the latest one.
Further down, there are fields for configuring Moodle’s data directory and cron jobs. Unless you have specific requirements, you can leave them as they are.
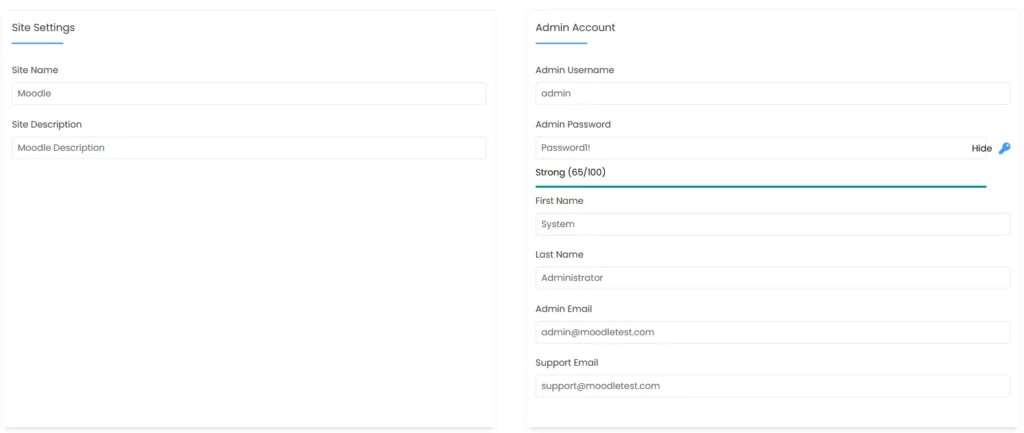
Further down, you configure your site’s name and admin account. The interface should be easy to navigate, even for complete novices.
One thing you must do is assign a strong password to your admin account. By default, Softaculous suggests using “Password1!“, which is a terrible idea. Be sure you choose a properly random password, and don’t forget that it needs to be unique. Otherwise, you’re putting your Moodle installation at serious risk.
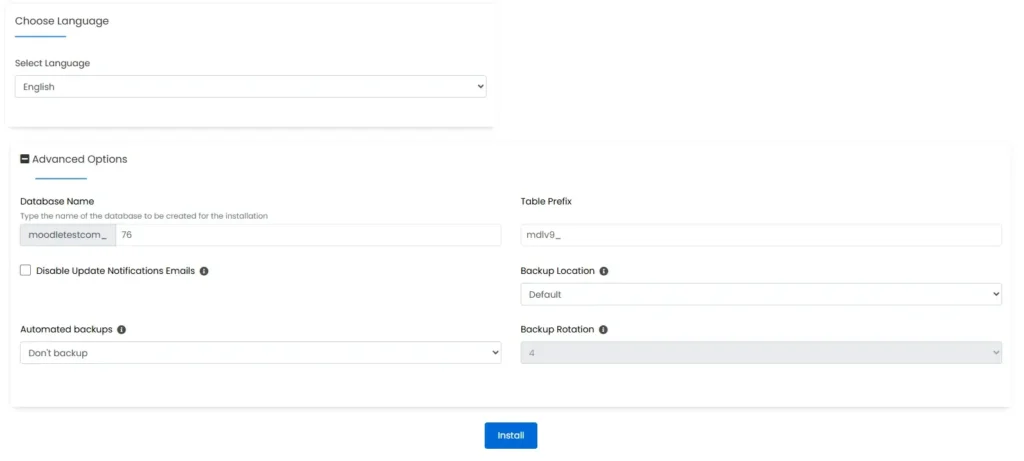
Scroll further down, and you’ll see a drop-down letting you choose the language of Moodle’s interface. Below it, there’s a menu labeled Advanced Options. Through it, you can tweak things like backups and the name of your database. If your hosting account has a good enough automated backup system, you won’t need to touch anything.
- Click Install.
Softaculous will download the chosen Moodle package, extract the files, set up the database, and configure everything. Within a minute, you can start work on your site.
How to Install Moodle Manually
If Softaculous isn’t available, you’ll need to install Moodle manually. While this sounds complicated, once you follow the steps, you’ll see that the process is fairly straightforward. Let’s get to it.
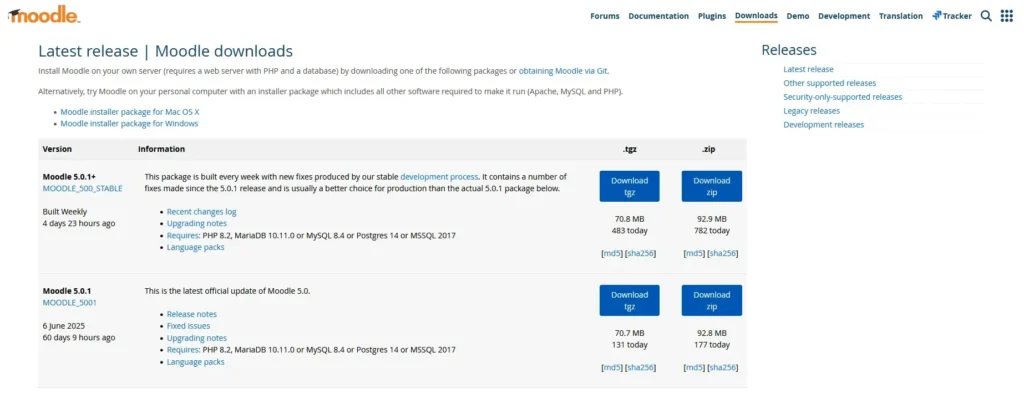
- Head to the official Moodle website and download the LMS.
You can choose between the latest official release and a version that regularly receives stability enhancements and fixes. The latter is the better choice for production environments. You can download Moodle either as a ZIP or as a TGZ archive.
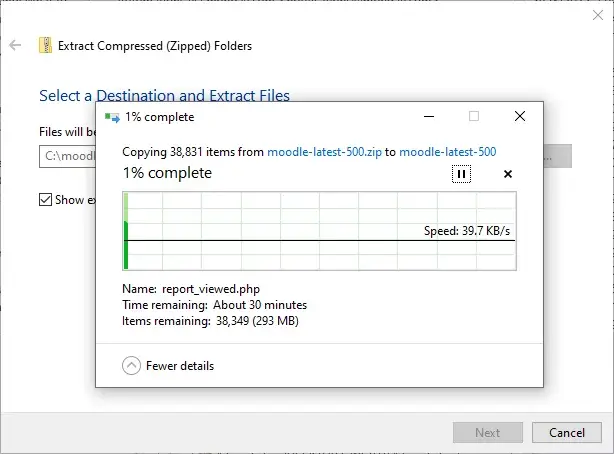
- Extract the archive on your local computer.
If you use SPanel, you can extract the archive straight on the server, but we’ll first unpack it locally to save storage space.
- Connect to your hosting account via an FTP client.
Our next step is to upload the files to your hosting account. To do that, you need to connect to the server via an FTP client like FileZilla. If you’re unsure what login credentials you need, use the ones you received in your welcome email.
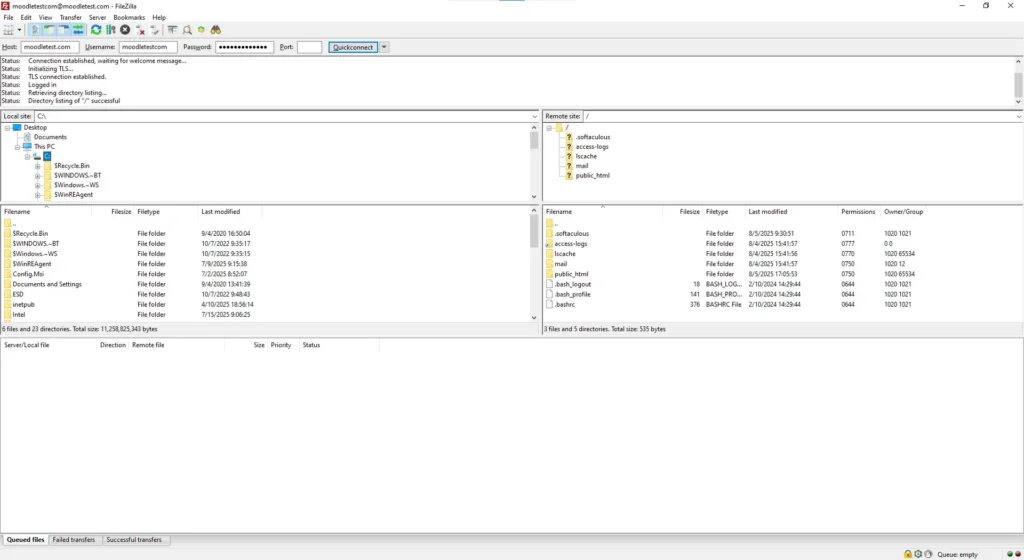
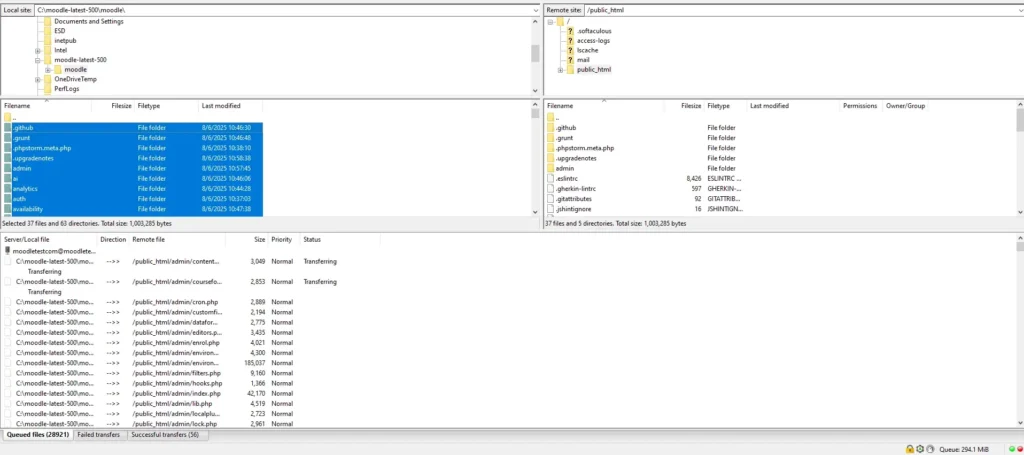
- Upload the Moodle files to your hosting account.
In the left-hand pane, the files and folders are stored on your local hard drive. Navigate to the folder hosting the Moodle files you extracted a minute ago.
On the right, you have the contents of your hosting account. Go to the directory that will host your Moodle installation. If you want to host it in your domain’s document root, open the public_html folder.On the left, select all the files and folders you extracted from the archive and press Enter. FileZilla will start uploading them to the server folder in the right-hand pane.
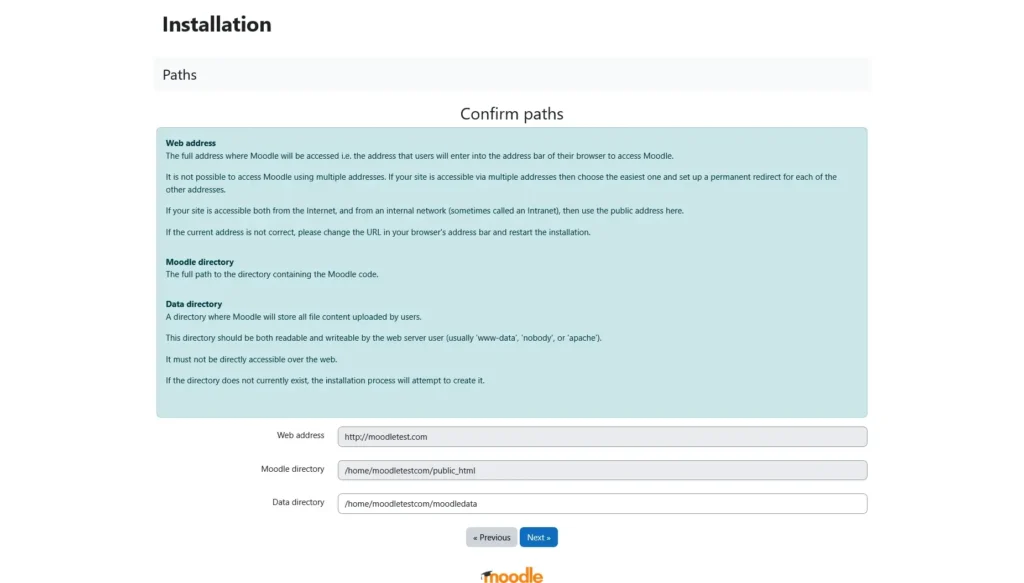
- Open a browser, enter the installation URL, and start the Wizard.
After you choose your preferred language for Moodle’s interface, you’ll have to confirm the installation URL and the file and data directories.
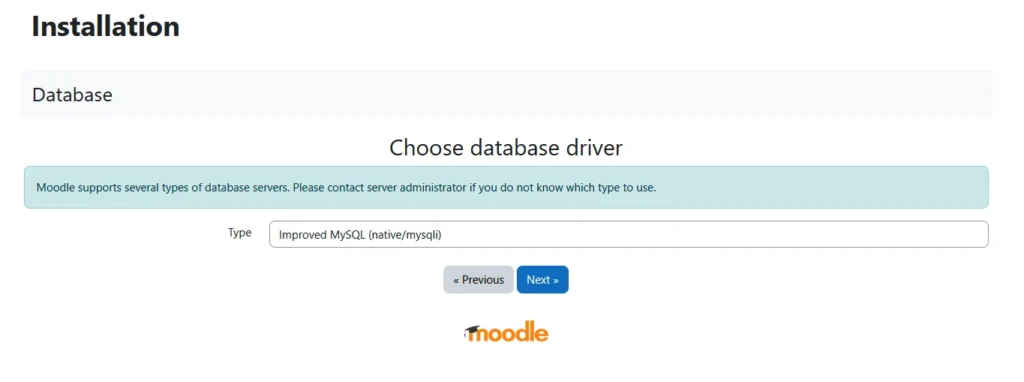
Moodle then asks what database management system you use. If you’re unsure, ask your hosting provider’s support team. If you’re deploying the LMS on a VPS from ScalaHosting, you need to choose MariaDB.
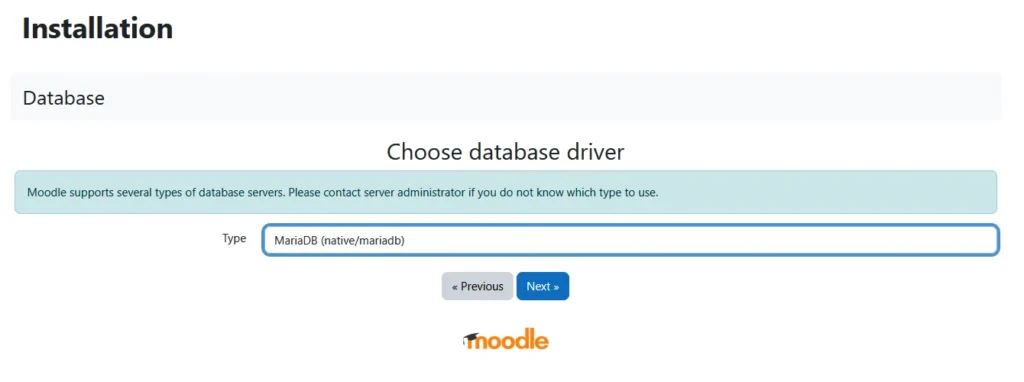
After you click Next, the Wizard will ask you for the database details. Leave the page as it is for now and open a new browser tab.
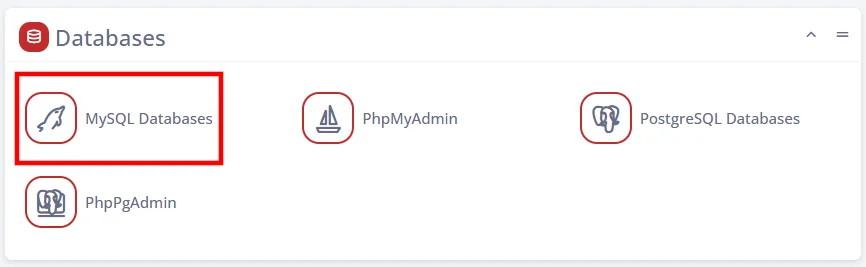
- Create a new database and user.
In the new tab, log in to your control panel and open the utility that helps you manage MySQL databases and users. If you use SPanel, the tool is located under the Databases section on the homepage of the User Interface.
Click Create a Database or a User and select the Create a user checkbox.
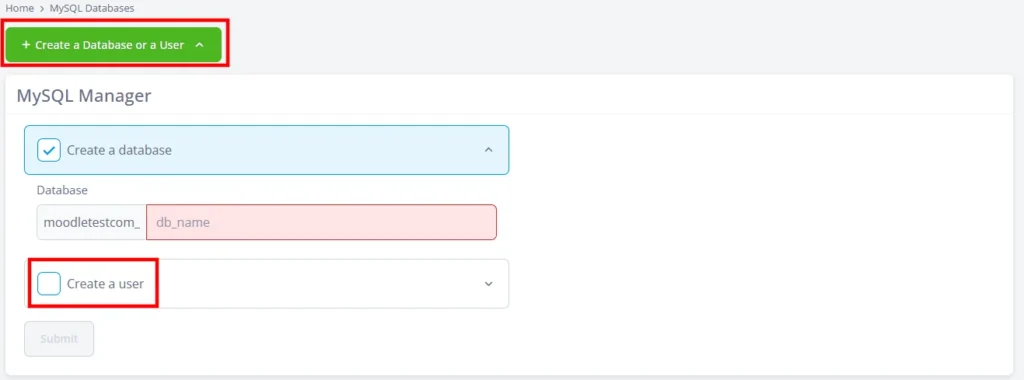
Enter a name for the database and a username for the MySQL user. SPanel has pre-generated a password for the user. Copy it and store it in a safe place, as we’ll need it in a moment.
Under Access Type, click the Local option, and make sure the checkbox that assigns the user to the database is selected.
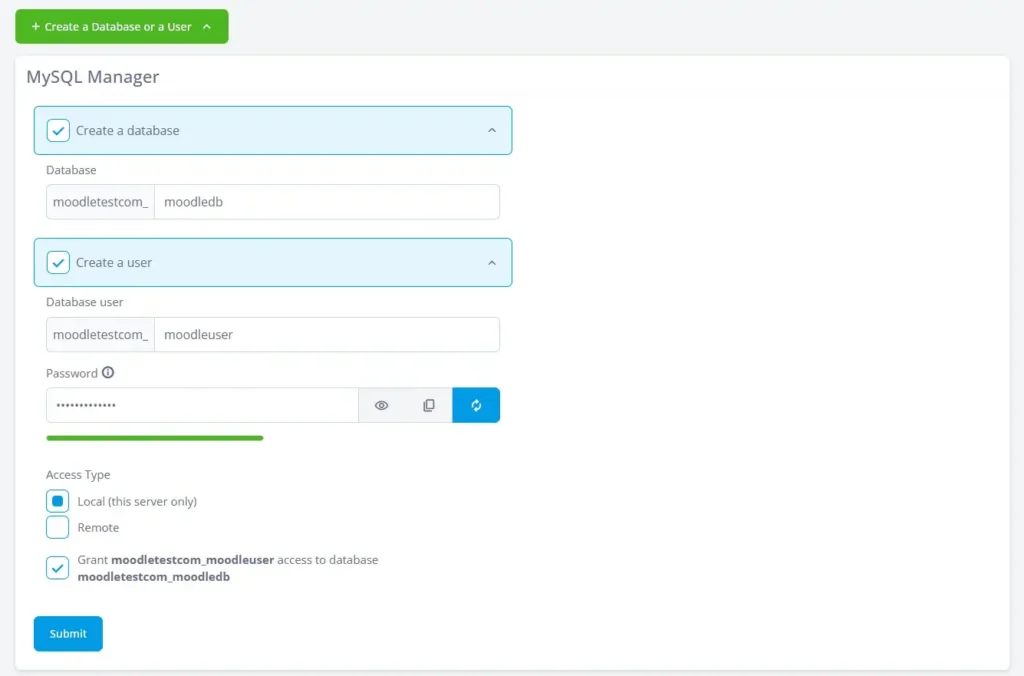
A few seconds after you click Submit, the database and user will be ready.
- Enter the database details into the installation Wizard.
It’s now time to return to the installation Wizard and enter the database details into the respective fields. The information you need is the database name, the MySQL user’s username, and the password.
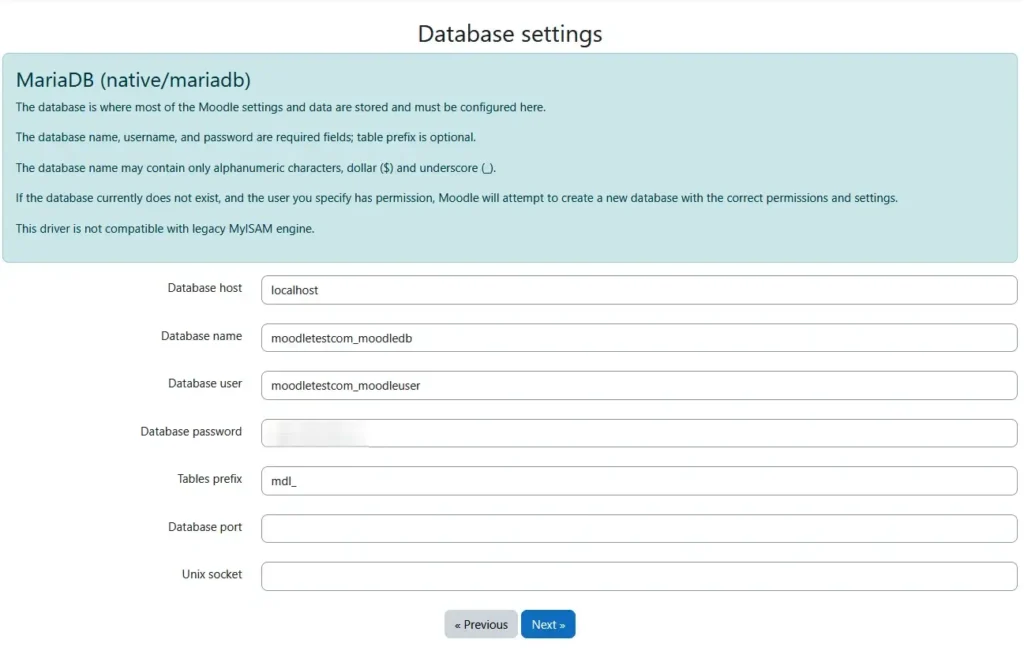
All other fields can remain as they are. Click Next to continue with the installation’s final steps.
- Finalize the installation.
After the database settings have been configured, the installation wizard will display a copyright notice. When you accept it, it will make a few checks to ensure all required PHP extensions and settings are present.
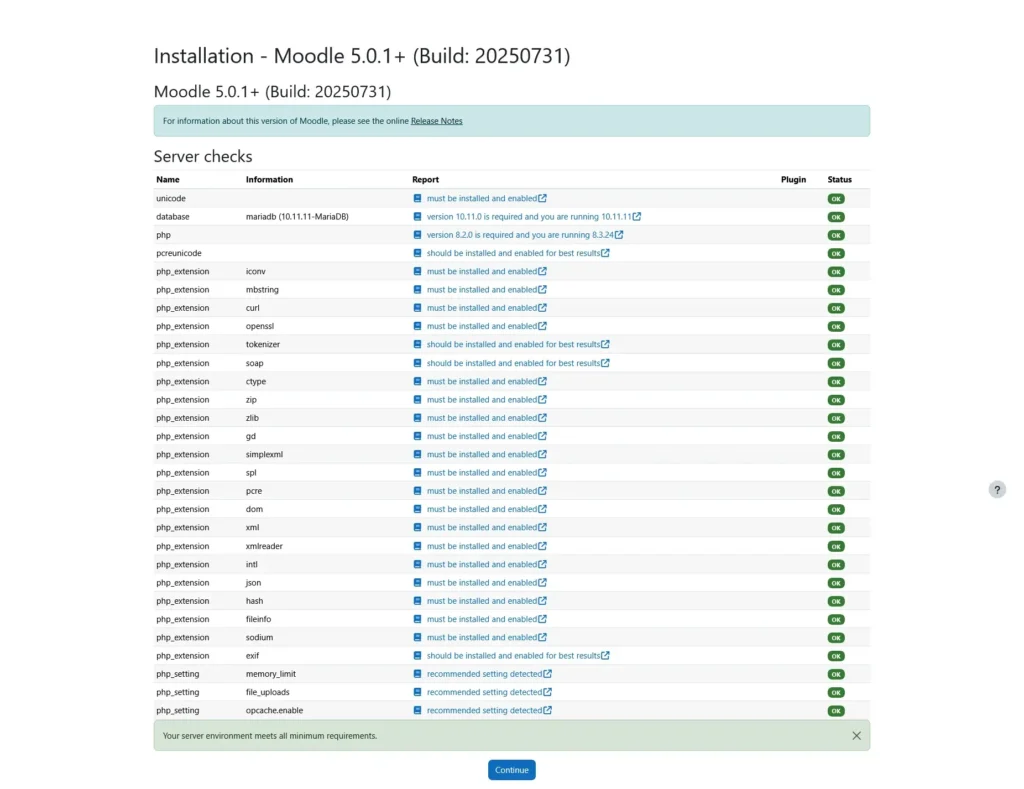
The wizard proceeds to install Moodle and all its modules. Quite a few modules must be set up, so don’t be alarmed if the process takes longer. When it’s done, you will see a long list of all the items that have been successfully installed. At the bottom, a Continue button leads you to the final step.
- Create your admin account and configure the site details.
The final form allows you to create your admin account. You can fill out quite a few fields, but the required ones are marked with a red exclamation mark.

Once you have created the admin account, you can set up the project itself. The wizard lets you configure things like the site name, time zone, registration mechanism, support email address, etc.
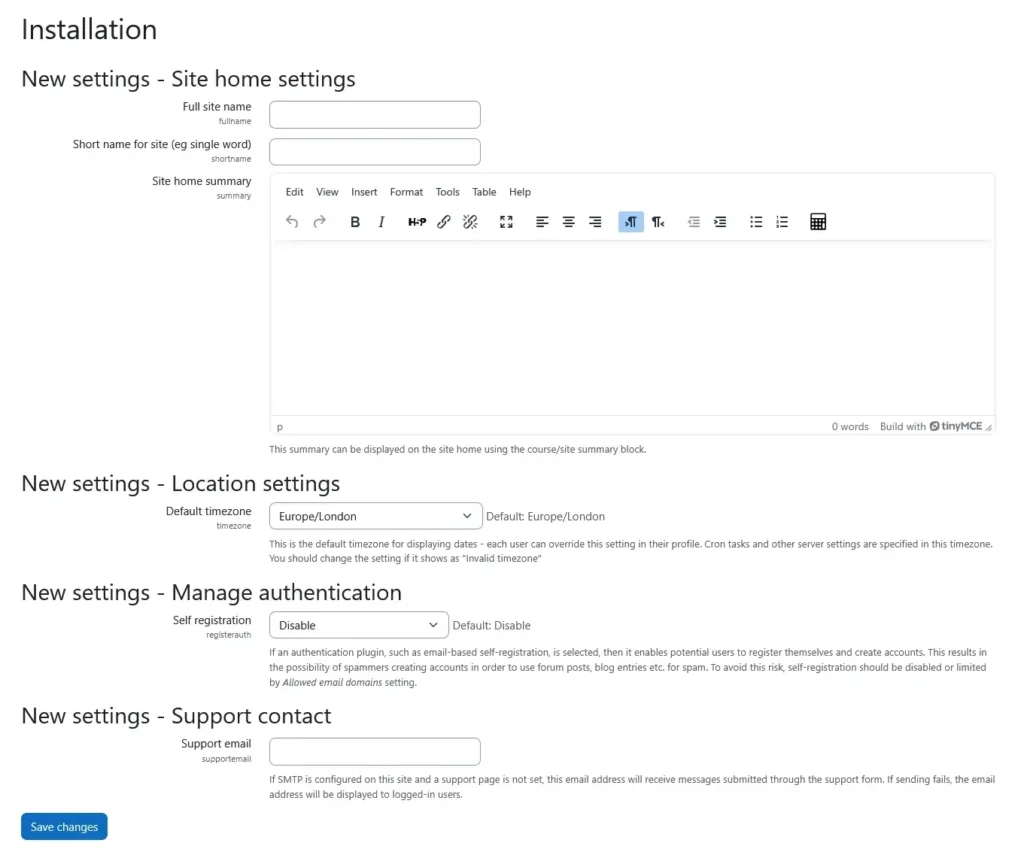
When you’re done, click Save Changes. You’ll be redirected to Moodle and logged in to your admin account, so you can start work on your project immediately.
How to Install Moodle on Your Computer
There are a few reasons why you may be reluctant to install Moodle straight on your hosting account. For example, you may not be entirely sure whether this is the most suitable app for your site or prefer to get used to the interface before you start working in production. If you have other projects running on your hosting account, you wouldn’t want to put additional load on the server.
In all these scenarios, it makes sense to install Moodle on your local computer first. That’s what we’re about to do right now.
Essentially, we’ll be performing a manual installation, but in the local environment, we’ll use different tools.
Here are the steps:
- Install XAMPP.
You can’t just download Moodle and expect it to work on your computer. Your local machine lacks a few key components, namely the web server software, the database management system, and the PHP interpreter. That’s why you need to install XAMPP on it.
XAMPP is an open-source web server solution stack. It combines all the technologies you need to run an application like Moodle on your computer. In fact, that’s where the abbreviation comes from:
- X = cross-platform
- A = Apache
- M = MySQL or MariaDB
- P = PHP
- P = Perl
The stack is available for Windows, Linux, and macOS, and can be downloaded for free from the official website of Apache Friends, its developer. On Windows, it’s set up through a standard installer, macOS users can install it via a DMG image, and on Linux, it comes as a RUN file.
When setting it up on a Windows machine, you’ll see a warning telling you to avoid installing XAMPP in the Program Files directory. To avoid conflicts and permission issues, it’s best to set it up in C:\xampp.
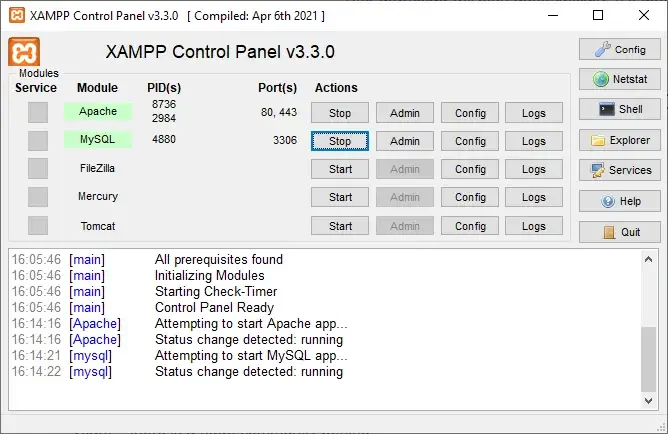
- Turn on Apache and MySQL.
XAMPP’s services are managed via an intuitive control panel in the Start menu.
To make Moodle work, open the XAMPP control panel and ensure Apache and MySQL are running. Next to each module, there’s a Start button, and after you press it, a green indicator shows up, letting you know the service is operational.
- Copy Moodle’s files to XAMPP’s document root directory.
Download the Moodle archive from the LMS’s official website, right-click on it, and click Extract all. Set the extract destination as C:\xampp\htdocs.
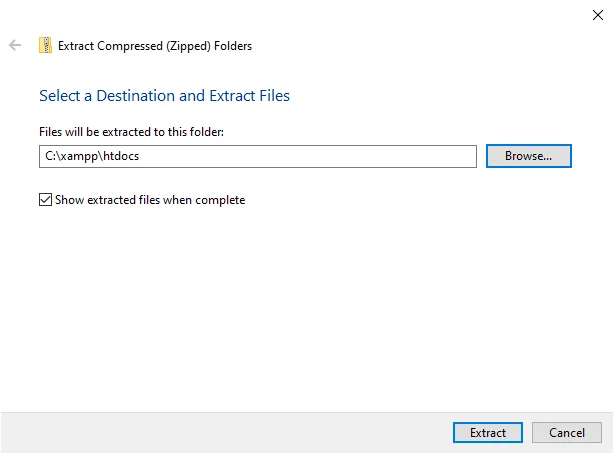
Because of how the archive is built, the files will actually be placed in C:\xampp\htdocs\moodle. This lets you run additional projects with different apps in their individual subfolders of the htdocs directory (e.g., a WordPress blog in C:\xampp\htdocs\wordpress, a Joomla site in C:\xampp\htdocs\joomla, etc.).
- Create a data directory for Moodle.
Moodle requires a dedicated data directory. When you install the LMS on your local computer, it doesn’t matter where you situate it, but you need to create it to complete the installation. You can set up C:\xampp\moodledata, for example. Just make sure you memorize the exact path, as you’ll need it in a minute.

- Create a new database.
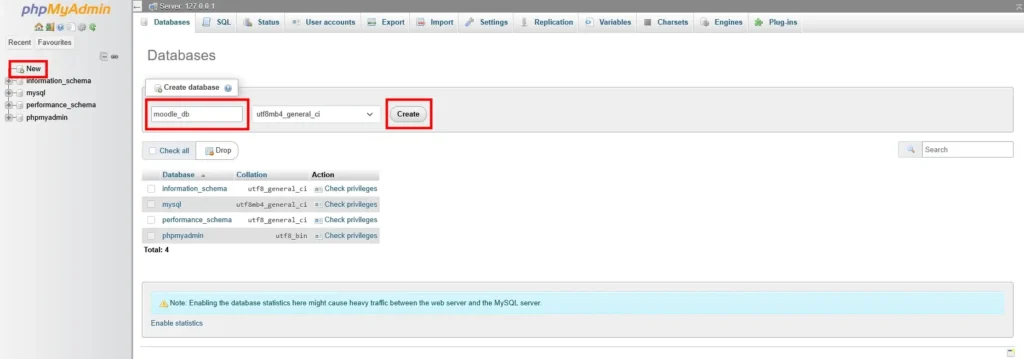
It’s now time to set up the database that will store the critical information generated by Moodle. Since your local computer doesn’t have SPanel’s intuitive interface, you need to create the database using phpMyAdmin. The process is pretty straightforward.
Open a browser window and enter localhost/phpmyadmin into the address bar.
From the menu on the left, click New. In the Database name field, enter your new database’s name (e.g., moodle_db), and click Create.
This time, we don’t need to set up a MySQL user. Instead, we’ll use the MySQL root account. The MySQL root account has unrestricted access to all databases on the server. It’s not protected by a password by design, which is why it’s usually disabled on your hosting account.
However, when you’re setting up Moodle on a local computer, where the project won’t be available online, it’s fine to use it.
- Run the installation Wizard.
In your browser’s address bar, enter localhost/moodle. You’ll see Moodle’s installation Wizard.
After you choose the interface language, you’ll see a page confirming the web address, the Moodle directory, and the data directory. If you’ve followed the steps above precisely, you won’t need to change anything here.
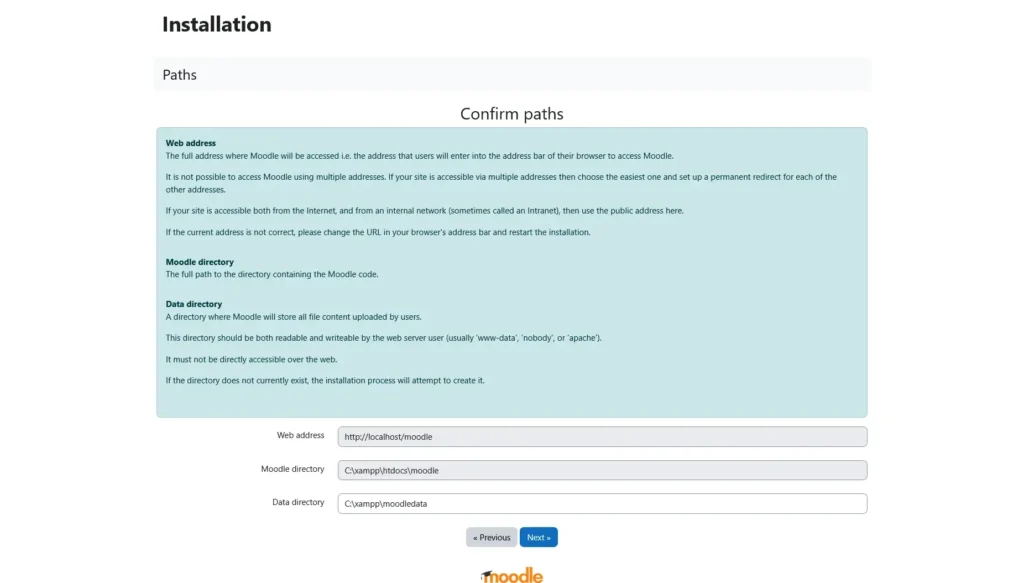
- Configure Moodle’s database settings.
On the next page, you’re asked to choose the database management system. Yet again, you need to choose MariaDB.
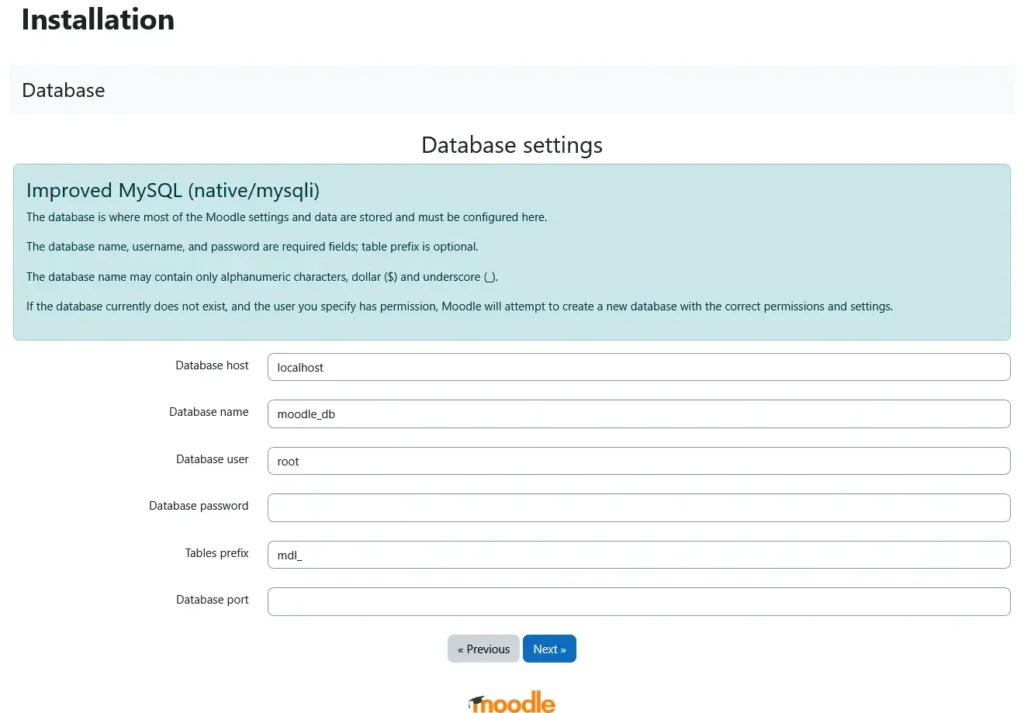
Next, it’s the database details. In the Database name field, enter moodle_db (or the name you assigned in phpMyAdmin).
The Database user is root, and the Database password field must remain empty. Leave the rest of the settings as they are.
- Finalize the installation and create an admin account.
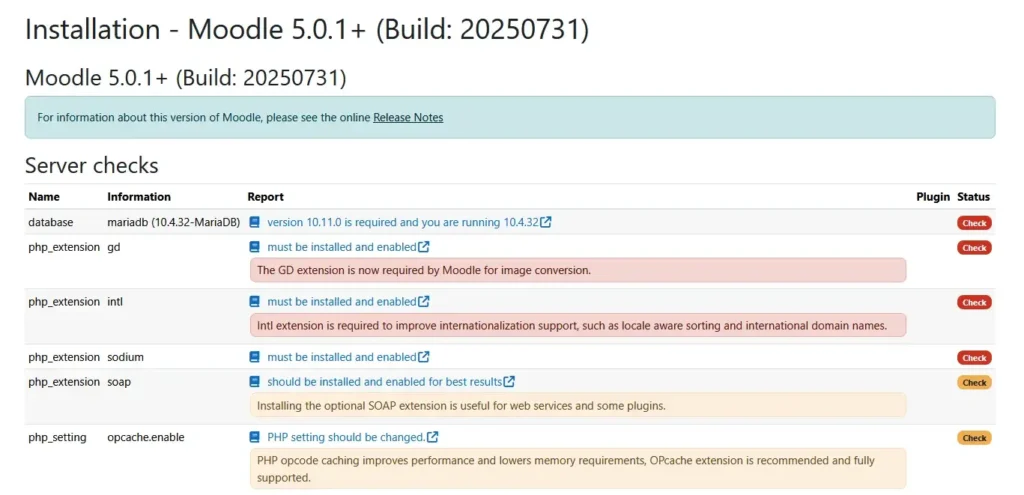
After you click Next, Moodle will display a copyright notice. Accept the terms and conditions and let the wizard perform a few checks to ensure all system requirements are met.
You may encounter a few errors related to missing PHP extensions or misconfigured settings. Luckily, there’s a link next to each issue that shows you how to resolve it. Usually, it’s a matter of quickly editing the php.ini file in XAMPP’s home folder (C:\xampp\php.ini).
After you edit the php.ini file, open the XAMPP control panel (there should be an icon in the tray bar) and restart the Apache service. When it’s back up and running, go back to the installer, scroll down to the bottom of the page, and hit Reload.
When everything’s fixed, click Continue and set up your admin account to start work on your Moodle project.
With that, Moodle should be fully operational and accessible at localhost/moodle.
Conclusion
Whether you’re using Softaculous, setting up Moodle manually, or running it on your local computer – the installation process is the straightforward part of creating a new e-learning platform. You just need a basic understanding of how the application works, and you have to pay attention to each individual step.
The tricky part is ensuring that your new Moodle installation is deployed in the correct hosting environment. Get it wrong, and you’ll be in a world of problems. Get it right, and you’ll have the performance, scalability, and maintainability you need to ensure the project’s long-term success.
FAQ
Q: What is Moodle?
A: Moodle is an open-source learning management system used to create and manage online courses and learning materials. It features dozens of tools allowing you to set up assignments, quizzes, discussions, as well as systems for grading and tracking learners’ progress.
Q: Is Moodle free?
A: Yes, Moodle is open-source and, therefore, completely free to download and use. You can install it on your own hosting server without paying a penny in licensing fees. Bear in mind that you may incur hosting and optional support expenses.
Q: What is Moodle used for?
A: You can use Moodle to set up an online learning platform, manage multiple courses and their content, and track student performance. In addition to schools and universities, businesses also use Moodle for employee training purposes.