You click Update on a plugin, refresh the homepage, and get a blank white screen. Meanwhile, customers are trying to check out.
A WordPress staging site prevents that moment. It’s a private copy of your live site where you can test changes, from plugin updates to new themes and custom code, before any visitor sees them. If something breaks, it breaks on the copy.
You can create one in two ways: use the staging tool your host builds into the server (host-native staging), or install a WordPress staging plugin that clones the site from inside WordPress. Both work. They suit different sites, though, and the difference matters most when it’s time to push changes live.
What Is a WordPress Staging Site?
A WordPress staging site is an exact copy of your live site, including its files, database, themes, and plugins, running at a separate address your visitors never see. Developers call the live version the production site and the copy the staging environment.
The workflow is simple.
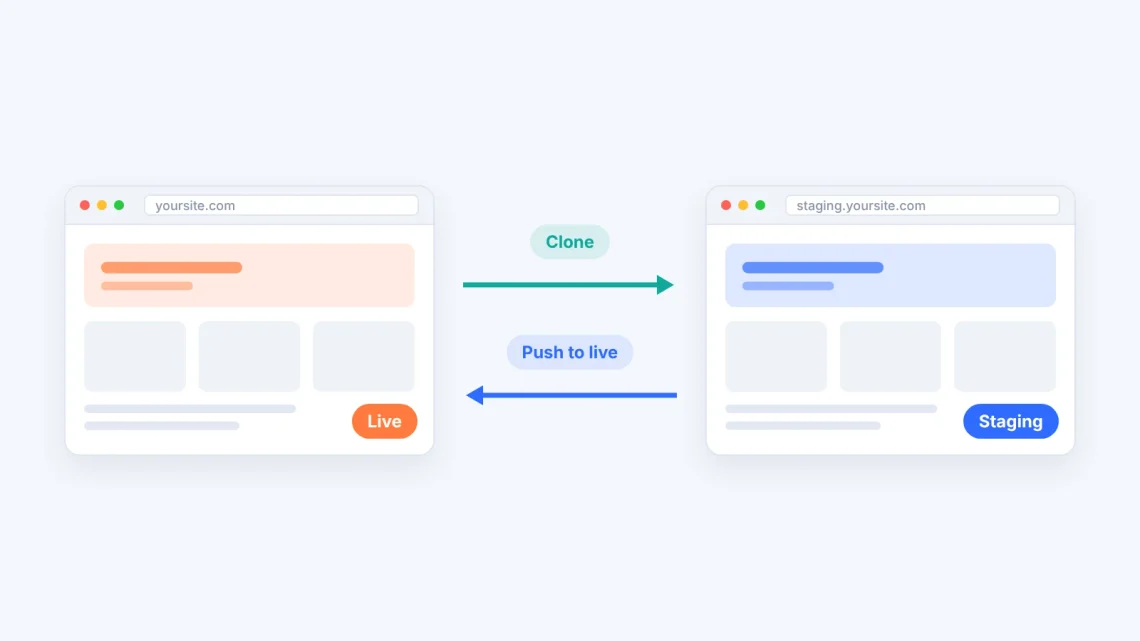
You clone production to staging, make your changes, test them, and push the approved version back to the live site.
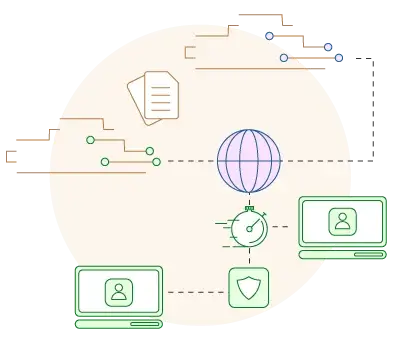
Diagram of a live WordPress site cloned to a staging site, with tested changes pushed back to live
Use staging for anything that can take a site down or change how it behaves:
WordPress core, plugin, and theme updates
PHP version upgrades
New plugins, page builders, and design changes
Custom code, snippets, and functions.php edits
WooCommerce checkout and payment changes
Host-Native Staging vs Staging Plugins: What’s the Difference?
The core difference is where the work happens.
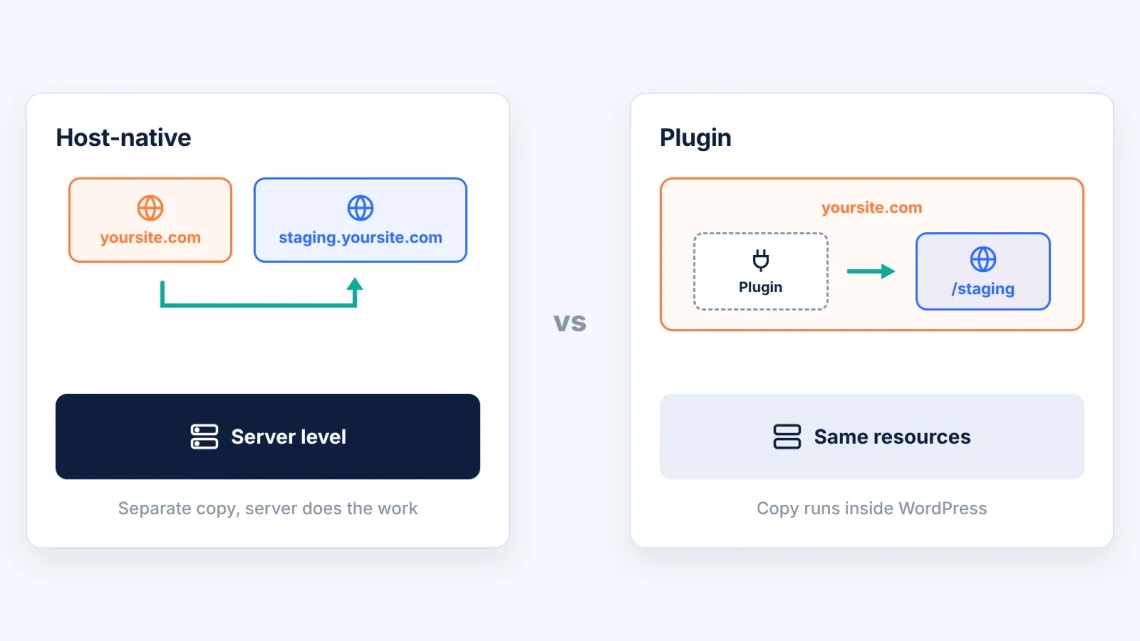
Host-native stagingruns at the server level: your hosting control panel copies the files and database into a separate environment, usually on a staging subdomain. A staging plugin runs inside WordPress itself, using PHP to copy your site into a subfolder or onto the plugin vendor’s cloud servers.
Comparison diagram: host-native staging copies the site at server level to a staging subdomain, while a staging plugin copies it from inside WordPress to a subfolder
That one difference shapes everything else. Here’s how the two staging methods compare on the factors that matter most:
Factor
Host-native staging
Staging plugin
Where the copy lives
Separate subdomain on the server
Subfolder or the vendor’s cloud
Who does the work
The server and control panel
PHP inside your live WordPress
Load on the live site
Minimal, runs outside WordPress
Shares the live site’s PHP limits
Large sites and databases
Handled at the server level
Bound by PHP time and memory limits
Push to live
✅ Built in
Often a premium feature
Extra plugin to maintain
No
Yes
Cost
Included with the hosting plan
Free tier, paid upgrades for sync
Plugins still have a place.
They’re portable, they work on any host, and some can spin up a disposable test copy in seconds. But if your hosting includes staging, it’s usually the faster and lighter option, because nothing extra runs inside your production site.
How to Create a WordPress Staging Site With SPanel’s WordPress Manager
On a ScalaHosting managed VPS, staging is already built in. SPanel’s WordPress Manager lists every WordPress installation on your account and gives each one a Stage action, alongside cloning, automatic updates, WP-CLI, and a security lock. There’s no plugin to install and no extra license to pay for.
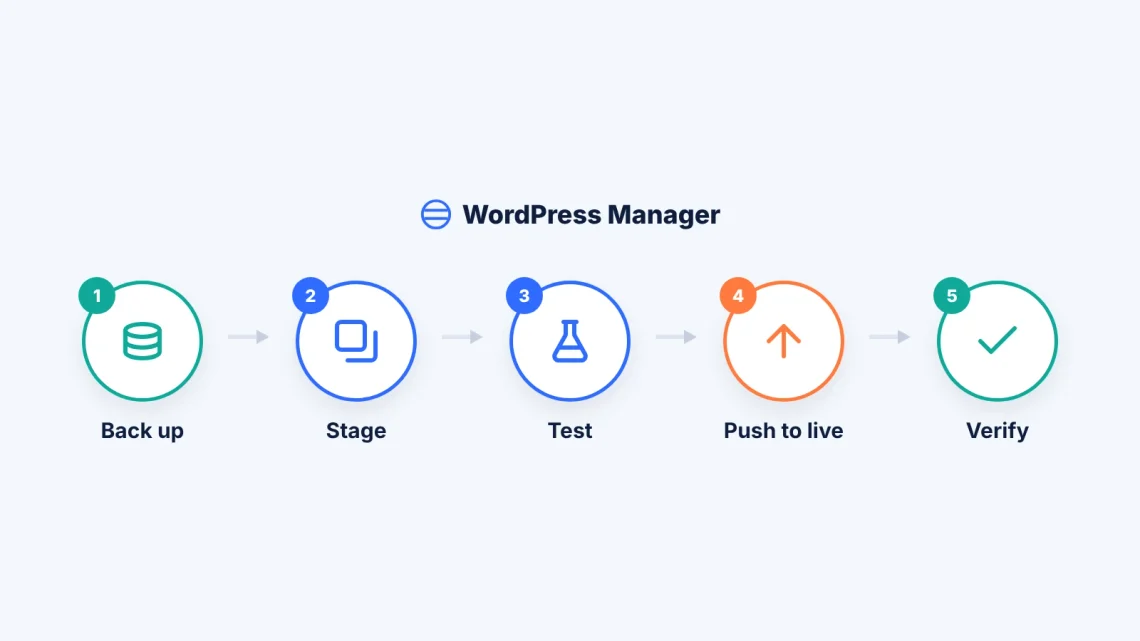
The whole process follows five steps, and each one happens inside the same dashboard.
Five-step WordPress staging workflow in SPanel’s WordPress Manager: back up, stage, test, push to live, and verify
Step 1: Back Up Your Live Site
Staging itself is safe, but pushing to live replaces production. Start with a fresh restore point.
SPanel’s scheduled backups run on hourly, daily, weekly, and monthly cycles, so a recent copy usually exists already. For a clean checkpoint, create a custom manual backup of your files and databases right before you stage. Then lock that restore point, and the backup rotation will never delete it.
Step 2: Create the Staging Copy
Creating the staging environment takes a few clicks:
Log in to SPanel. Open the User Interface for the account that hosts your site.
Open WordPress Manager. You’ll find it in the Software section, with all your WordPress installations listed below.
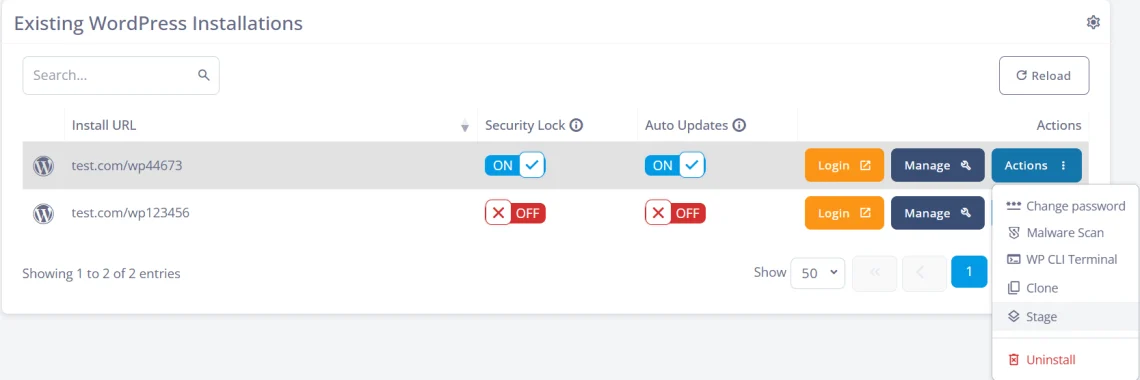
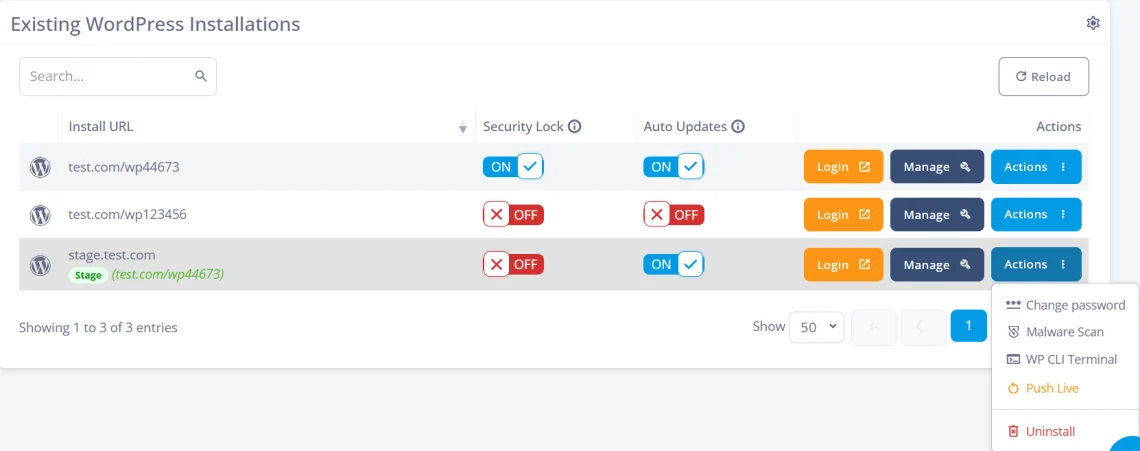
Choose Stage. Click Actions next to the site you want to copy, then select Stage.
Pick a staging subdomain. Keep the pre-selected subdomain, such as wordpress.yourdomain.com, or create a new one like staging.yourdomain.com.
Click Stage. WordPress Manager builds a copy of your site on that subdomain.
SPanel WordPress Manager Actions menu with the Stage option selected
Step 3: Test Your Changes on Staging
Your staging site runs on the same server as production, so it behaves like the real thing. Open its dashboard straight from WordPress Manager and work through your changes: you can run the updates, activate the new plugin, or switch themes.
Three SPanel tools make this testing more thorough:
PHP per subdomain. SPanel sets the PHP version per document root, so you can move only the staging subdomain to a newer PHP release and check compatibility while the live site stays put.
Built-in speed tests. WordPress Manager runs Lighthouse tests, so you can compare load times before and after a change. It’s a quick check before deeper WordPress performance optimization.
WP-CLI and search and replace. Run WordPress commands or update database records from the panel, without adding helper plugins to the copy.
One tip: if Security Lock is on for the installation you’re testing, WordPress can’t install new plugins or themes. Switch it off while you test, then turn it back on.
Step 4: Push Staging Changes to Live
Open the Actions menu on the staging installation and choose Push Live. The tested version replaces your live site, with no manual file copying, database exports, or URL search-and-replace.
Staging installation in SPanel WordPress Manager with the Push Live action.
But here’s the part most guides skip.
Pushing a staging database overwrites the live one, whichever tool you use. If your live site took new WooCommerce orders, comments, or sign-ups after you created the staging copy, those records don’t exist on staging. For busy stores, refresh staging right before your final round of testing and push during low-traffic hours.
Step 5: Verify the Live Site
Load the live domain and check the pages that earn money or leads: the homepage, forms, cart, and checkout. Clear your server, plugin, and CDN caches so visitors see the new version instead of a cached copy of the old one.
The Safety Net Behind Every Push
Staging lowers the risk of a bad update. It doesn’t remove it. That’s why WordPress Manager sits on top of several SPanel layers that protect your live site if a push goes wrong:
Single-file and database restores. Restore just the file or database a push broke, or restore a database under a new name to compare it with the live version.
Real-time security.SShield is an AI-powered tool developed by ScalaHosting that monitors traffic across the whole server, so a test copy you forgot about doesn’t become an easy target.
How to Create a WordPress Staging Site With a Plugin
If your host doesn’t include staging, a WordPress staging plugin fills the gap. The process looks much the same across most tools:
Install and activate the plugin from your WordPress dashboard.
Start a new staging site and choose which folders and database tables to copy.
Wait for the clone to finish, then log in to the staging copy.
Test your changes.
Push the staging site to live, if your plan includes that feature.
A few well-known options for WordPress staging plugins that cover most needs include:
WP Staging. Clones your site into a subfolder on the same server. Pushing changes back to live is part of the Pro version.
Duplicator. A migration plugin first, it packages your site so you can rebuild a copy anywhere, including a staging subdomain.
WPvivid. Pairs backups with a staging feature that creates the copy in a subdirectory of your server.
InstaWP Connect. Builds the staging copy on InstaWP’s cloud servers, which keeps the load off your hosting but places a copy of your data with a third party.
Keep the trade-offs in mind.
Some WordPress plugins clone your site under the same PHP time and memory limits as the live site, so large databases can stall mid-copy. A subfolder copy also shares production’s server resources and caching rules, which can make test results less reliable. And every plugin you add is one more thing to update and secure.
Which WordPress Staging Method Should You Choose?
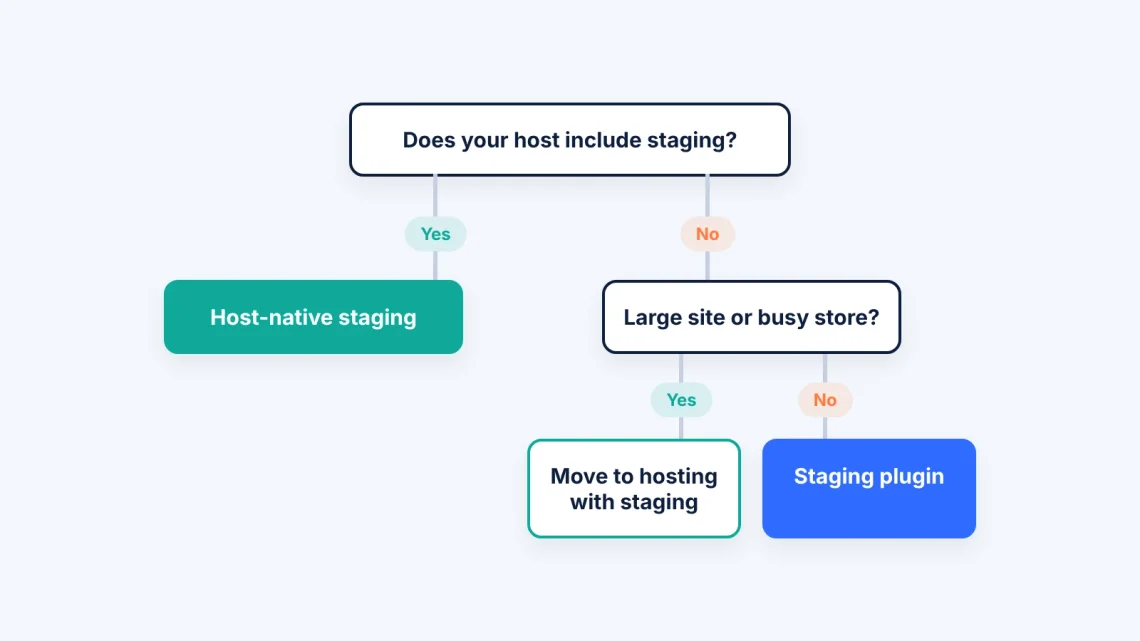
For most site owners, it comes down to one question: does your hosting already include staging?
Decision flowchart for choosing a WordPress staging method
Your host includes staging. Use host-native staging. It’s faster, keeps production lean, and usually includes a push-to-live option.
No staging, small site. A free staging plugin is a reasonable start for a blog or brochure site.
No staging, large site or busy store. A plugin is a stopgap. Slow clones, shared resources, and paid sync features add up, and hosting with built-in staging usually costs less time than working around them.
WordPress Staging Best Practices
Whichever method you choose, these habits keep staging useful and safe:
Keep staging out of search results. Password-protect the staging directory (SPanel’s security tools handle this) or block indexing, so search engines never treat it as duplicate content.
Refresh before big changes. A copy from last month doesn’t reflect today’s content, plugins, or orders.
Test one change at a time. If you update five plugins at once and the site breaks, you won’t know which one did it.
Push during quiet hours. Low traffic means fewer new records at risk and fewer visitors affected if you roll back.
Delete staging copies you no longer need. Forgotten test sites run outdated plugins and undermine everything else you do for WordPress security.
Final Thoughts
Every WordPress site needs a safe place to break things. A plugin can give you one, but staging built into the server does it with less overhead and a direct path back to production.
With WordPress Manager on a ScalaHosting managed VPS, that path is one click long, includes free backup options, and you always have SShield watching over your server for suspicious activity.
Supercharge Your Business with an All-inclusive Fully Managed Cloud
A: Not if you keep it private. Search engines can only index a staging site they can reach, so password protection or a noindex setting keeps it from competing with your live pages.
Q:What’s the Difference Between Staging and Production?
A: Production is the live site your visitors use, and staging is a private copy of it for testing. Changes normally move in one direction, from staging to production, after they pass testing.
Q:Is Staging the Same as a Local Development Environment?
A: No. A local environment runs WordPress on your own computer, which works well for building from scratch. A staging site runs on your real hosting server, so it reflects the PHP version, server configuration, and caching your live site actually uses.
Q:How Often Should I Refresh My Staging Site?
A: Refresh it before every significant round of changes. A stale copy can hide conflicts with content, plugins, or settings added to the live site since your last clone.
Q:Do I Need a WordPress Staging Plugin if My Host Offers Staging?
A: Usually not. Host-native staging covers cloning, testing, and pushing to live without adding another plugin to production. A WordPress staging plugin only makes sense when you need something your host’s tool doesn’t offer, such as a disposable copy on an external server.
Q:Can I create a staging site manually?
A: With the built-in WordPress Manager in ScalaHosting’s SPanel, you can create a WordPress staging site with a single button click. Simply open the WordPress Manager, click the Actions button next to your site, and choose the Stage option.