How to Host a Website on VPS Without Control Panel
A Virtual Private Server has many advantages over other major web hosting solutions. Unlike shared hosting, it has dedicated resources, which means you can host multiple websites and rely on excellent loading speeds and consistent performance. At the same time, it doesn’t have the hefty price tag of a dedicated server and is much more flexible and easily scalable.
If it has a control panel, it can also be pretty easy to use. Most VPS hosting providers package their solutions with management platforms like cPanel or SPanel to ensure even newbie website owners can launch their projects, monitor their VPS’s health, and tweak some server settings through an intuitive Graphical User Interface (GUI).
However, some self-managed VPS solutions do not have a control panel. How difficult is it to host a website with them?
We’re about to find out.
Prerequisites
The exact steps for launching a website on a VPS with no control panel depend on the applications and technology you’ll use. There are hundreds of different options, each with its own requirements and procedures. It’s impossible to cover them all in a single guide, so we’ll focus on the most common type of project out there – a WordPress website.
We chose this particular Content Management System (CMS) partly because it powers over 40% of the world’s websites and partly because it works great with the popular LAMP stack.
LAMP stands for Linux, Apache, MySQL, and PHP. These technologies are free and relatively easy to install, even for people with limited server management experience. Crucially, they’re used by most website-building applications, so even if you don’t want to go down the WordPress path, you’ll still need the same setup.
Before we start, we must make sure we have the right VPS hosting plan. You won’t need a particularly powerful package to begin with, so you can opt for a cheap virtual machine. Thanks to VPS hosting’s scalability, you can add more server resources later when your website starts gaining popularity. One thing you can’t change, however, is the operating system, so make sure you choose the correct one.
While you can theoretically deploy WordPress on a Windows VPS server, you’re better off looking for a Linux machine. Because installing some of the software we’ll need to launch our new website requires system-wide privileges, ensure your VPS package includes root access.
Linux may not be the most popular choice for desktop computers, but over the years, it has built a reputation for providing the best server environment. Don’t forget that, unlike Windows, many Linux distributions, especially those installed on a web hosting server, don’t have a GUI. You can’t establish a remote desktop connection and launch your website by clicking the mouse a few times.
Instead, you’ll do it through an SSH connection. SSH stands for secure shell, a communication protocol that lets you establish an encrypted connection to your Linux server and execute commands.
You have two methods for starting an SSH session:
- Through an SSH client
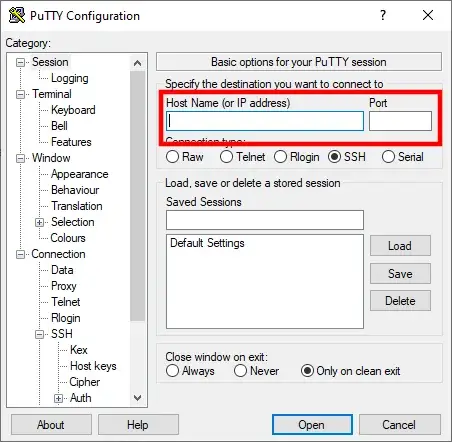
PuTTY is the most popular SSH client application. It’s free to download and install, and it’s pretty straightforward to use. All you need is your new VPS’s IP address and SSH port number (the default one is 22, but your host may have changed it for security reasons).
After you click Open, your server will ask you for a username and password and let you in.

SSH clients are convenient because they can save your sessions and login details and streamline the process. However, there’s another option for securely connecting to your VPS.
- Through your operating system’s command-line utility
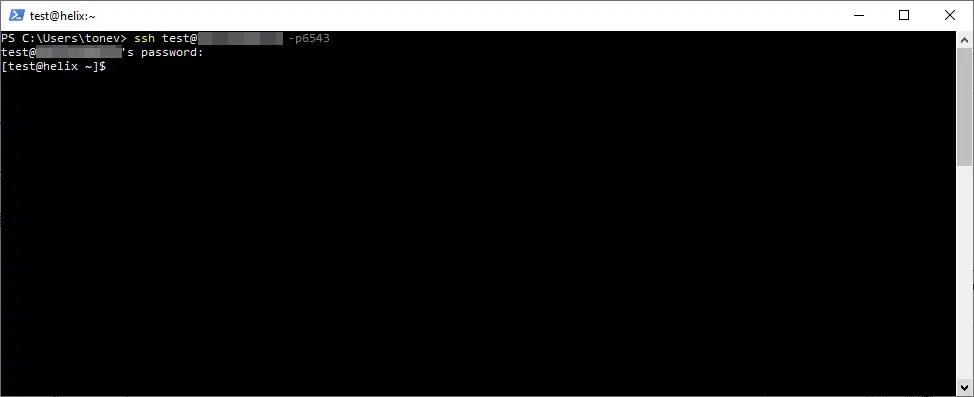
Your personal computer has at least one command-line utility that can execute commands both on your local machine and on a remote server. If your personal computer runs Windows, you can use either Command Prompt (or cmd) or PowerShell. In MacOS and Linux, the console is referred to as Terminal.
To connect to your server, enter ssh followed by your username, @, and the new VPS IP address. If your host has enforced a custom SSH port, you must add -p followed by the port number. For example, all ScalaHosting VPS solutions use port 6543 for SSH connections, so this is what the command would look like for one of our customers:
ssh user@123.123.123.123 -p6543

The server asks you for your password and lets you in. With that, you’re finally ready to start work on your new website.
How to Install a Web Server
When a user wants to visit your website, their browser sends a request for the homepage, which has to be processed. The correct scripts must be executed, and the correct HTML code, images, and other resources must be returned to the visitor’s computer. This is the job of the web server.
Although it’s not the fastest web server, Apache remains the go-to solution for many. It’s also reasonably easy to install on a Linux server. Let’s look at the steps.
Different Linux distributions use different package managers, so the exact commands you’ll use depend on your operating system. Let’s examine the process for three of the most popular package managers.
- Advanced Package Tool (apt)
Used in Debian and Debian-based distributions, like Ubuntu or Linux Mint, for example, the Advanced Package Tool installs Apache with the following commands:
$ sudo apt update
With this, you update the package lists and ensure you’ll install the latest version of Apache. The command starts with sudo, indicating that it’s executed with root privileges. Linux may ask you for your password before you continue.
$ sudo apt install apache2
This is the command to install Apache. If you add a -y attribute, you’ll skip the prompt asking if you’re sure you want to proceed.
- Dandified YUM
Dandified YUM is a more modern, improved version of the old yum package manager. It works with .rpm packages and can be found in numerous Fedora- and Red Hat-based distributions like RHEL, CentOS, and Rocky Linux. The steps are identical, and the commands are only slightly different.
You start by updating the package listings:
$ sudo dnf update
You then proceed to install the web server:
$ sudo dnf install httpd -y
- Zypper
If your VPS runs on SUSE Linux Enterprise or openSUSE, it uses the Zypper package manager.
It updates the package lists with:
$ sudo zypper refresh
It installs Apache with the following:
$ sudo zypper install apache2
It’s now time to see if the process has been successful. The first task is to start Apache.
Regardless of the distribution, the command is the same:
$ sudo systemctl start apache2
With Dandified yum, you need to change apache2 with httpd.
The next step is to enable Apache to run at every boot. The command is:
$ sudo systemctl enable apache2
Finally, we should ensure the web server is up and running. You can do that with the following command:
$ sudo systemctl status apache2
However, an easier option would be to open a web browser and navigate to the server’s IP address. On the screen, you should see the Apache default page.
How to Install PHP
The phrase “installing PHP” can actually be a bit confusing. PHP is a programming language, so it’s not something you can install on a server. Instead, you install an interpreter that will enable your VPS to process PHP code. This is critical for allowing WordPress (or any other PHP CMS) to communicate with the database and build a dynamic website.
It sounds like a complicated job, but in reality, it’s a matter of a couple of commands. Here’s how to proceed, depending on your package manager.
- Advanced Package Tool
Make sure you first update the package lists.
$ sudo apt update
To install the PHP interpreter, use:
$ sudo apt install php -y
In addition to the interpreter, you’ll need a few PHP extensions to ensure you can use its best features. To set them up, use:
$ sudo apt install php-cli php-mysql php-curl php-gd php-mbstring php-xml -y
- Dandified YUM
The command for updating package lists on Fedora-based distributions is:
$ sudo dnf update
Installing PHP is done with:
$ sudo dnf install php -y
And to set up the required PHP extensions, you can use:
$ sudo dnf install php-cli php-mysqlnd php-curl php-gd php-mbstring php-xml -y
- Zypper
Update the lists on your SUSE/OpenSUSE server with:
$ sudo zypper refresh
Install the interpreter with:
$ sudo zypper install php
And set up the PHP extensions with:
$ sudo zypper install php-cli php-mysql php-curl php-gd php-mbstring php-xml
To ensure PHP is available, restart the Apache web server with the following command:
$ sudo systemctl restart apache2
On dnf servers, you may need to use httpd instead of apache2. Finally, you can check whether the PHP is successfully installed with:
$ php -v
How to Install MySQL
The MySQL database is an integral part of every modern website. Thanks to it, instead of static web pages constructed of simple images and text, we have sleek, interactive sites and web applications with tons of useful features. To create and use MySQL databases on your VPS, you first need to install MySQL. Yet again, the process is more straightforward than it appears at first:
- Advanced Package Tool
Updating the package lists is the first step:
$ sudo apt update
The command for installing MySQL on apt distributions is:
$ sudo install mysql-server -y
The -y attribute skips the “Are you sure?” prompt.
- Dandified YUM
After updating the package lists with:
$ sudo dnf update
You can install MySQL with:
$ sudo install mysql-server -y
- Zypper
The procedure is identical for SUSE and OpenSUSE servers, and the commands are:
$ sudo zypper refresh
followed by
$ sudo zypper install mysql mysql-client
After MySQL is installed, you need to run the service and enable it to start at every boot. The commands are the same for all distributions:
$ sudo systemctl start mysql
$ sudo systemctl enable mysql
How to Create a Virtual Host
Virtual hosts allow you to run multiple websites on the same server. Thanks to them, Apache knows where the required data is located when a request arrives at your VPS. Here’s how to do it:
- Set up the domain’s document root folder.
The document root folder contains your website’s files. In it, you traditionally have a file called index.html or index.php that represents your homepage. You can set it up using an FTP client, but because we’ll have plenty more work in the console, we might as well stick to the command-line interface for this task as well:
$ sudo mkdir -p /var/www/[your domain]/public_html
To ensure access to the data inside the document root is not restricted, your next job is to change the folder’s ownership and permissions. Here are the commands:
$ sudo chown -R $USER:USER /var/www/[your domain]/public_html
$ sudo chmod -R 755 /var/www
- Create a default page for testing purposes.
Once you’ve set up all virtual hosts, you’ll want to ensure they work correctly. To do it, you can set up a simple HTML page. Navigate to your domain’s document root and run the following command:
$ nano index.html
With this, you’ll create a new HTML file using the Nano text editor. You can paste the following HTML code inside it:
<html>
<head>
<title>Success!</title>
</head>
<body> <h1>Hello, world!</h1>
</body>
</html>
Save and exit the Nano text editor.
- Create a virtual host file.
Next, it’s the virtual host file itself. You first need to check how Apache handles them in your particular distribution. Depending on the mechanism, you’ll need to enter either:
$ sudo nano /etc/apache2/sites-available/[your domain].conf
or
$ sudo nano /etc/httpd/conf.d/vhost.conf
We’re using sudo because we’re editing a major configuration file. The contents of the file itself should look like this:
<VirtualHost *:80>
ServerAdmin [your email address]
ServerName [your domain]
ServerAlias [your domain preceded by www.]
DocumentRoot /var/www/[your domain]/public_html
ErrorLog ${APACHE_LOG_DIR}/error.log
CustomLog ${APACHE_LOG_DIR}/access.log combined
</VirtualHost>
Save and exit the Nano text editor.
- Enable the new virtual host and reload Apache.
You’ve created the new virtual host, but you now need to make sure Apache knows how to use it. This means enabling it with the following command:
$ sudo a2ensite [the name of the virtual host configuration file]
Reload Apache to ensure the changes take effect:
$ sudo systemctl reload apache2
- Test the new virtual host.
Finally, it’s time to see if everything works. If your domain is pointed to your VPS, enter it into your browser’s address bar and see if the “Hello, World!” message appears on your screen. If you haven’t changed your domain’s DNS settings yet, you can still test the virtual host with a simple edit of your computer’s hosts file.
You need to repeat the steps for every domain and subdomain on your VPS.
Upload your Website Files
FTP is arguably the fastest and most convenient method for uploading files to a remote server. You’ll probably prefer it if you’re building your site locally and want to make it live. The graphical user interface of modern FTP clients means that you’re unlikely to run into any issues connecting to the server and getting your data to where it needs to be. Just don’t forget to preserve the folder structure and place all the files in your site’s document root directory (as defined in the previous section).
However, if you want to set up a brand new WordPress installation, there is another, more convenient. It’s all done through the command line.
If you use a WordPress hosting account, you can use WP-CLI. However, because you’re using a self-managed solution, the WordPress command-line tool is unlikely to be available out of the box. There is an alternative, though.
You can get the WordPress files straight to your VPS without downloading them to your computer first. Navigate to your site’s document root folder and run the following commands:
$ wget https://wordpress.org/latest.tar.gz
This one downloads the WordPress core as a TAR archive.
$ tar xfz latest.tar.gz
With this one, you extract the archive.
$ mv wordpress/* ./
When you extract the archive, the files are placed in a subdirectory called “wordpress“. Using the command above, you move them to the document root, where they should be.
$ rmdir wordpress/* ./
$ rm -f latest.tar.gz
You no longer need the archive or the subdirectory that is now empty, so you can get rid of them and free up some server space with the commands above. You’re just one step away from opening the WordPress installation wizard and starting work on your new project.
How to Create a Database
The WordPress files are now in place, but they’re not much use without a database. We’ve already installed the MySQL service, so it’s now time to use it to create the required database and user.
First, you need to use an account with SYSTEM_USER privileges to log in to MySQL itself. The command looks like this:
$ mysql -u [your account’s username] -p
After you provide your password, MySQL will log you in and display the mysql> prompt.
Creating individual MySQL users for every database is one of the key security measures you should take when building your website, so the first command you need to enter is:
mysql> CREATE USER ‘[the user account’s username]’@’localhost’ IDENTIFIED BY ‘[a password for the new account]’;
Capitalization is critical in SQL queries, and you shouldn’t forget to add the semicolon at the end of the command. Otherwise, the MySQL service won’t recognize the command. The password you pick at this point will protect all the information in your website’s database, so make sure it’s strong. You’ll also need it in a few minutes, so don’t lose it.
With the MySQL user set up, it’s time to create the database. The command is:
mysql > CREATE DATABASE ‘[the database’s name]’;
The final step is to allow the new MySQL user to make changes to the database with the following:
mysql> GRANT ALL PRIVILEGES ON [the database’s name].* TO ‘[the MySQL user]’@’localhost’;
How to Complete The CMS Installation
With the files uploaded and the database up and running, you can now start work on setting up the website. How you’ll proceed depends on what sort of website you’re building and the application you’re using.
With WordPress, for example, you need to load the website’s domain (a configuration of your computer’s hosts file may be required if the domain is not yet pointed to the server) and complete the installation wizard.
After you choose a default language for the backend, you will be asked for the database details. WordPress will attempt to use the MySQL user to connect to and modify the database, and if it’s successful, it will ask for other information like the site address. The whole process should take no more than five minutes, and after that, you can log in to the WP dashboard and start work on your new project.
The procedure may be different in other content management systems. Sometimes, you may need to manually enter the database name and credentials into the application’s configuration file, for example.
After the CMS setup, you need to install an SSL certificate. This is critical for ensuring your website protects its users and ranks well on the search engine results pages.
ScalaHosting Self-Managed Options and Alternatives
If you’re looking for a self-managed VPS, our solutions can provide you with the perfect environment.
You can choose between five Linux distributions (with full root access on all of them) and two Windows versions, and there’s no control panel in the default setup. Our self-managed servers offer incredible value for money, and since they’re deployed in our state-of-the-art cloud environment, their hardware configuration is fully customizable.
Still, if you prefer the convenience of a point-and-click interface and don’t have the time to install software or perform various server maintenance jobs, you’re better off picking one of our managed virtual private servers.
With them, your hosting environment is ready to go out of the box. You don’t need to install or configure anything, and you certainly don’t need to learn any commands.
Our managed solutions come with SPanel – a comprehensive all-in-one management platform that gives you everything you need to launch a website on a VPS. Whether it’s a WordPress site or something more complex, SPanel can do it all – from setting up CMSs to installing SSL certificates. All tools are accessible through an intuitive graphical interface, allowing even complete novices to find their bearings and manage their projects with speed and efficiency.
In other words, both managed and self-managed solutions have advantages. If you’re not sure which one to choose, do not hesitate to contact our sales specialists, who will give you all the information you need.


Conclusion
Hosting a website on a VPS without a control panel is not for everyone. However, if you’re willing to invest the time and effort into making it work, the article above should provide you with all the tips you need to get started.
The good news is that if you don’t have the resources to learn how to do everything through the command line, there are alternatives.
FAQ
Q: Do I need cPanel on a VPS web hosting plan?
A: cPanel is one of the most popular control panels for shared, VPS, and dedicated hosting, but it’s far from the only one, and it’s not necessarily the best. For example, SPanel, ScalaHosting’s own server management solution, has an even more comprehensive set of tools but is more reasonably priced. You can also have a fully functioning VPS without a control panel.
Q: How does a VPS work?
A: With traditional VPS hosting, a single physical server is divided into multiple virtual machines. Every VPS account has its own operating system, IP address, and hardware resources. Unlike a shared plan, a virtual server gives you guaranteed resources, more power, and consistent performance. The concept is taken a step further with cloud VPS hosting, where clusters of physical nodes instead of individual machines provide the hardware resources.
Q: Is it difficult to manage a VPS without a control panel?
A: If you’re completely unfamiliar with your server’s operating system, it will definitely be a challenge. However, if you have enough time to learn the ins and outs of how your VPS works, you’ll be able to create a suitable hosting environment for your project.


