Understanding how your computer or phone interacts with the internet is the first step toward fixing any connection issues you may be experiencing.
For example, if your website is fully up and running but you’re unable to access it from your computer, you’d know it’s most likely a DNS cache issue.
Today, we’ll dig a bit deeper into how it all works, figure out when you need to flush your device’s DNS cache, how to do it, and what you can expect.
Introduction to DNS Caching
In simple terms, DNS caching is how your device stores domain-to-IP mappings to speed up browsing. When you try to open a new domain – e.g., www.domain.com – your computer queries the global DNS system and finds out that this domain is hosted at a particular IP address – 123.123.123.123.
That information is stored in the cache in much the same way you’d store names and phone numbers in an address book. When you need to access domain.com again, your device already knows it must send a request to 123.123.123.123 and goes straight to that IP address.
Skipping the DNS check saves time and speeds up site loading. However, it will only work if the information in the cache is correct. If, for example, you’ve moved your site from one server to another and the DNS cache still points to the old server, your device won’t be able to reach your site.
In this case, you’ll need to renew (or flush) the DNS cache.
DNS Caching: How Does It Work?
DNS caching on a personal device occurs at multiple levels to improve efficiency. Here’s how the entire system works.
- Browser cache – Modern browsers have caching capabilities, and when you enter a domain into your address bar, the browser first checks its cache to see if the domain and its IP address are stored.
- Operating system resolver cache – If there are no relevant entries in the browser cache, the operating system’s DNS cache is used.
- Public/ISP resolvers – Your internet service provider uses public resolvers that also cache DNS requests, so your operating system is bound to check with them as well before it proceeds.
DNS data is layered, but at every stage, technical configurations determine what is stored and how. Here’s an overview of the most important factors:
- TTL (Time to Live): Every DNS record has a time-to-live (TTL) value that determines how long it remains in the cache before it expires and must be refreshed.
- Positive vs Negative Caching: Positive caching saves only successful lookups. If negative caching is enabled, unsuccessful requests are cached as well. If there’s a temporary server problem and the error message is cached, you may experience connection issues even after the server is fixed due to negative caching.
- Encryption: DNS over HTTPS (DoH) or DNS over TLS (DoT) can sometimes bypass traditional OS caching mechanisms by communicating directly with a resolver using encrypted channels.
- User Implications: While caching results in faster load times, it can lead to “stale” or outdated IPs persisting long after the site has moved, especially if the DNS records are configured with a long TTL.
- Edge Cases: DNS caches can be corrupted by malware (a.k.a. DNS poisoning) or experience interference from VPNs and DoH settings.
When Should You Flush DNS Cache?
Flushing DNS isn’t a “magical button” that solves all your internet problems. However, in certain scenarios, it may be the only way out. It’s important to distinguish these cases and act accordingly.
Here’s when it’s a good idea to flush cached DNS data:
- After site updates: If your website shows old content after you’ve made changes to it or its hosting environment, it’s most likely due to cached DNS data. Deleting them ensures the latest version of your site is available to everyone.
- When you encounter connection errors: A correctly configured domain shouldn’t display an error message like ERR_NAME_NOT_RESOLVED. If you see it and all the DNS records have been properly pointed, the issue may be down to cached data.
- When you see problems with redirects: Flushing the DNS cache may also be needed if you modify redirects on your site but don’t see them take effect.
- When you’ve made changes to your network configuration: If you’ve moved to a different ISP or VPS provider, you may need to flush cached DNS records in order to ensure everything is working correctly.
- If your browser is playing up: When your browser seems “stuck” trying to reach a specific domain, it may be down to outdated cache entries.
Flushing the DNS cache is not the same as disabling it. After you delete the old data, the caching engine (whether it’s in your browser, operating system, or at your ISP) will automatically start caching new DNS queries.
It’s a myth that periodically clearing the cache during routine browsing can somehow improve the overall experience. DNS records are automatically refreshed periodically, so website configuration changes can propagate across the world relatively quickly. At the same time, if you flush the cache frequently, your device will repeatedly send queries to the global DNS system, which can slow page load times.
People also confuse clearing cache with deleting cookies, search history, or saved passwords. This is largely because when you delete browser cache, you usually clear cookies and login credentials from the same interface.
However, the two activities are completely separate.
One thing you must remember is that flushing the DNS cache won’t help in case of server-side issues. It can affect how the domain resolves to the server, but it has no bearing on how the server responds to requests.
Step-by-Step Guide to Flushing DNS Cache
Now that we know when you might need to flush the DNS cache, it’s time to find out how to do it. We’ll examine the steps for the three most popular desktop operating systems – Windows, macOS, and Linux. Although you’ll need to use the command-line interface in all three cases, you’ll see that the process isn’t too complicated.
Windows
- Open the command prompt or PowerShell.
You can find Windows’ command-line interface utilities in the Start menu. PowerShell is the more modern and powerful alternative to the traditional command prompt. Both will work in our case.
- View current cache. (Optional)
You can view the currently available entries in your DNS cache with the following command:
ipconfig /displaydns
- Execute the flush command.
The primary command for flushing DNS cache is:
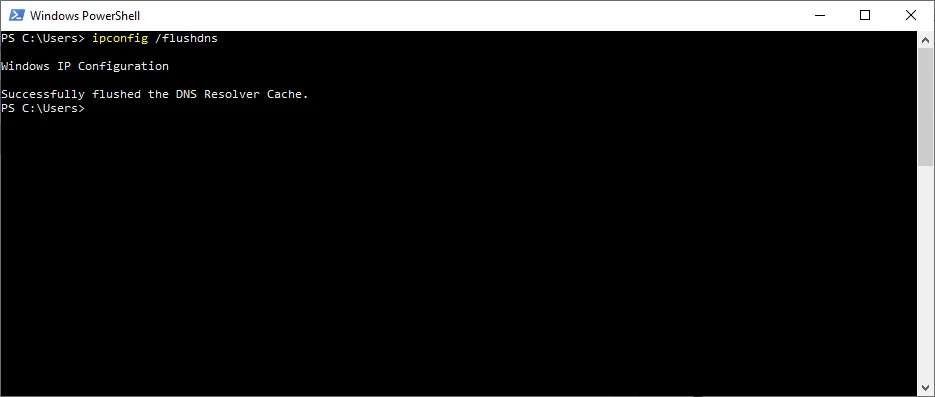
ipconfig /flushdns
When it’s done, Windows will display the following message:
Windows IP Configuration
Successfully flushed the DNS Resolver Cache.
- Full reset. (If needed)
If flushing the DNS cache doesn’t work, you can perform a deeper reset. You can release and renew your IP lease. Note: this resets your network adapter, not the DNS cache directly.
ipconfig /release
ipconfig /renew
For a true full DNS and network stack reset, also run:
ipconfig /flushdns
netsh winsock reset
Restart your computer after running these commands.
Linux
Most modern Linux distributions rely on systemd-resolved for local network name resolution. It’s controlled entirely via the command-line interface, and below are the steps to clear its cache.
- Open the Terminal.
Most Linux distributions for personal computers now include a desktop environment, but the Terminal is usually available either as a shortcut or in the main app menu.
- Check the status of the systemd-resolved service.
To see if your network name resolution service is up and running, you can use:
$ resolvectl status
- Flush the cache.
The command for flushing the cache is:
$ resolvectl flush-caches
- Restart NetworkManager. (If needed)
If your distribution doesn’t use systemd-resolved, you may need to restart the NetworkManager daemon. This requires root privileges, and the command is:
$ sudo systemctl restart NetworkManager
5. Alternative resolvers (if systemd-resolved is not present)
Check which resolver your system uses:
$ systemctl status nscd
$ systemctl status dnsmasq
If your system uses nscd:
$ sudo systemctl restart nscd
If your system uses dnsmasq:
$ sudo systemctl restart dnsmasq
macOS
Unlike Linux, macOS doesn’t have different distributions, and it relies on a more unified set of utilities. As a result, the steps tend to be more straightforward:
- Open the Terminal.
It’s available in Applications > Utilities.
- Enter the flush command.
Enter the following and press Enter.
sudo dscacheutil -flushcache; sudo killall -HUP mDNSResponder
- Enter your login data.
The command above requires root privileges, so you’ll need to enter your account’s password.
The command above applies to macOS 10.10.4 (Yosemite) and all later versions through macOS Sequoia (15.x). Earlier versions required different commands.
Here’s a quick summary of what you need to do depending on your device’s operating system:
| Operating system | Tool | Command |
| Windows | cmd or PowerShell | ipconfig /flushdns |
| Linux | Terminal or another command-line utility | $ resolvectl flush-caches |
| macOS | Terminal | $ sudo dscacheutil -flushcache; sudo killall -HUP mDNSResponder |
How to Flush DNS Cache in Chrome, Firefox, and Edge
Chrome / Edge:
1. Type chrome://net-internals/#dns (or edge://net-internals/#dns) in the address bar
2. Click “Clear host cache”
Firefox:
1. Type about:networking#dns in the address bar
2. Click “Clear DNS Cache”
Note: this clears only the browser’s DNS cache, not the OS-level cache.
Clearing DNS Cache in Public Resolvers
If your site still doesn’t load, the DNS caching issue may lie beyond your local device. It’s most likely DNS cache generated and stored by a public resolver like Google or Cloudflare. Devices and ISPs use these resolvers to reduce the number of queries to the global DNS system and improve loading speeds.
The problem is, if the information in the global resolver is stale, your browser won’t be able to reach your website, regardless of whether you clear your local cache.
Fortunately, Google provides a web-based tool for manually purging its cache. Here are the steps:
- Visit the Google Public DNS Cache Flush Tool.
Google’s public DNS cache flush utility is completely free and available to anyone.
- Enter your domain name.
You can clear the cache for subdomains as well.
- Select the Resource Record type (RR Type).
A Resource Record Type is a standardized data entry in a domain’s DNS zone file that specifies how a domain name maps to IP addresses, mail servers, and other network resources.
In our case, you can use the following:
- A – Deletes cached data for IPv4 addresses.
- AAAA – Purges IPv6 cache.
- CNAME or ANY – You can use this for broader cleaning.
- Click Flush Cache.
The process is usually near-instant.
Purging the public cache will resolve connectivity issues not only for you but also for others trying to access your website. There are a couple of limitations, though.
- This only works for Google’s public DNS resolvers (8.8.8.8 and 8.8.4.4).
The web utility only affects Google’s public DNS cache. It won’t work if your ISP uses Cloudflare or Quad9, for example. You have to rely on the TTL of your DNS records. That’s why it’s a good idea to lower TTL values before you migrate a website.
If you use SPanel, doing it is pretty straightforward. You have to log in to SPanel’s User Interface and go to DNS Editor. You first see a list of all the resource records set in your domain’s DNS zone. Next to each of them, there’s an Edit button.
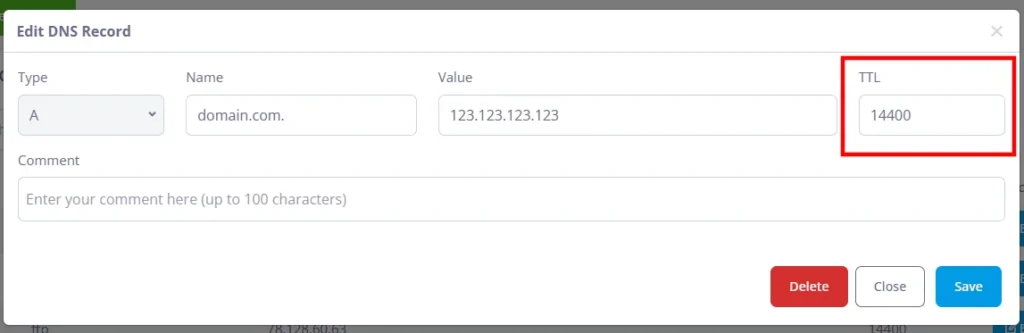
By default, all DNS records have a TTL of 14,400 seconds (4 hours). However, before a website migration, it’s recommended to set your TTL to 300 seconds (or 5 minutes). That way, the transfer will be completed more quickly.
- No automation.
At the moment, there’s no API allowing you to connect to Google’s public DNS cache and erase data related to your domain. You have to do it by hand.
Cloudflare also provides a public DNS cache purge tool at:
https://1.1.1.1/purge-cache
The process is similar: enter your domain, select the record type, and click Purge Cache. This clears Cloudflare’s 1.1.1.1 and 1.0.0.1 resolver cache.
Quad9 (9.9.9.9) does not offer a public flush tool — propagation relies solely on TTL expiry.
How to Verify Your DNS Cache Flush Worked
Your first job is to open the website and check whether it works with all the latest changes you’ve made, with those updates clearly visible. You can also perform a manual lookup using the following command:
nslookup yourdomain.com
If you don’t feel like using the command line, you can check how your domain resolves via web-based tools like What’s My DNS and DNS Checker.
Troubleshooting Persistent Issues
If flushing your DNS cache doesn’t fix the issue, the root cause may be elsewhere. Here are a few things you can check.
- Browser extensions
Some browser extensions interfere with how pages load. By default, all extensions are disabled in incognito (or private browsing) mode, so you can try loading your page through it. Alternatively, you can disable extensions one at a time until you find the culprit.
- Hosts file
Manual entries into your operating system’s hosts file bypass global DNS settings. They’re usually used during site development, so double-check to ensure you haven’t forgotten anything.
- VPN
VPNs also bypass local OS flushes, so try accessing the website without one and see if it works.
FAQ
Q: Can I flush the DNS cache for a specific website only?
A: On a local OS level, no – the command clears the entire resolver table. However, you can use Google’s web tool to flush the DNS cache for a specific domain in their public resolver.
Q: Does flushing affect my bookmarks and passwords?
A: No, it doesn’t. It only affects the temporary table of IP mappings. Your personal data remains intact.
Q: How do I purge Google’s DNS cache for a subdomain?
A: Google’s DNS cache purging online tool works for both domains and subdomains. The steps are identical.
Q: Why don’t mobile devices have direct flush commands?
A: Most mobile operating systems don’t have a user-facing command for flushing the DNS cache. However, if you restart the device or simply toggle Airplane Mode on and then off, you’ll trigger a DNS cache refresh on most platforms. On Android, Chrome users can also visit chrome://net-internals/#dns and tap “Clear host cache.” On iOS, clearing Safari’s history and website data achieves the same result.