Migrating email accounts between hosting providers can seem daunting, especially when handling months or years of critical business communications.
It sounds like a painful experience, but in reality, it can be pretty straightforward.
All you need to do is find out how your emails work and how your control panel manages them.
That’s exactly what we’ll do today.
How Does Your Email Work?
Whether you use your server for website hosting and emails or email communication only – the chain of events triggered after you hit the Send button is identical.
Your email client takes your message, encodes the attachments, and generates some metadata before putting everything in a file. The client then connects to your hosting account’s outgoing mail server, often referred to as the SMTP server because it uses the Simple Mail Transfer Protocol.
The SMTP server sees that the message has to be sent to john@example.com and asks the global Domain Name System (DNS), which server handles emails for example.com. The global DNS checks the MX records for example.com and replies with the destination server.
The email file is sent to the destination server, which saves it in a specific folder on its drive and notifies the inbox owner.
In essence, sending an email means transferring a file from one server to another.
If you want to migrate from one email hosting provider to another, you need to complete two tasks:
- Move your existing email files from the old server to the new one.
- Ensure that new emails arrive at the new server.
How you’ll do it depends on your hosting environment and the tools you have at your disposal.
How to Migrate Your Emails From One Hosting Provider to Another
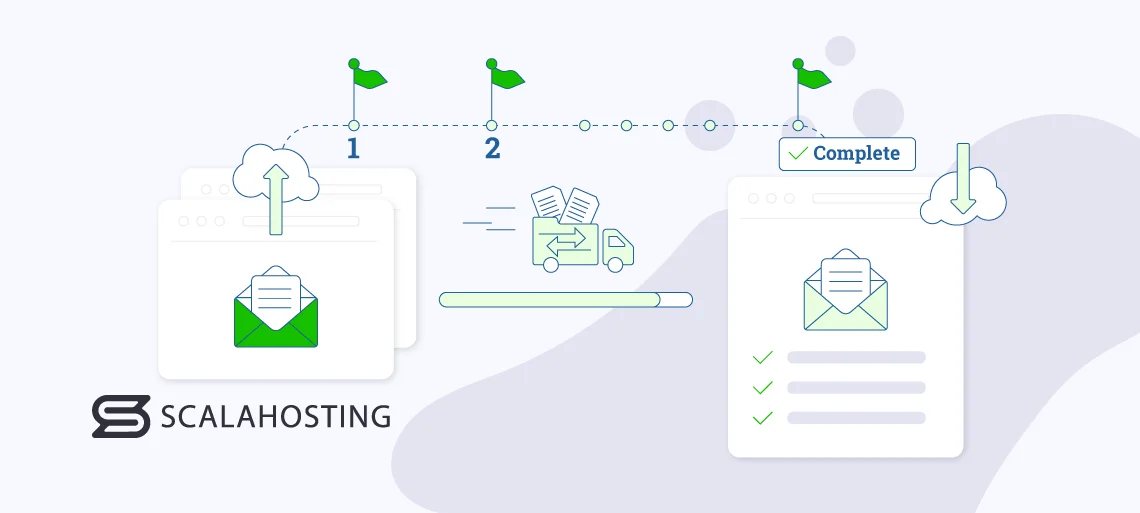
A switch from one hosting provider to another happens for a reason. You may have exceeded the limitations of your old account or missed some features. You could also be unhappy with the host’s pricing policies.
Whatever the reason, make sure the change fixes the issue. This is the first, and perhaps trickiest, step of the entire migration process.
Examine all available options carefully and familiarize yourself with the different setups and features of the chosen alternative. Look at all limitations hosts impose and ensure your preferred solution doesn’t hamper your business progress.
Security Considerations Before Migration
Before starting any migration, ensure:
- Both old and new servers support SSL/TLS encryption
- You’re using secure connections (ports 993 for IMAP, 465/587 for SMTP)
- Passwords are stored securely during the transfer process
- Consider using app-specific passwords or OAuth where available
Ideally, you’d be looking for a long-term partner, so check out the available upgrade options and see whether the service is scalable enough for your needs.
With the new account up and running, it’s time to prepare for the actual migration.
If everything goes according to plan, you should be able to move the contents of all your inboxes without a single lost message. Nevertheless, to be on the safe side, it’s a good idea to ensure you have a working backup of all your emails before proceeding.
Think of when you’re carrying out the migration as well. Ideally, you’ll want to do it on a quiet day when you don’t expect a lot of incoming messages (e.g., during the weekend or outside working hours). This will ensure there will be minimal or no disruption to your communication.
Pre-Migration Testing Checklist:
1. Create a test email account on the new server
2. Verify you can send and receive emails using your server’s hostname
3. Test webmail access and email client connections
4. Confirm storage quotas meet your needs
5. Document all current email settings (filters, forwarders, signatures)
With that sorted, it’s time to proceed with the actual migration. There are several different approaches. Let’s have a look at the most common ones.
| Method | Time per Account | Technical Skill | Preserves Settings | Best For |
|---|---|---|---|---|
| Email Client | 15-30 min | Low | No | 1-5 accounts |
| SPanel | 5-10 min | Low | Partial | Multiple accounts |
| cPanel Backup | 2-5 min | Medium | Yes | Full site migration |
| Manual Files | 20-30 min | High | No | Selective migration |
Moving your emails with a client application
One way to move your emails from one server to another is through the IMAP protocol. IMAP stands for Internet Message Access Protocol, and it’s one of the most popular technologies for accessing your inbox remotely.
It’s supported by all popular email clients, and people like it because it syncs the contents of your inbox between your devices and your server. This will help you move your communication to your new server with little hassle.
- Replicate your email inbox on your new hosting account.
To migrate your emails, you need to recreate your old email account with the same address. You can use the same password on the new server for a smoother transition.
- Connect both email accounts to your email client via IMAP.
Most likely, your old inbox is already connected to your email client. You also need to set up the new one to work with it. Because your domain isn’t yet pointed to the new server, you may need to use the hosting account’s hostname. Your new host’s support team should be able to give you the information you need. Don’t forget to use IMAP when connecting your email client to your new account.
- Copy your emails from your old account to the new one.
You can open your old account’s inbox, select all messages, and paste them into the new account. You’ll have to do that for every folder in your old account, including the custom ones.
Because IMAP synchronizes the data between your device and your server, your emails will automatically be transferred to your new hosting account as well.
- Verify that the messages have been successfully moved.
Most email hosting services offer webmail access to your inbox. This means that in addition to email clients, you can also manage your messages through a browser-based interface. Use it to check the new account’s inbox and ensure all old emails are there.
Preventing Email Loss During Migration:
To ensure no emails are lost during DNS propagation:
1. Lower your DNS TTL to 300 seconds 24 hours before migration
2. Keep both old and new email servers active for 48 hours
3. Set up email forwarding from old to new server during transition
4. Monitor both inboxes until DNS fully propagates
5. Consider using a mail spooling service for critical business emails
- Point the domain to the new hosting account.
Finally, it’s time to point your domain to the correct server. If you’re using your new hosting account for both your emails and website, you’ll need to change its nameservers. If you need it for your emails only, you can just change its MX records. Your registrar (or the provider where your domain DNS zone is located) should be able to give you more information.
Once the changes are made, you will need to allow anything up to a day for the new DNS settings to propagate globally.
As you can see, this is a fairly simple way of copying tons of messages from one server to another. It doesn’t require special skills or complex tools – just a run-of-the-mill email client and a basic understanding of how emails work.
However, this approach does have its drawbacks.
Important IMAP Limitations:
- Maximum message size varies by provider (typically 25-50MB)
- Some folder names may not transfer correctly between different email systems
- Custom labels and flags might be lost
- Large migrations may trigger rate limits, causing temporary blocks
- Calendar invites and tasks won’t transfer via IMAP
You must repeat the steps for every email account associated with your domain or have your employees do it themselves. Moreover, if a user has a habit of creating custom folders, their migration will involve more manual work.
Another thing to keep in mind is that this approach can’t transfer any forwarders, autoresponders, filters, and other settings. You’ll have to recreate them yourself.
Migrating Emails With SPanel
SPanel is a server management platform built by ScalaHosting. We’re one of the few companies that, in addition to building and maintaining top-quality hosting services, is also developing an entirely new control panel. The reason for this is simple – traditional control panels often require manual configuration for each email account, which can be time-consuming for businesses with multiple mailboxes.
Having worked with website owners for years, we saw that the leaders in a fiercely competitive web hosting control panel market lack features and make procedures unnecessarily complicated. Migrating email accounts is a classic case in point.
It’s not exactly rocket science, but it often involves a lot of manual work that users can easily find frustrating, especially when they need to move a large number of inboxes.
With SPanel, this isn’t a problem.
Here are the steps:
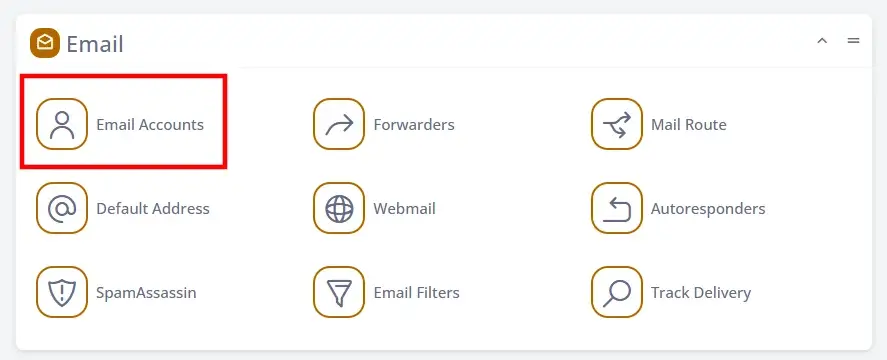
- Open the Email Accounts tool in SPanel.
You don’t even need to log into your old hosting account. You can go straight to SPanel’s User Interface and click the Email Accounts option. By default, it’s right at the top of the page.
- Click Create an Email Account and go to Transfer an Existing One.
The Create an Email Account button opens a new menu, with the default tab letting you create a new email address in a few simple steps. However, the one we need today is Transfer an Existing One.

- Enter your email account details.
Immediately, you can see that the process is much more automated. By default, the Single Email Box radio button is selected, and SPanel asks for your old account’s IMAP server, email address, and password.
At the bottom of the form, you enter the destination inbox where your messages will be transferred.
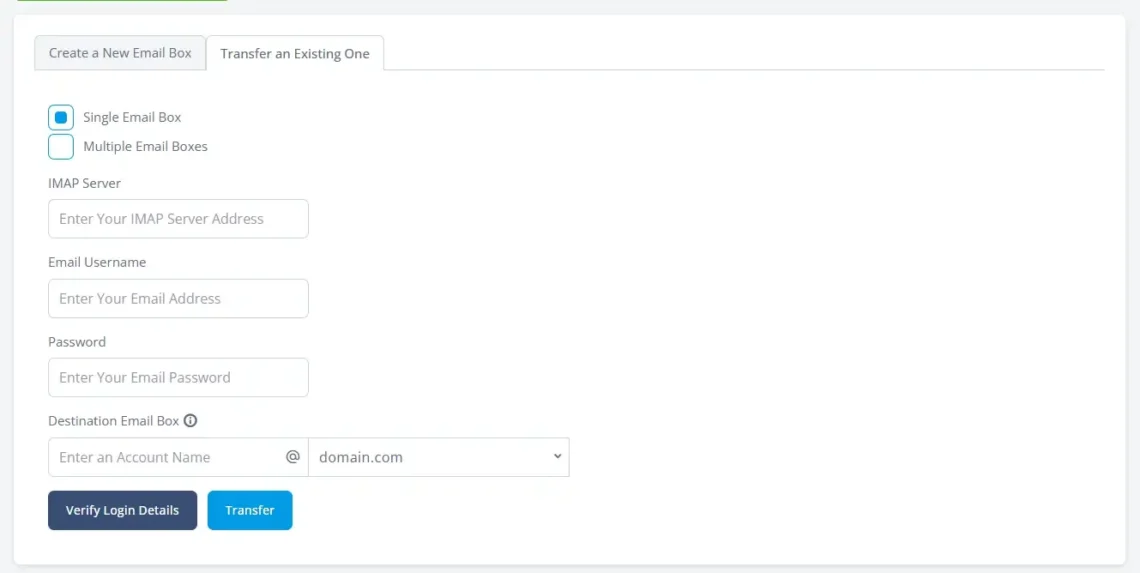
When you enter your old email’s details, you can click Verify Login Details. SPanel will attempt to establish a connection to your email server, and if it’s successful, it will display a message telling you that you can proceed with the transfer.
No need to move files, play around with email clients, or create cumbersome backups. SPanel copies all the messages, attachments, and folders from your old account and places them in the new one. When the migration is complete, the new address will appear in the list at the bottom of the page.
It’s a lot quicker and easier than using any other method, but it could still take a while if you need to move your inboxes one by one. SPanel has a solution to that problem as well.
At the top of the tab, there’s a Multiple Email Boxes radio button. When you click it, you’ll see clear instructions on how to migrate all your emails with one swift move.
Here’s how it works:
- Open a text editor and enter your email addresses and their login details.
Notepad will be the app of choice for Windows users. On macOS and Linux, you can find many text editors that will do the job.
You need four pieces of information for every account you’re transferring:
- IMAP server
- Old email address
- Password
- Destination email address
The details must be entered in the order above, separated by a space and on a new line for each email account. Here’s what the format looks like:
mail.domain.com john@domain.com secretpassword1 john@domain.com
mail.domain.com joanne@domain.com secretpassword2 joanne@domain.com
Because we’re replicating the inboxes on the SPanel server, the origin and destination addresses match.
When you’re done, save the file as a TXT document.
Security Alert: The text file contains passwords in plain text. Ensure you:
- Create this file on a secure, encrypted device
- Delete the file immediately after migration
- Never share or email this file
- Consider using a password manager to generate temporary migration passwords
- Upload your email data to SPanel.
Go back to SPanel’s interface. You can drag and drop your TXT file to the box that says Drag your emails file here or click in this area, or you can click the box and select the document from your computer.
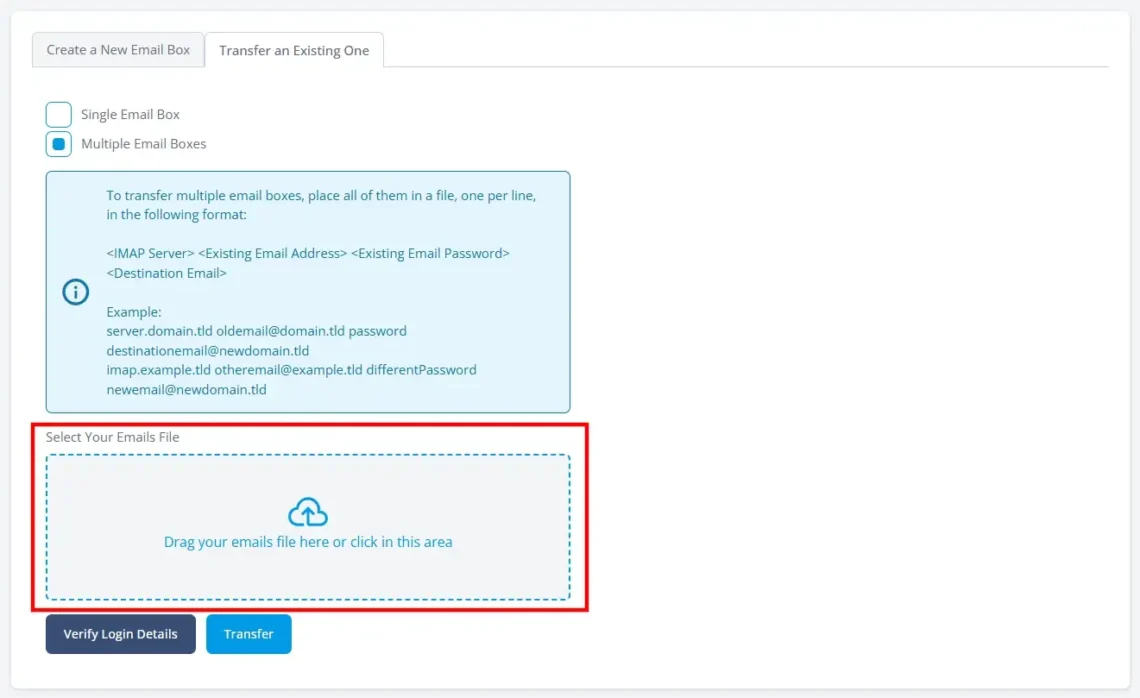
Once you have selected the file, click Verify Login Details to ensure the transfer will be successful. If everything works, you’ll see the following message:

- Let SPanel transfer the data and verify the migration was successful.
When you click Transfer, SPanel will perform several operations for each of your email accounts. First, it creates the destination inbox and protects it with the old account’s password. Then, it connects to the old IMAP server and downloads the contents of the origin inbox. Finally, it places the data in the new account. When it’s done, it will display the following message.

After you refresh the page, you’ll see the new inboxes in the list of existing email accounts. Next to each is a Check Email button that opens SPanel’s webmail interface and allows you to verify the transfer has succeeded.
All that’s left is to configure your domain to work with the new SPanel account. Details on how to do that are available in your welcome email, and if you have any questions, you can always contact our customer support specialists, who will assist you further.
Migrating emails with cPanel
Although it’s lagging behind some of its competition in terms of interface and features, and despite its controversial pricing policy, cPanel continues to be one of the world’s most popular web hosting control panels. Many people are far too used to its interface, and even when they’re switching hosting providers, they look to find a service that also uses cPanel.
How you migrate your emails from one cPanel server to another depends on your needs. Here are the options:
Moving email accounts with a full account backup.
If you’re moving both your emails and websites from your old account to the new one, it makes sense to transfer everything using a full cPanel account backup. The steps are simple:
- Open the Backup utility on your old server.
Log in to your old cPanel account and open the Backup utility available under the Files section on the cPanel dashboard.

- Set the backup parameters.
One of the first buttons on the page is labeled Download a Full Account Backup.

Somewhat confusingly, clicking it won’t let you download a backup of your account right away. Instead, you can generate one.
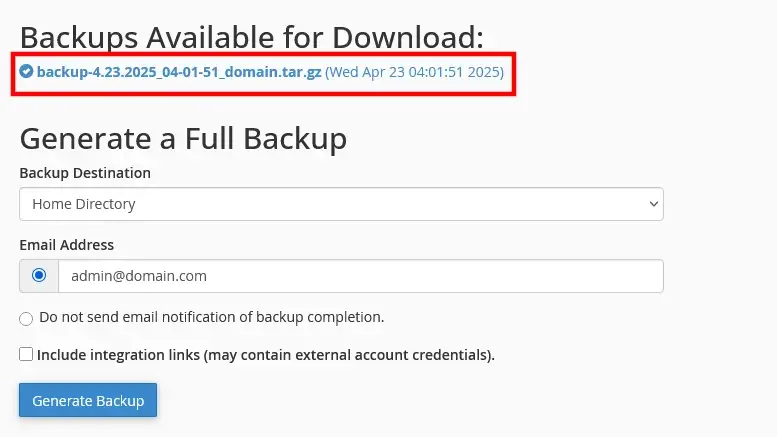
From the Backup Destination drop-down, cPanel allows you to send the newly generated backup straight to your new server. However, in our case, it’s better to save it to the home directory of your old account.
The Generate Backup button initiates the process. When it’s done, a link to your new backup will appear in the Backups Available for Download list. Click it and save the TAR archive to your computer.
- Upload the backup to the new server and restore the data from it.
You can’t restore a full account backup on your new server from the cPanel interface. You’ll need full root access and login credentials for the server’s WHM interface. In there, find the Transfer or Restore a cPanel Account utility. You can use the search field in the left-hand pane.
Select the Upload a file to restore radio button and click Browse to locate the backup file on your computer. When you’re ready, click the Restore button and wait for WHM to recreate your old account on the new server.
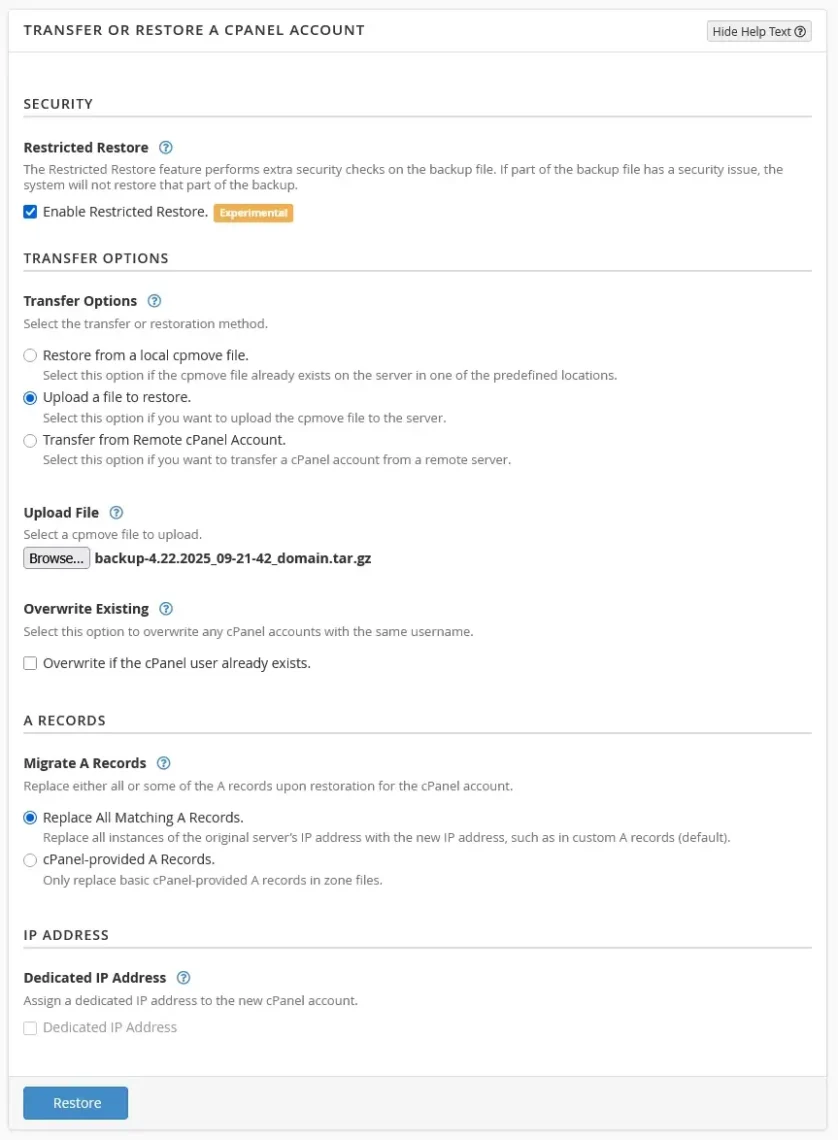
In addition to all the files, databases, DNS records, and domain settings, WHM will replicate all email inboxes, forwarders, autoresponders, and other email-related settings on your new account. The login credentials remain the same.
- Change your domain’s DNS settings.
Finally, you need to point your domain to the new server. Your new hosting provider’s welcome email should include the required nameserver settings.
Migrating email files manually
Another method for migrating emails across cPanel servers is moving the files manually. It’s suitable if you’ll only use your new hosting account for emails, and it also doesn’t require WHM or root access, so you should have no problems following the steps yourself. Here they are:
- Recreate your email accounts on your new server.
First, you have to recreate your inboxes on the new server. Make sure you use the same addresses and, for the sake of a smoother transition, the same passwords.
- Log in to your old server and download your email files.
The easiest way to access the contents of your inboxes is through cPanel’s File Manager. The folder you’re interested in is called mail, located in your account’s home directory.
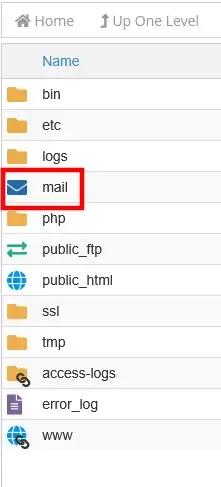
Inside mail, you’ll find a bunch of configuration files and a folder for each domain you’ve added in cPanel. Inside each domain folder, there’s a subfolder for every inbox. For example, the data of john@example.com is situated in /mail/example.com/john/.
Navigate to the correct folder. You don’t need all the data inside it. The important information is in the cur and new directories as well as in the file named maildirsize. Select the three items, right-click, and choose Compress. This will create an archive file that you can download to your computer.
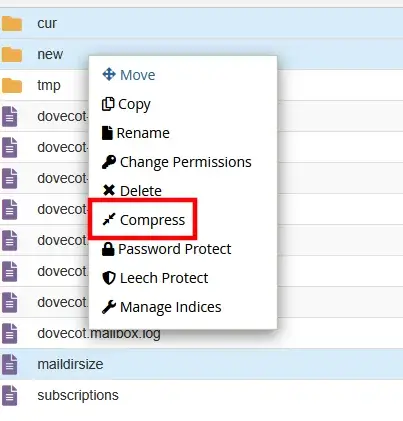
- Upload the data to your new server.
Log in to your new account’s cPanel File Manager, open the folder of the account you’re migrating (i.e., /mail/example.com/john/), and upload the archive file you downloaded from your old server. Right-click on it and click Extract.
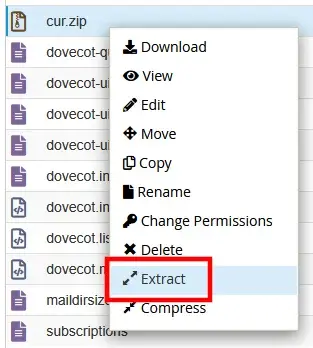
Log in to the new account’s webmail interface to confirm the messages are where they should be.
- Change your domain’s DNS settings.
Finally, it’s time to point the domain to the new server. Because the method above concerns the migration of your emails only, you will most likely need to change your MX records instead of setting brand new nameservers.
What you see above is a much more hands-on approach to migrating from one email host to another. It might appeal to those who want to get stuck in and find out how their hosting services work. However, it, too, has its downsides.
The most obvious one is that you’re moving email accounts one by one. If you have many inboxes, you could be looking at days of work. Furthermore, the more manual work, the higher the chance of annoying mix-ups.
These are not problems you’ll encounter if you use SPanel.
ScalaHosting and Email Migration
Throughout the years, we’ve strived to ensure the experience of running an online business on top of ScalaHosting’s services is as smooth and effortless as possible. That’s why SPanel was designed to automate transferring multiple email accounts to the new server.
However, if you use a ScalaHosting service, there is an even easier way of migrating all your messages—you can just leave it to us.
With every ScalaHosting plan, our technical support specialists can move all your data to the new server for free. This includes your website files, databases, and, of course, emails.
After you sign up, you can open a support ticket and ask our technicians to migrate your old account data to your new service. They’ll need the login details for your old account and ask you to schedule the migration for the most suitable day and time.
Our technicians are available 24/7, so you can have it done whenever you want. Do not hesitate to contact our customer care experts with any further questions.
Did you know that ScalaHosting is among the few providers that perform free data migrations regardless of the number of websites or their size? This is one of the features that make us the best SiteGround alternative, according to clients.
Common Migration Issues and Solutions
If carried out correctly, all methods for migrating emails should give you a smooth transition from your old host to the new one. However, every now and again, problems can put a spanner in the works. Luckily, the most common ones are pretty straightforward to put right. Let’s take a look at some examples.
Authentication failures
Authentication issues may appear at several stages during the migration process. Troubleshooting them shouldn’t be too difficult.
- Check the server details – If your email client is unable to connect to the server, your first job is to review the IMAP and SMTP configuration. Double-check the hostnames and make sure you’ve set the correct ports. IMAP over SSL uses port 993, and secure communication via SMTP is done through ports 465 or 587.
- Temporarily disable 2FA if necessary – Two-factor authentication is a must-use security mechanism that can keep the contents of your inbox safe. However, in some cases, it may cause communication problems, especially while you’re trying to move data from one server to another. You can consider disabling it while transferring your email accounts but don’t forget to turn it back on once the process is complete.
- Check for app-specific passwords – Some email providers use app-specific passwords as an additional security feature. If you’re having trouble connecting to one of your services with your main account password, you may need to generate an app-specific one.
Missing emails
Data is rarely lost during a correctly carried out email migration. However, certain configuration setups may cause some messages to go AWOL. Here’s how to detect the issue.
- Check spam/junk folders – When you find a message missing, your first port of call is to open the spam folder and see if it has ended up there.
- Verify your IMAP folder subscriptions – If your email client isn’t subscribed to all folders in your email account, it won’t synschronize all your data. You can review its IMAP subscription in the account settings.
- Look for potential size-based filters – There may be size-based filters you have forgotten about somewhere in your account configuration. Make sure they’re disabled during the migration.
Slow transfer speeds
If you have a large number of inboxes with thousands of messages and gigabytes upon gigabytes of attachments, you’ll need to set aside a good few hours for the migration. That said, if you feel like it’s taking far too long, there are several things you can do.
- Split large inboxes into smaller chunks – You can break the contents of each email account into date ranges and reduce the volume of data you need to migrate at a time. This will improve transfer speeds and optimize the process.
- Migrate during off-peak hours – Scheduling the migration for the quiet hours of the day will minimize the number of incoming messages that end up on the old server. It will also speed up the migration because of the lower server load.
- Check for provider throttling – The migration of a large volume of data can sometimes be hampered by bandwidth or other restrictions. If you feel like your host may be slowing down your transfer, contact its technical support team and ask if something can be done about the issue.
Conclusion
Moving emails from one server to another sounds daunting, especially for those with more hosting experience. The truth is, the process is not complicated. You just need to know what the best approach is in your case. Either that, or you sit back and leave it to ScalaHosting’s experts.

FAQ
Q: How long will it take me to migrate all my mailboxes and accounts?
A: The time it takes to migrate mailboxes and email accounts depends on various factors, such as the number of accounts, size of mailboxes, type of email server, and complexity of the transfer. Additionally, unexpected issues may arise during the migration that can impact the timeline.
Q: Will I lose my emails if I change hosting?
A: If you take the proper steps to transfer your emails, you shouldn’t lose any messages. Before switching hosting providers, back up your email data, including messages, contacts, and settings. You can do this using an email client like Microsoft Outlook or Mozilla Thunderbird or via your hosting control panel’s built-in tools.
Q: Can I use MX records or A record changes to migrate my email?
A: MX records direct incoming email traffic to the appropriate mail server, while A records map a domain name to its corresponding IP address. If you have your website on your old server but would like to receive messages on the new one, you need to change the domain’s MX records. If you’re also migrating your website, setting the correct nameservers for your domain should also point it to the proper A records.
Q: What’s the average migration time based on mailbox size?
A: Internet speed, server load, and transfer method are all factors that affect the time you’ll need in order to transfer a mailbox. However, the following estimates should give you an idea of how lengthy the process is:
- Under 1GB: 10-30 minutes
- 1-5GB: 30 minutes – 2 hours
- 5-10GB: 2-6 hours
- Over 10GB: > 6 hours, and you may want to consider hiring an expert to do it for you.
Q: How do I migrate emails without knowing passwords?
A: If you transfer your emails with a full account backup, all your inboxes will be migrated with their old passwords. If you want to update the credentials, the control panel you’re using is bound to have a password reset facility for email accounts.
Q: How do I migrate emails from Gmail/Office 365?
A: You should have no problems transferring your inboxes from Gmail/Office 365 to your new host using an email client and the IMAP protocol. The export tools integrated by Google and Microsoft could also be handy, and there’s a range of free and paid services and utilities like BitTitan, MigrationWiz, Imapsync, Audriga, etc. that can do the heavy lifting for you.
